User Guide
How to Create your Account
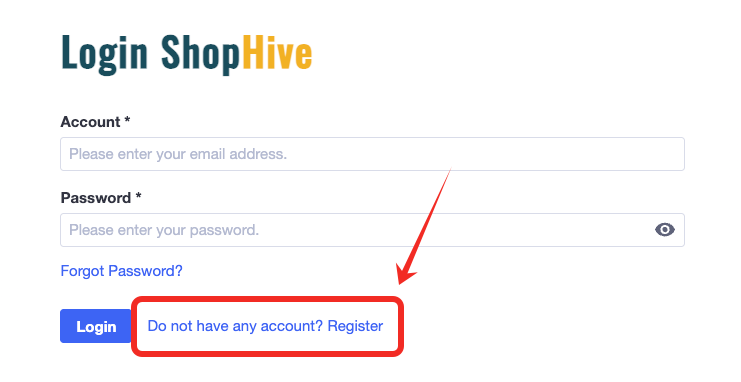
The first step to start syncing your products from Epicor kinetic to BigCommerce Store would be to create your account with Silk!
-
Click the " Register " button
-
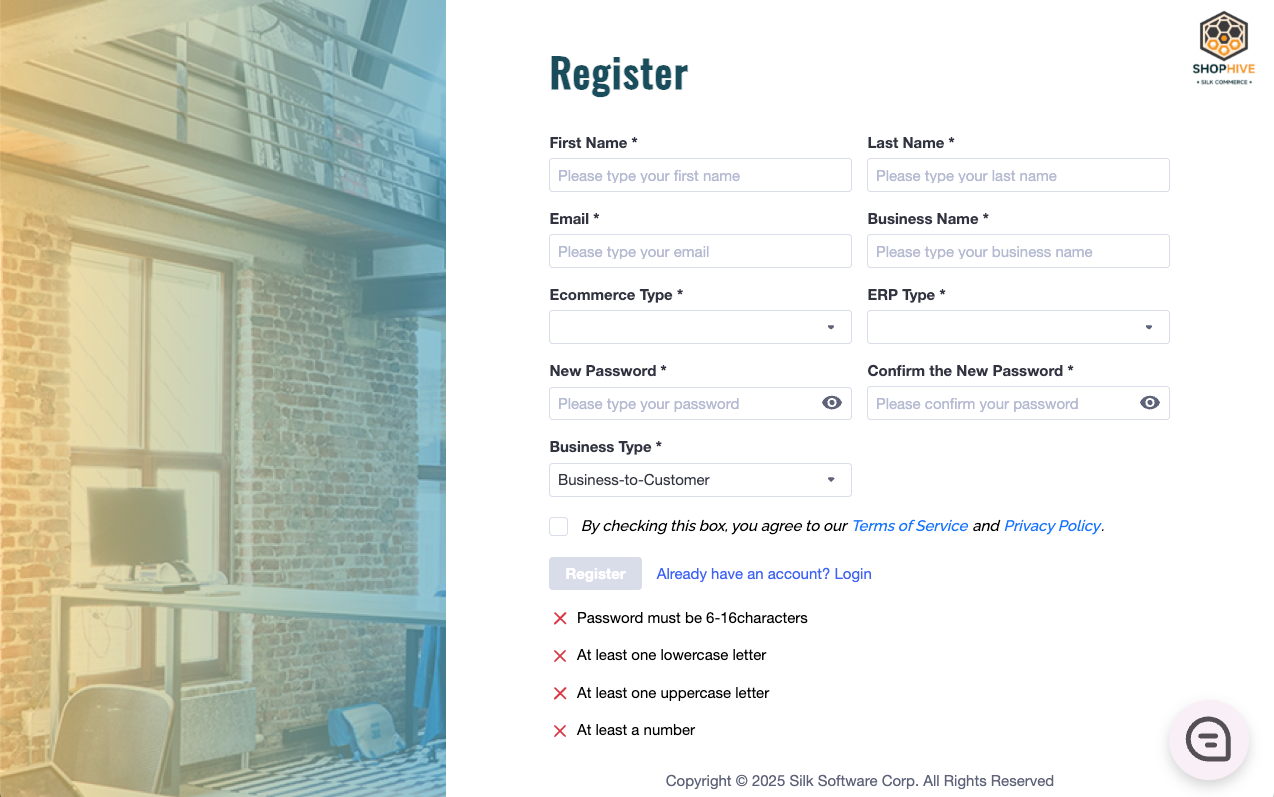
Fill in this information, choose the E-Commerce Type and Business Type according to the actual situation.
-
Then click the " Register " button. Please wait for 10s, it will redirect to the login page.
Having trouble logging in? Click on 'Forgot Password?' to reset your account.
Click on 'Forgot Password?' to reset your account.
-
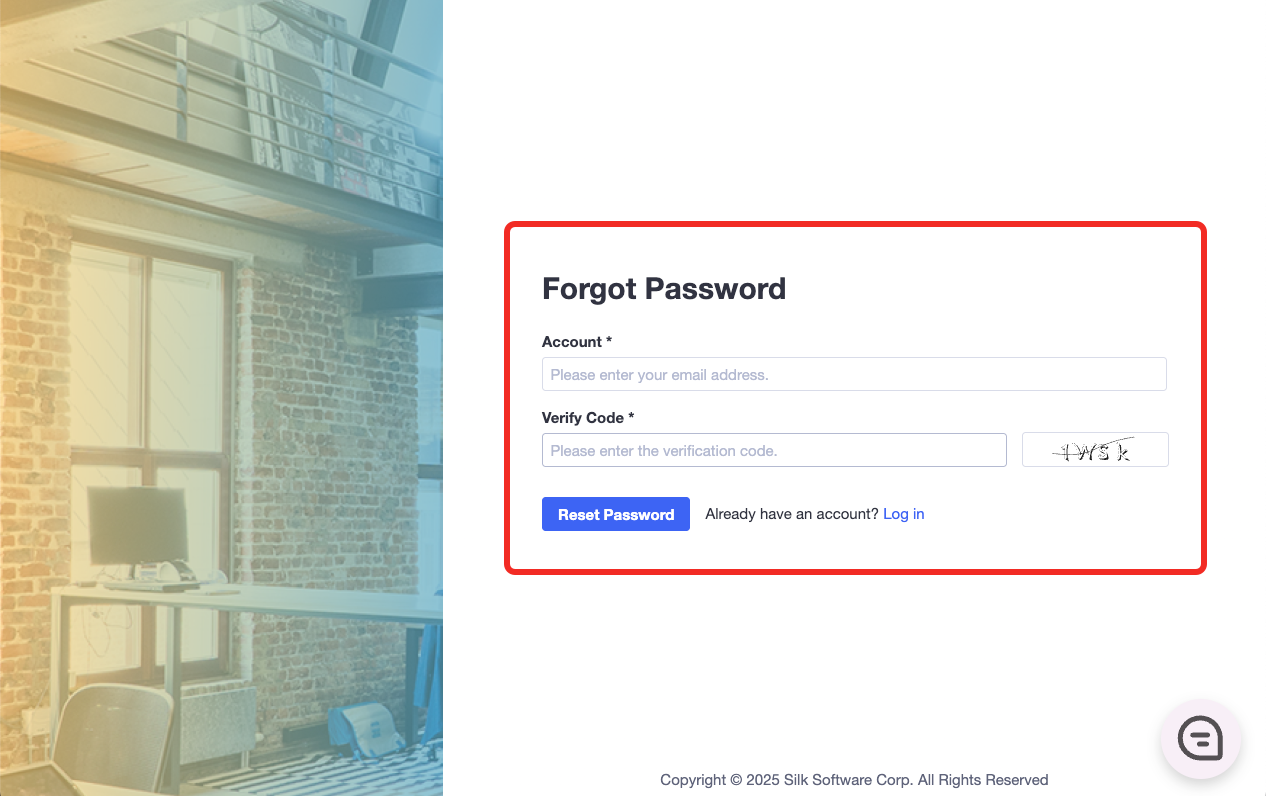
When you forget the Account Password, click the "Forgot Password" button to reset the password.

-
Jump to the Forgot Password Page. Enter your email address and verification code.
-
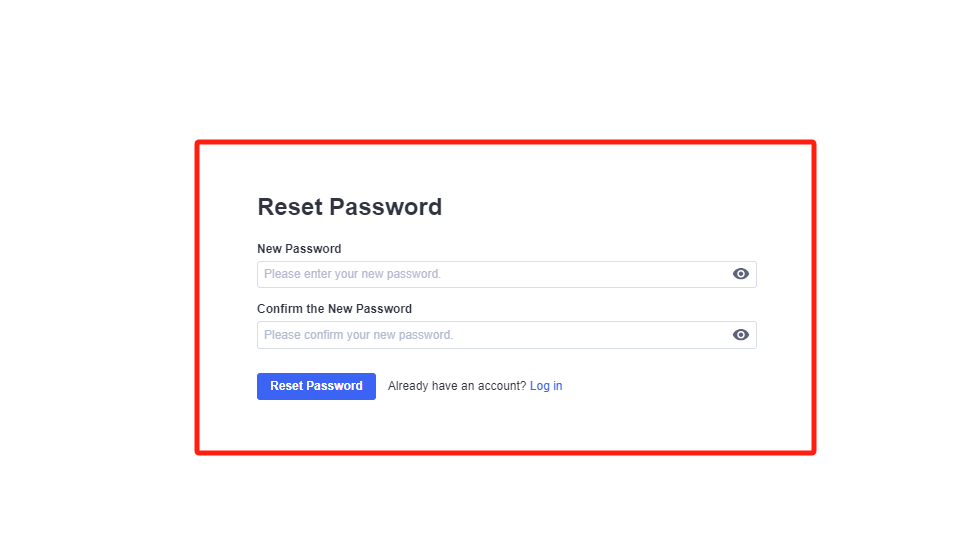
Afterwards, get into your email to check it and click the 'Change Password' button to jump to the Reset Password page.
-
Enter your new password and confirm your new password again
Step-by-Step Guides
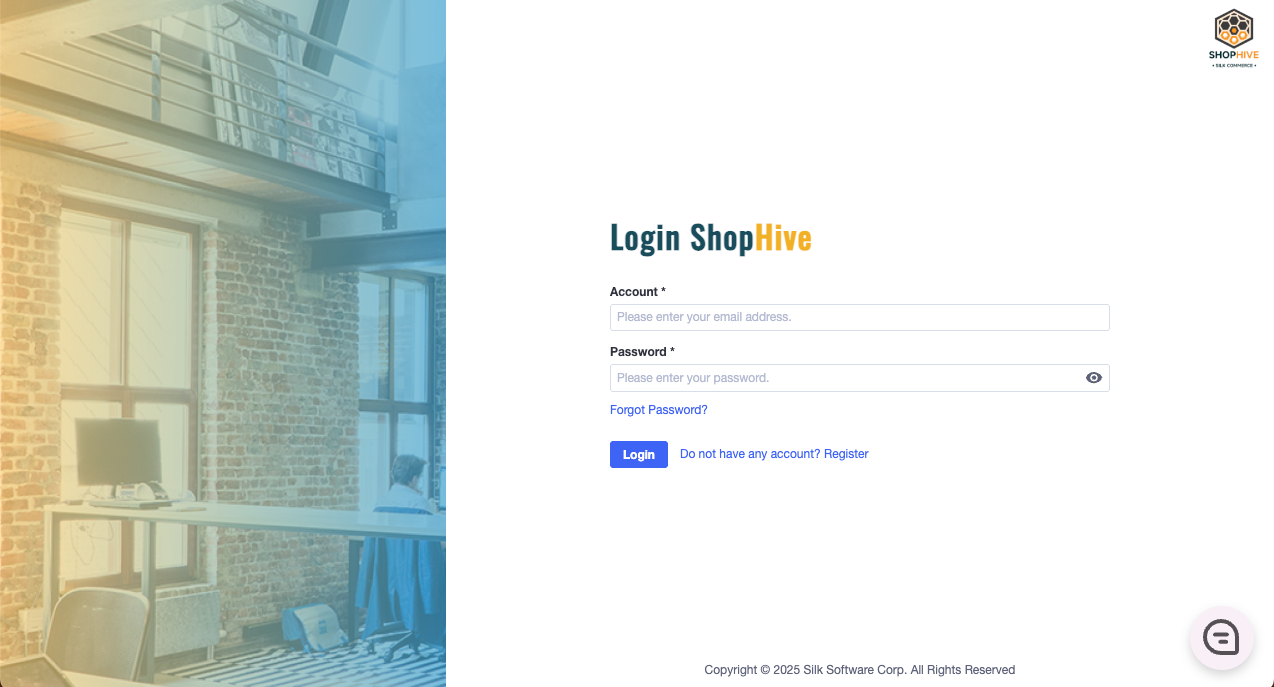
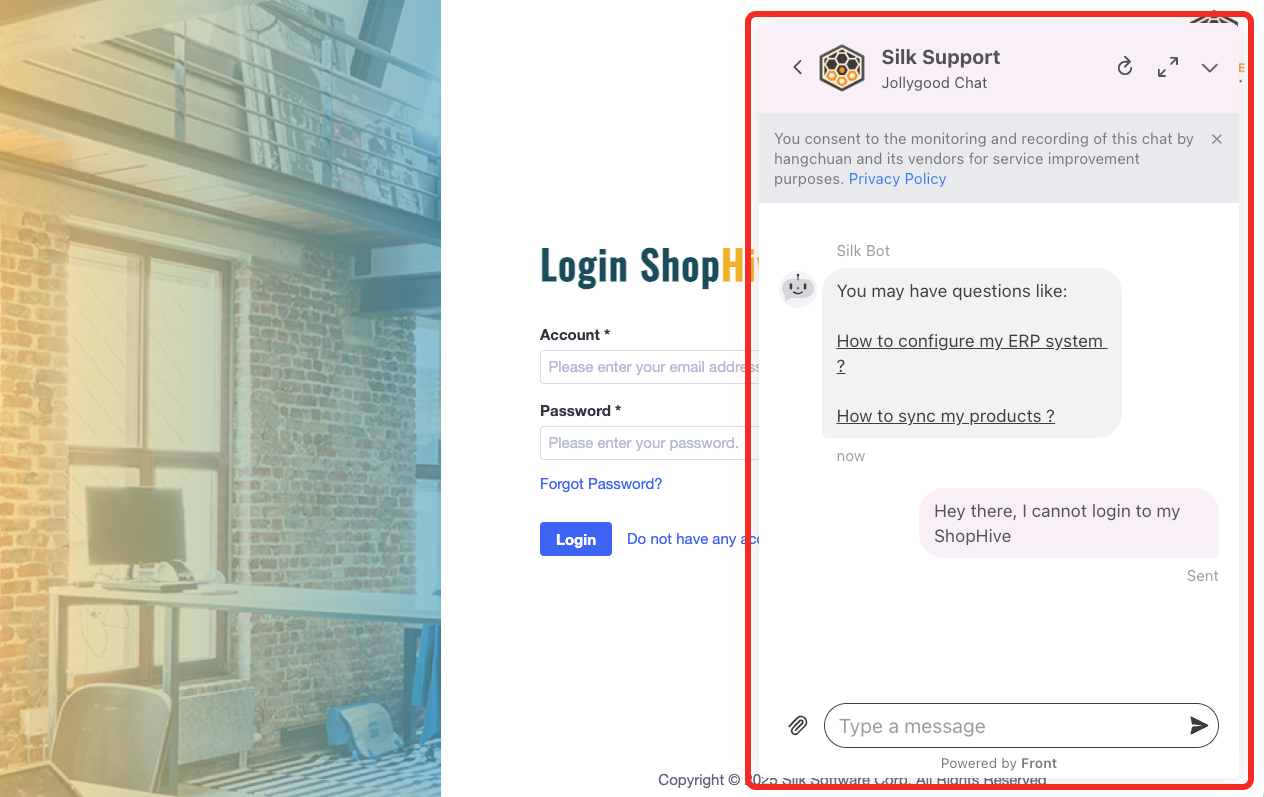
Login
Fill in email and password and click the "Login" button.
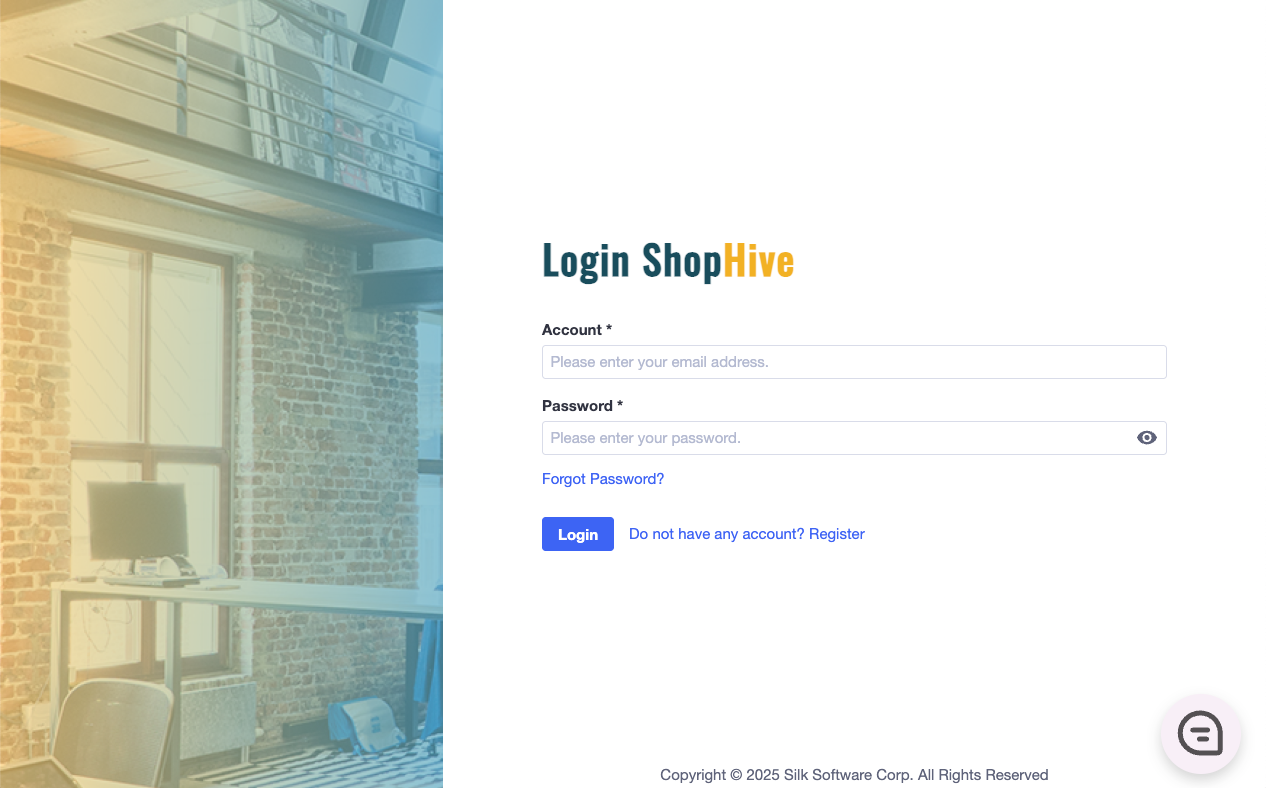
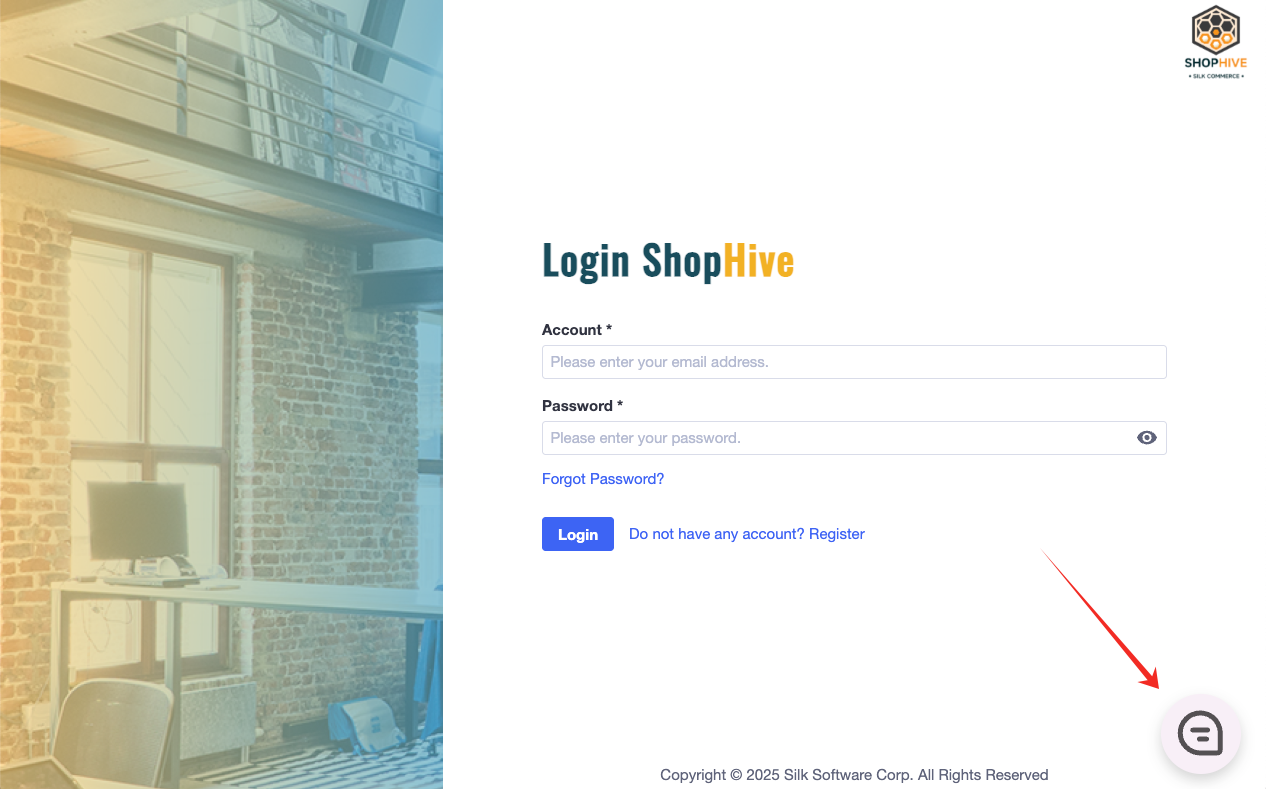
If you got troublesome when login to ShopHyve, feel free to reach out to our support team.
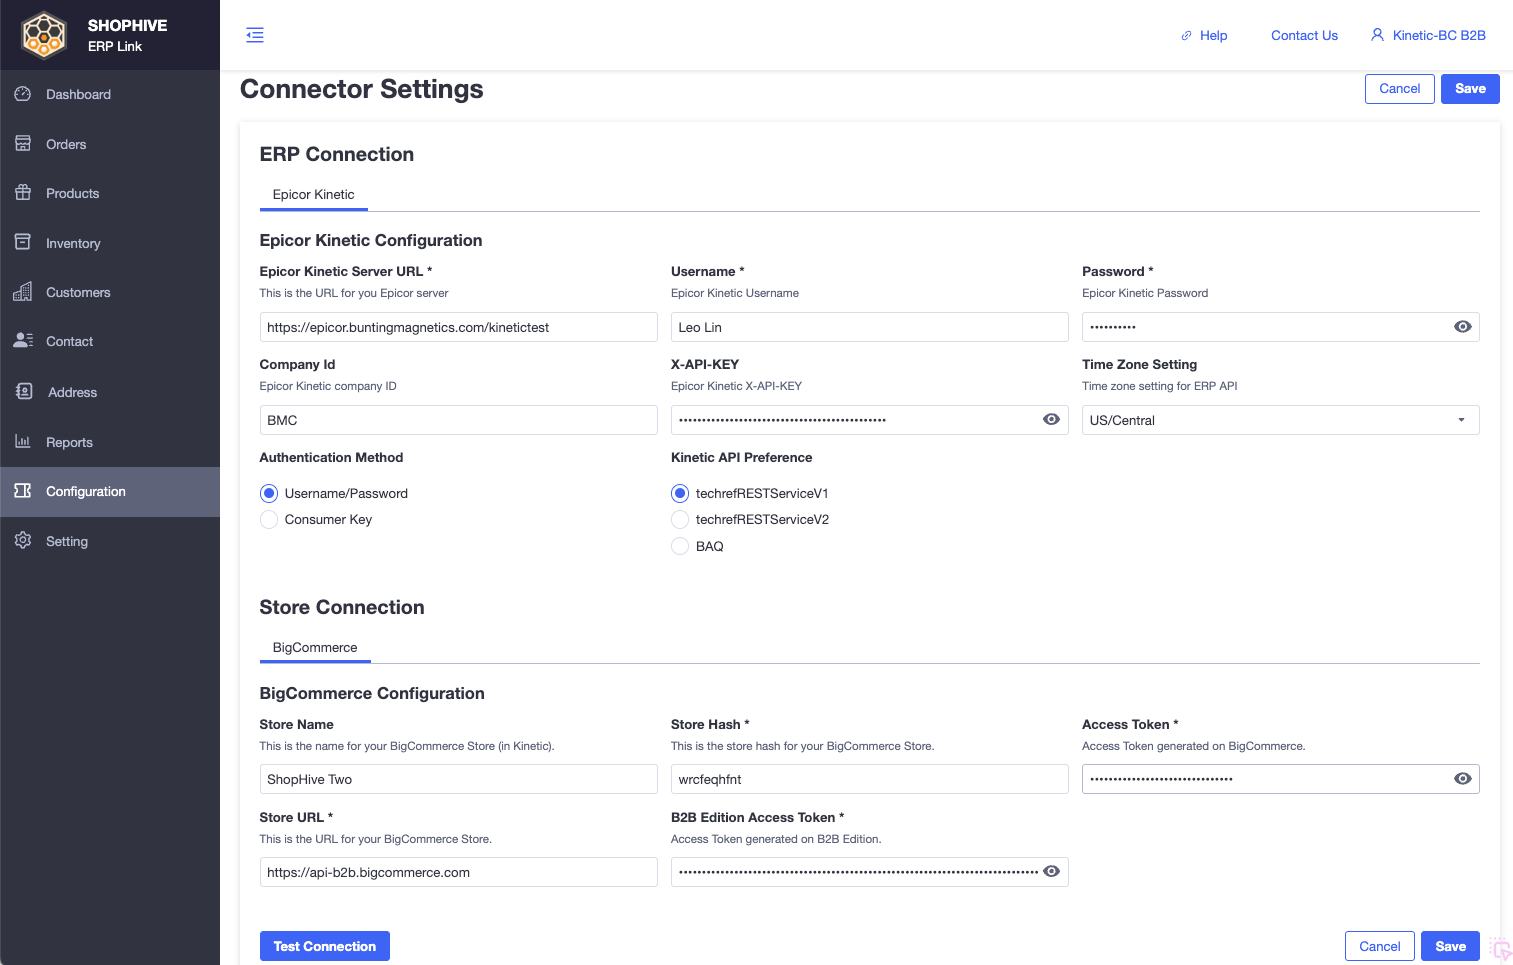
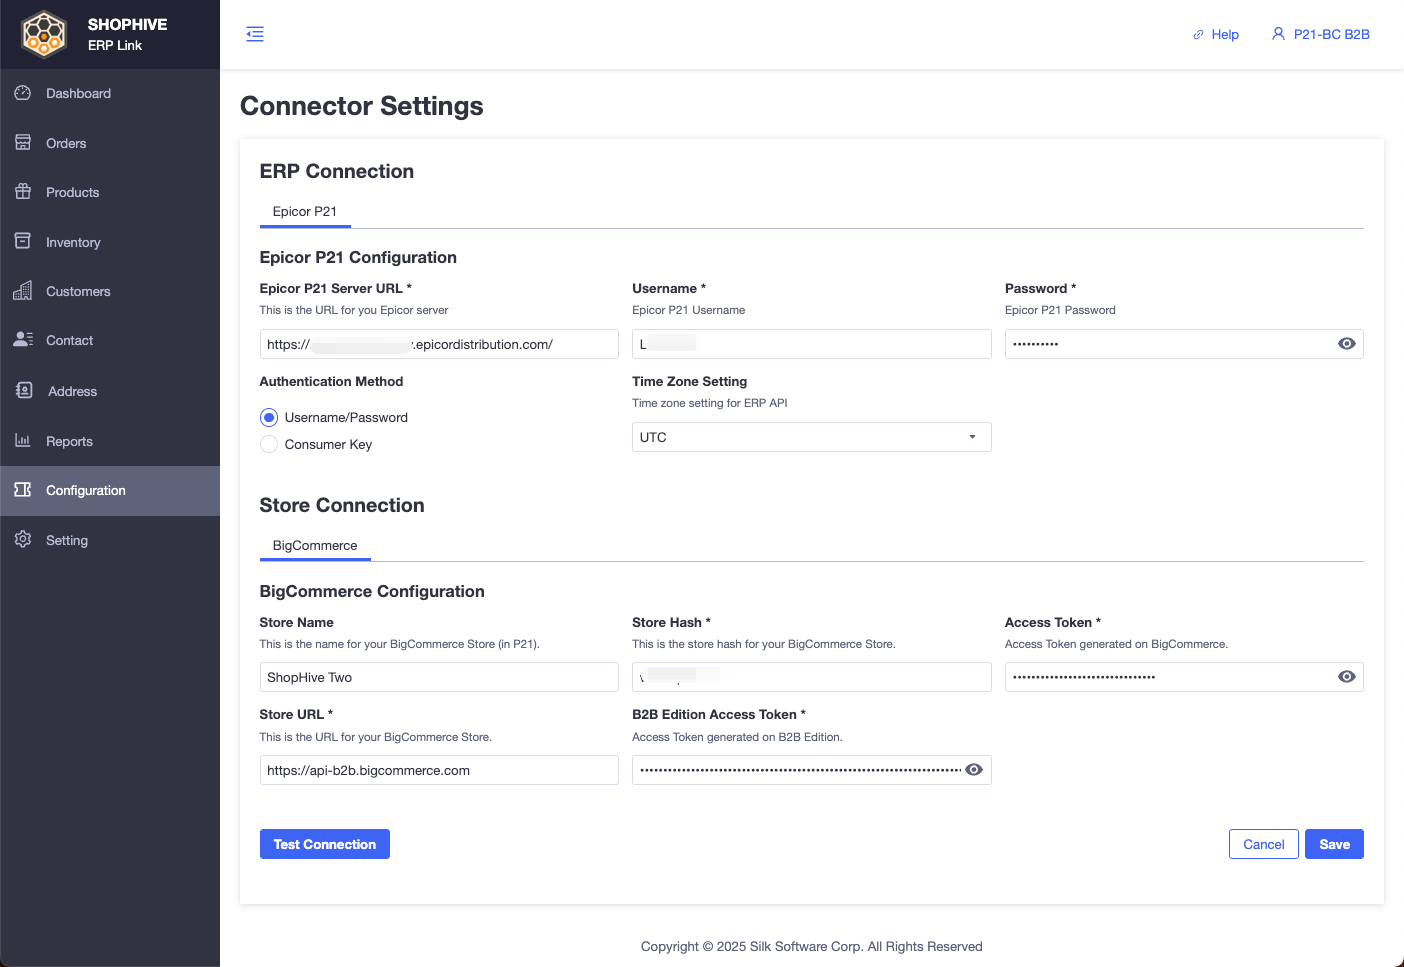
Connector Settings
- Fill in ERP Connection configuration information
- Fill in BigCommerce Store Connection configuration information (Please refer to BigCommerce Store Configuration for specific operations)
- Click on 'Test Connection' to test
- Click "Save"
BigCommerce Store Configuration
This section provides step-by-step instructions for accessing the store's data through the BigCommerce API.
To obtain the API Access Token/API key/API secret key, you must first create a BigCommerce API account in the BigCommerce store backend.
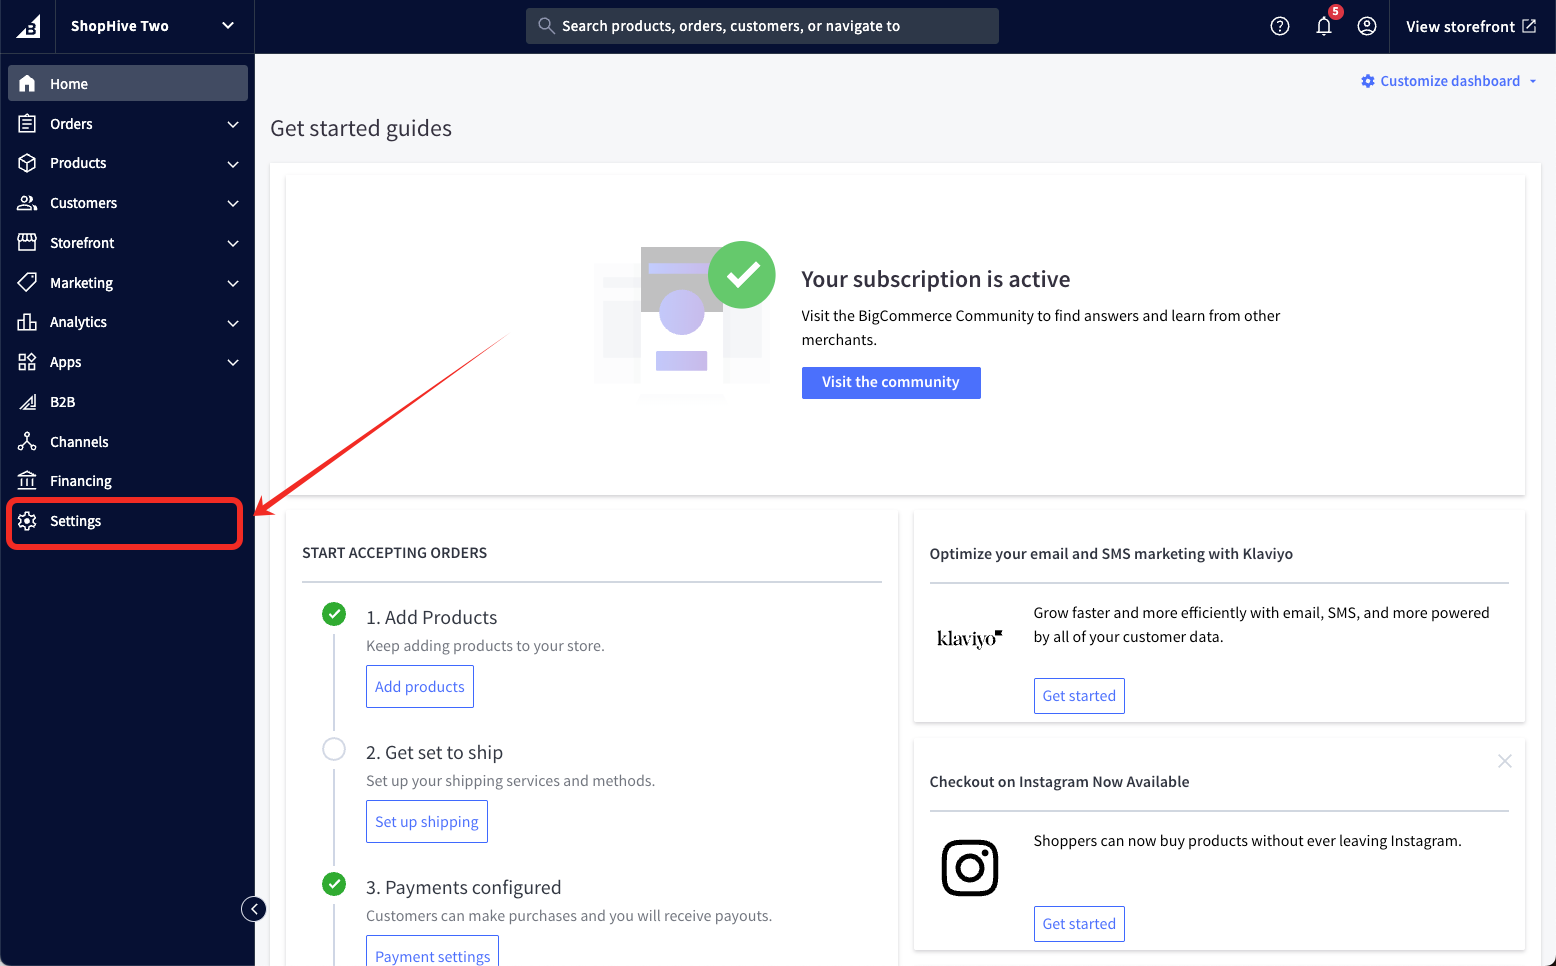
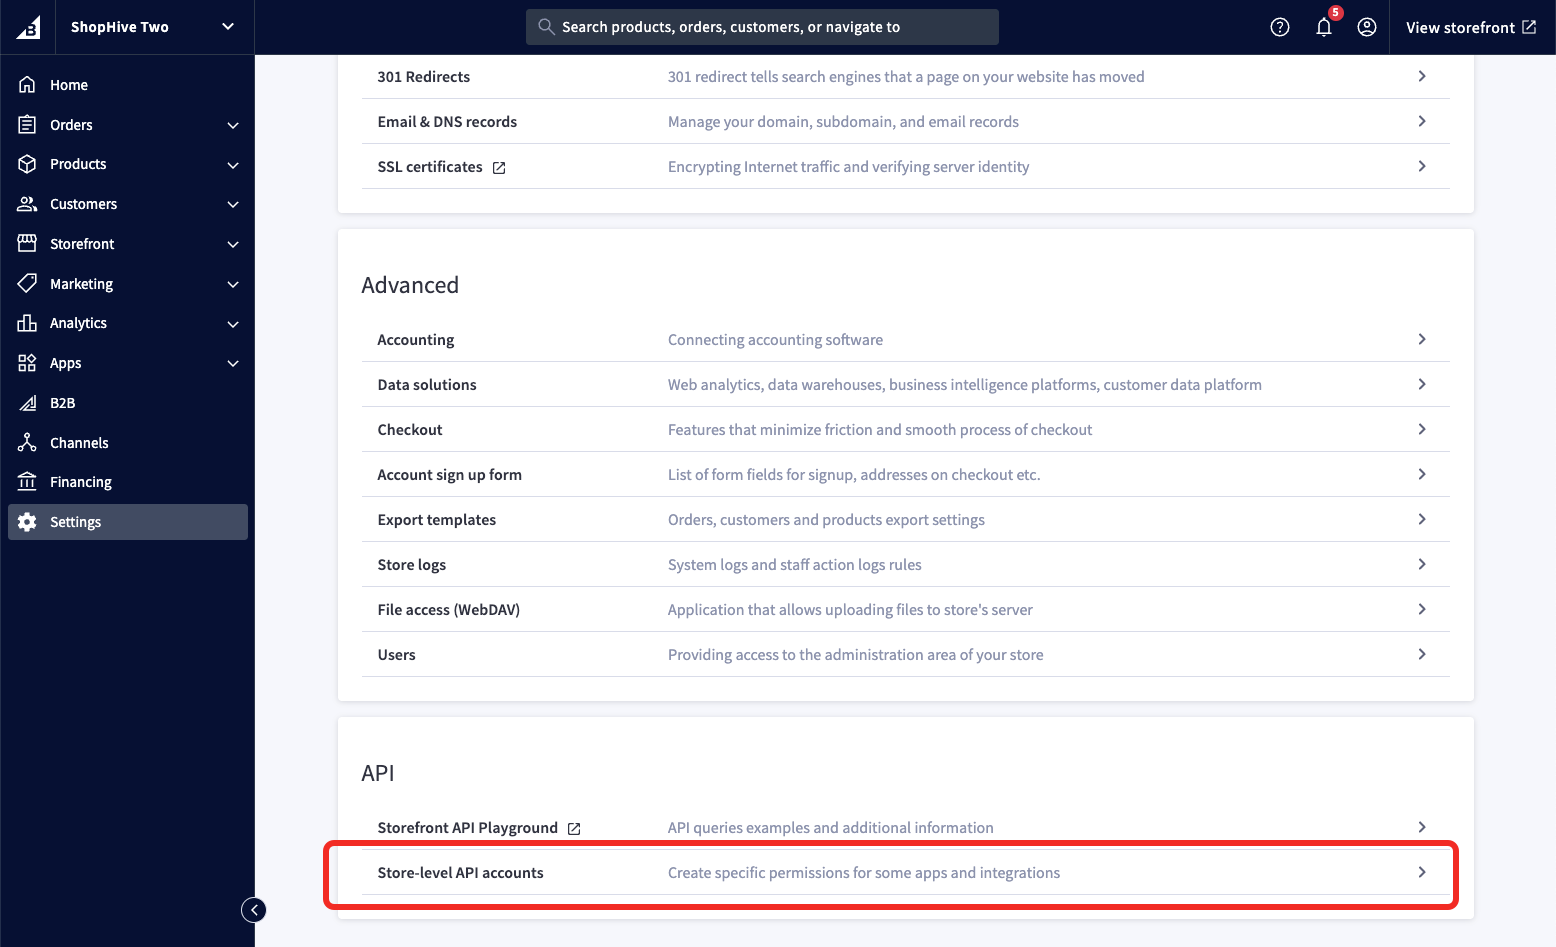
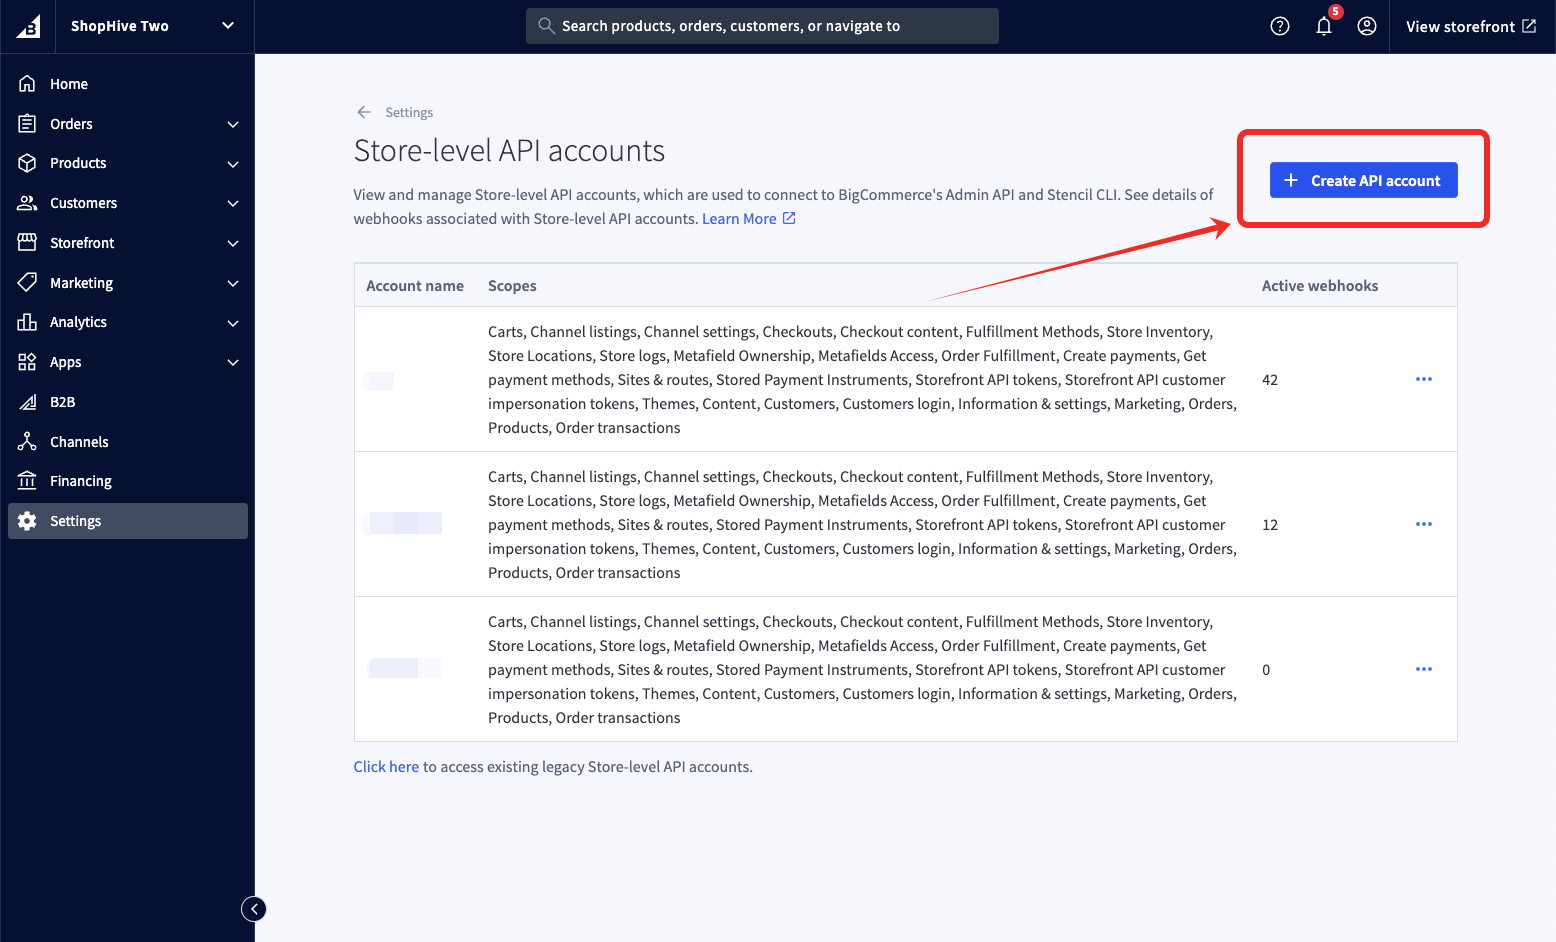
API Account Creation Workflow:
In the BigCommerce store sidebar: click Settings tab > click Store-level API accounts > Then click the 'Create API accounts' CTA button.
- Click on the 'Create API account' button.
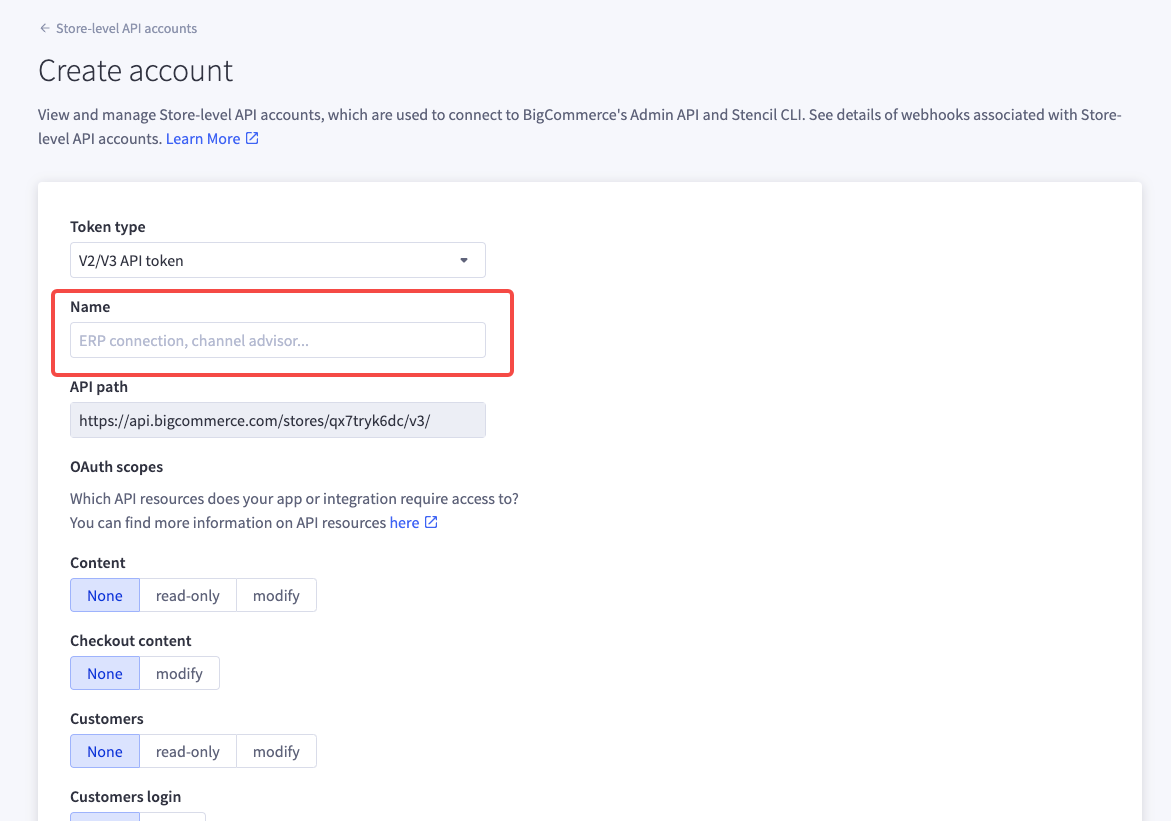
- Fill in the " Name " with any name you would like.
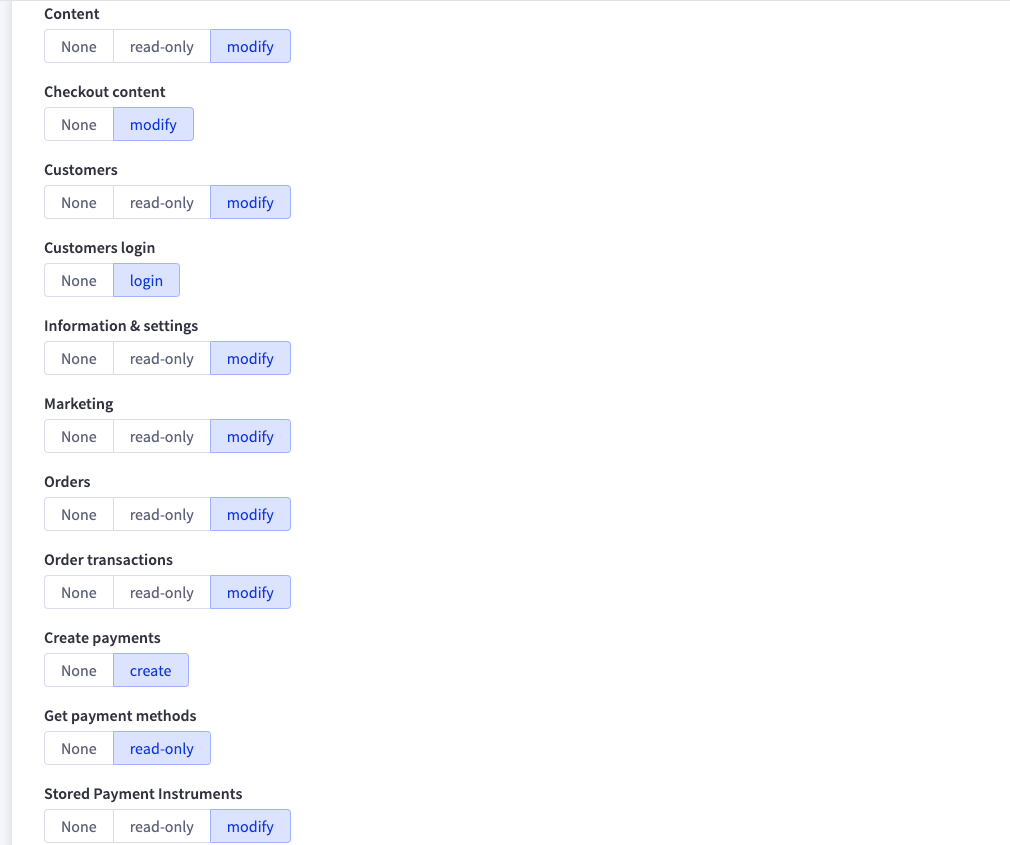
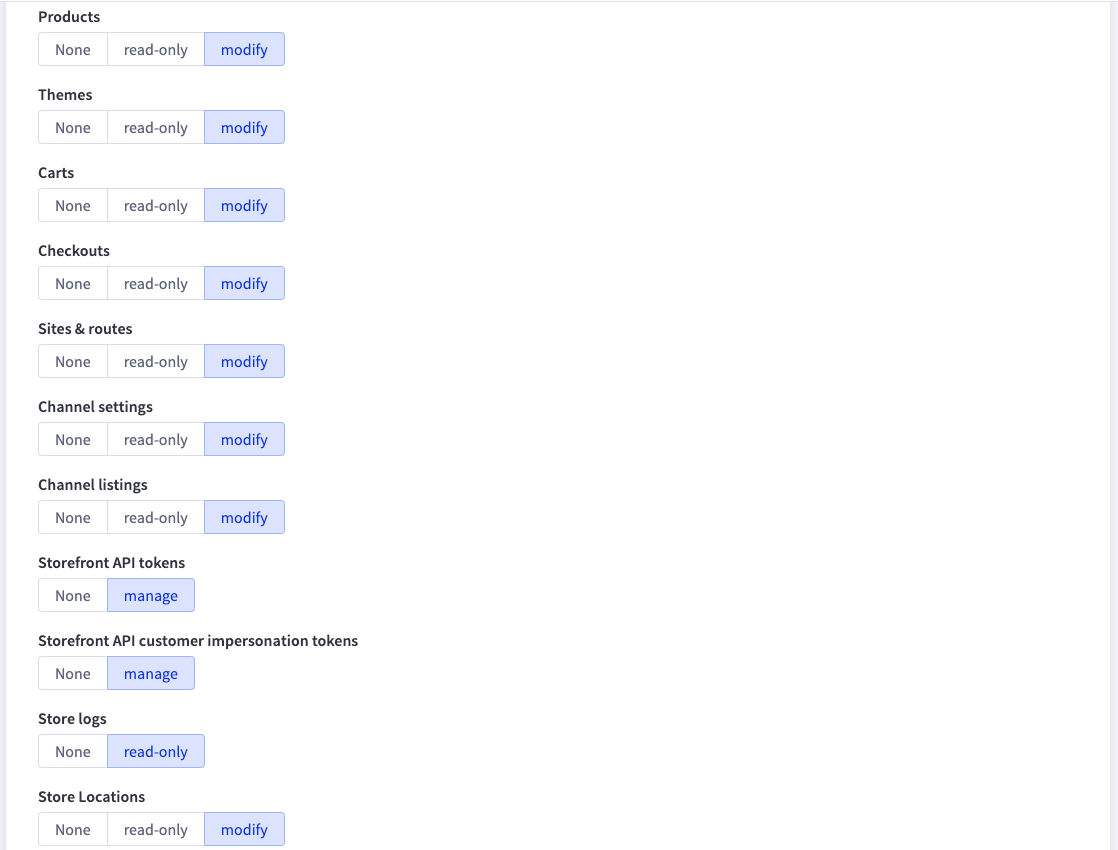
- Check the permission multi-select boxes shown below and click the 'Save' button to save all the settings.
Customers modify
Information & settings read-only
Orders modify
Order transactions modify
Products modify
Channel settings read-only
Channel listings read-only
Store Locations read-only
Store Inventory modify
Fulfillment Methods read-only
Order Fulfillment modify
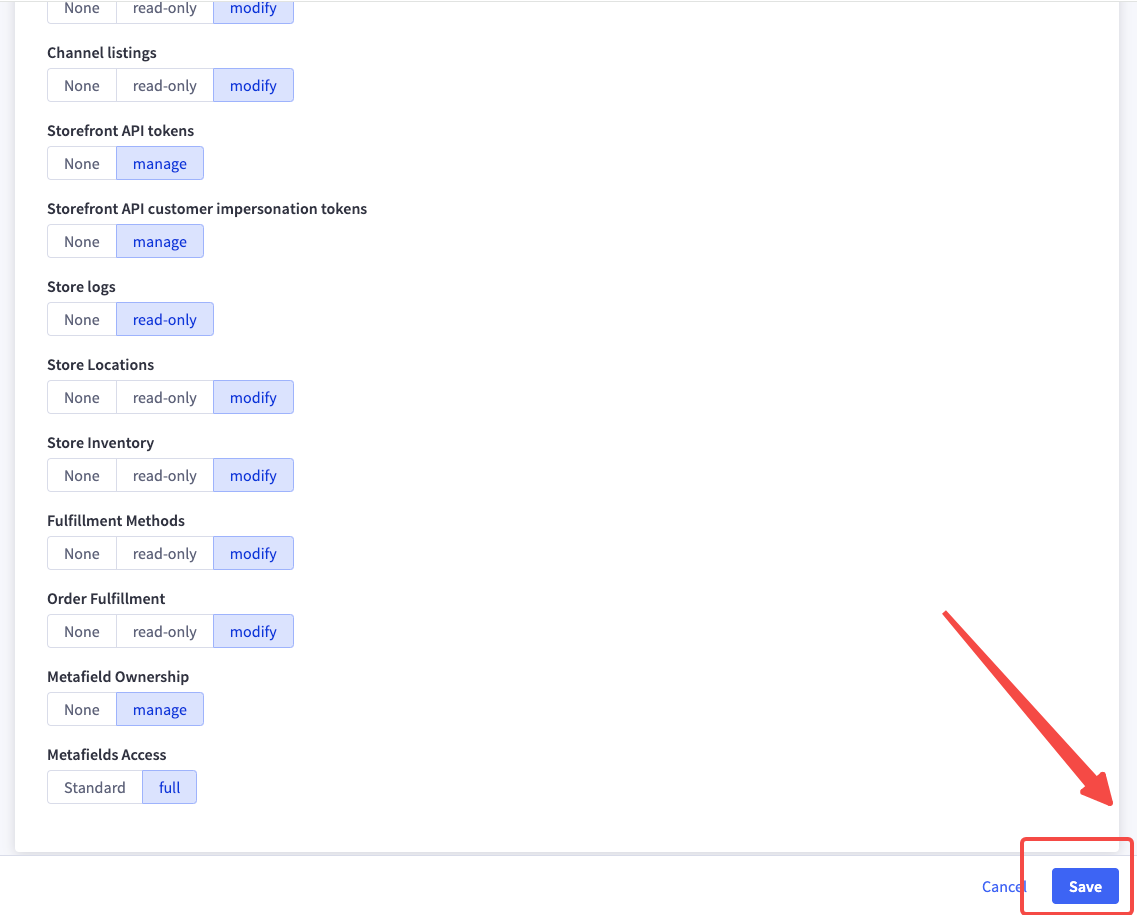
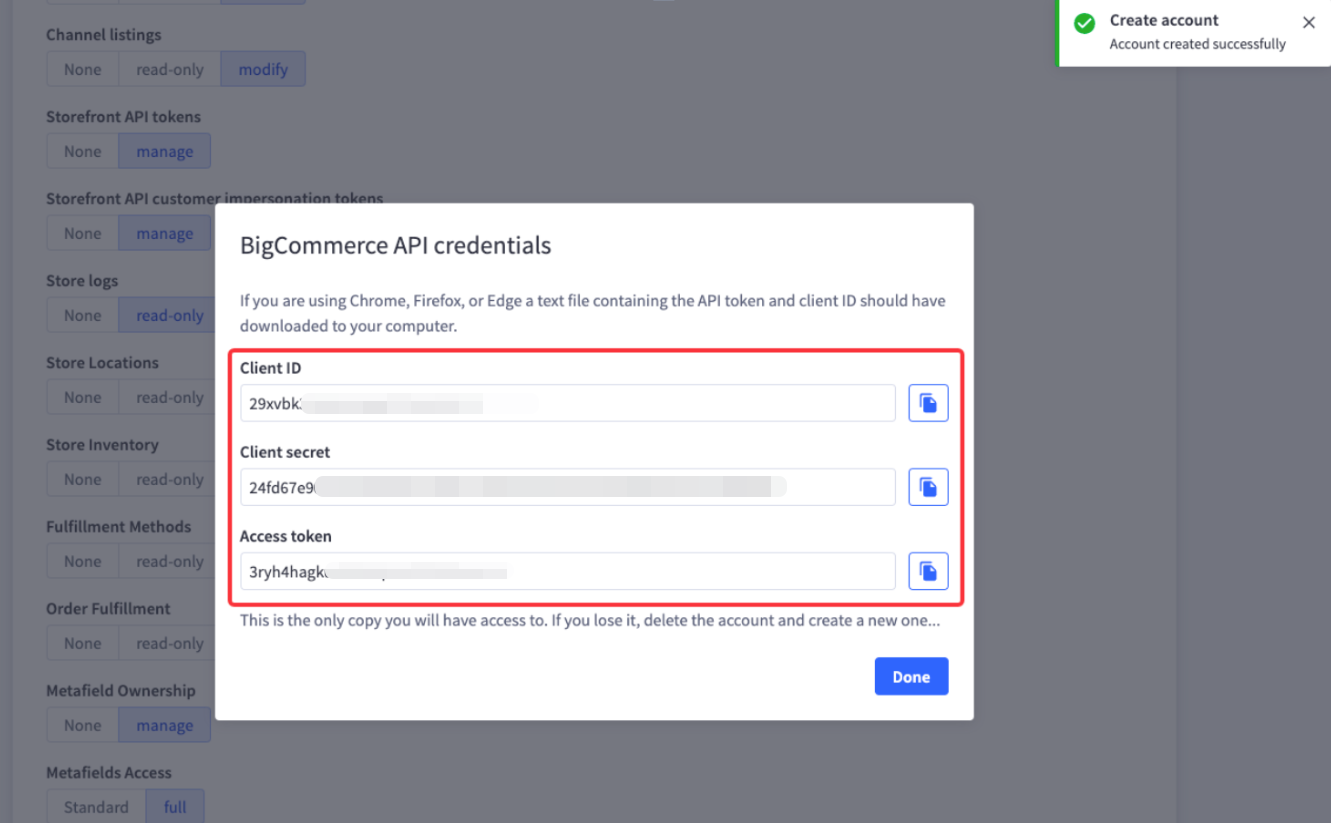
- After you click save, the BigCommerce API credentials will be generated
- Copy the API credentials and input it into the required fields of the connector.
API access token and key(s) can only be viewed once. If it fails to be copied and stored successfully, you will need to delete the app and reinstall it.

How to Sync Products
This section introduces the product module, which primarily encompasses the product list, imports Kineticproducts, sync products to BigCommerce, as well as a filter function.The product list displays the basic information of products fetched from Kinetic. It allows for individual product updates, push product, and view details.
Import Products
When you first access your account, your products and dashboard tabs will be blank. You will need to "pull" products from Epicor Kinetic into the ShopHyve for the first time and then "push" them to BigCommerce.
To "pull" products from BigCommerce into ShopHyve:
- Click the "Import Kinetic Products" button at the top of product list.
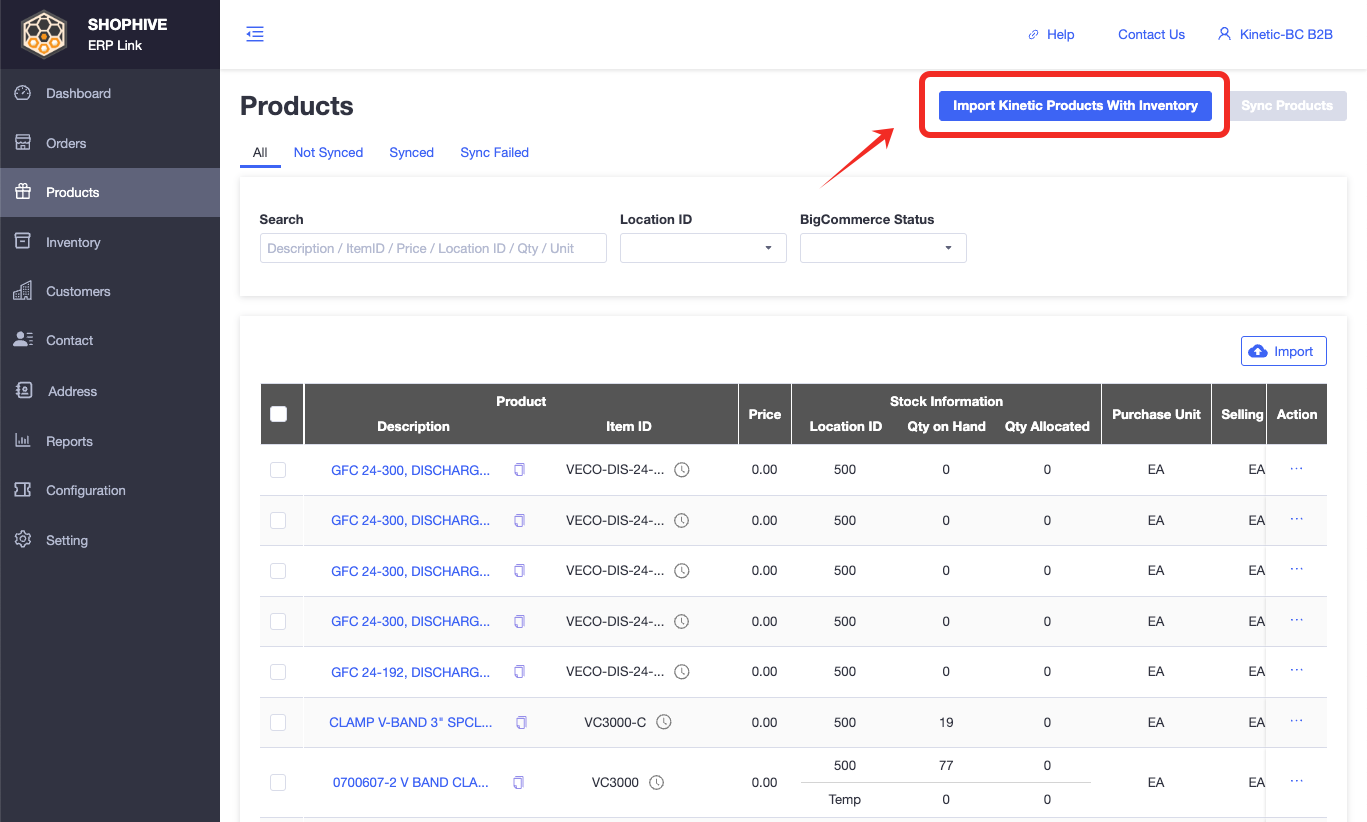
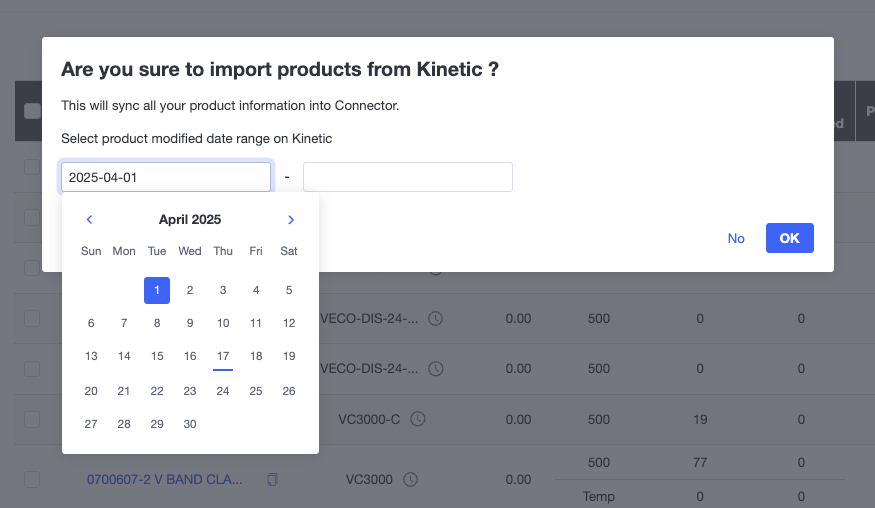
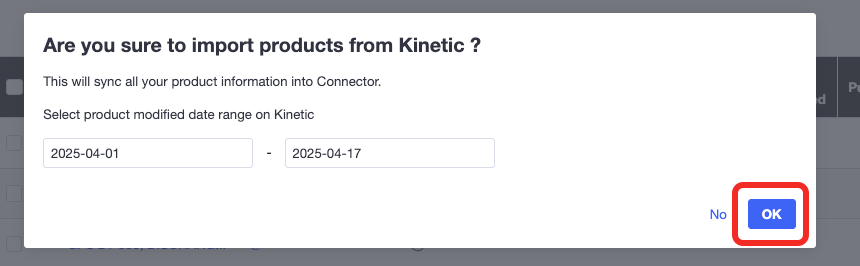
- The pop up displays prompt information. "Are you sure to import products from Kinetic"
- Choose the date range to pull products from Kinetic. If you don't choose the data range, you will pull all products from Kinetic into ShopHyve.
- Click on the "ok" button, a corresponding pop-up message will appear prompting the start of the pull product task. And then refresh this page, you will see your product on this page.
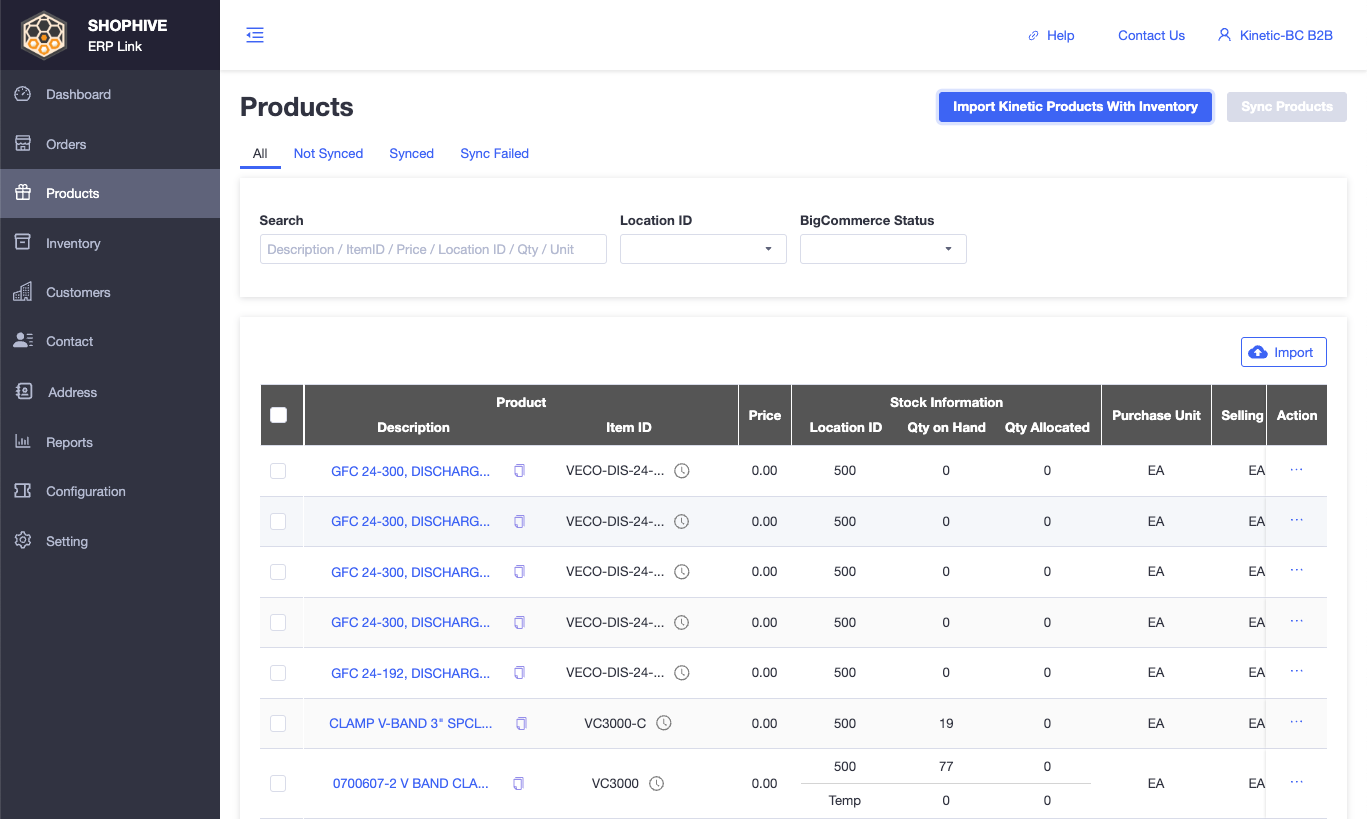
- If you pull products successfully, you can see the products imported from Kinetic in the product list.
- Item ID
- Description
- Price
- Last Maintained By
- Class ID
- Selling Unit
- Purchase Unit
- Stock Information
- Weight
- Net Weight
- BigCommerce Status
- Action
- View Details
- Sync Products
- Update Product
Import Kinetic Inventory
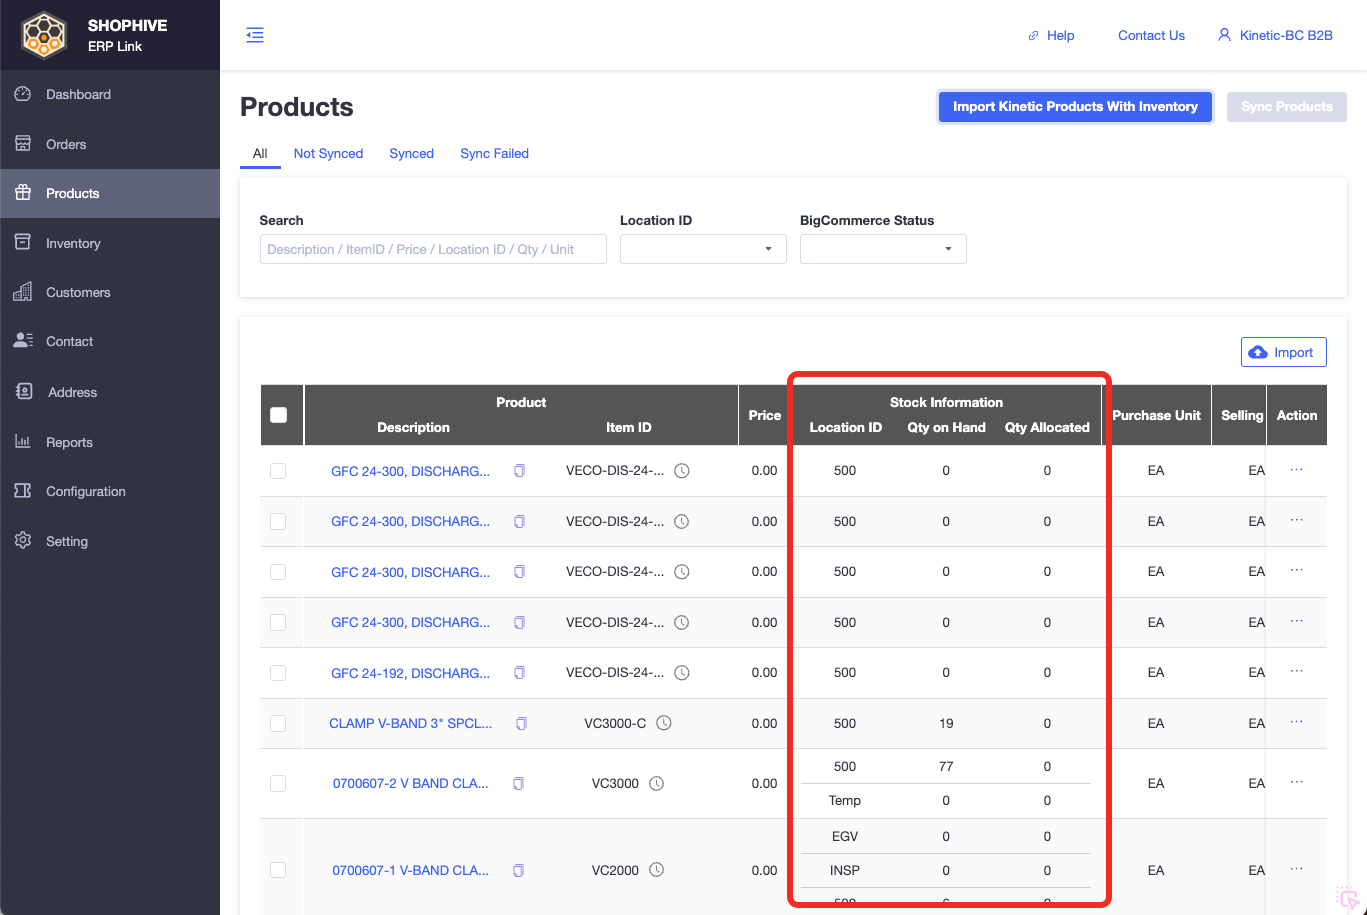
- When you click the "Import Kinetic Products" button at the top of product list.The inventory information (Location ID/Qty on Hand/Qty Allocated) imported from Kinetic will be displayed in the product list.
- The actual inventory synced from Kinetic to BigCommerce is equal to Qty on hand minus Qty Allocated
- Qty on hand:Total quantity of Kinetic products
- Qty Allocated:Quantity already sold
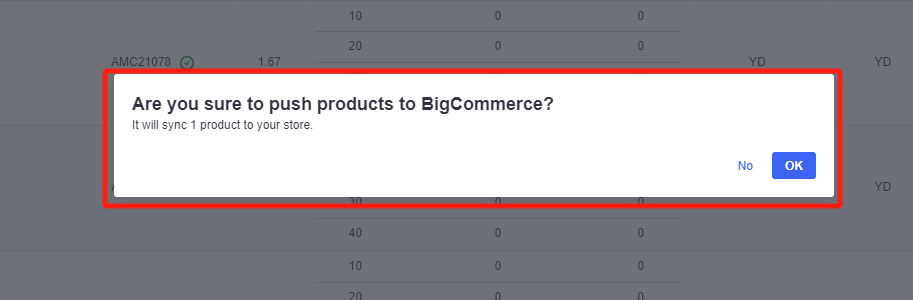
Sync Products:
"Pushing" a product will sync your product from ShopHyve to BigCommerce Store.
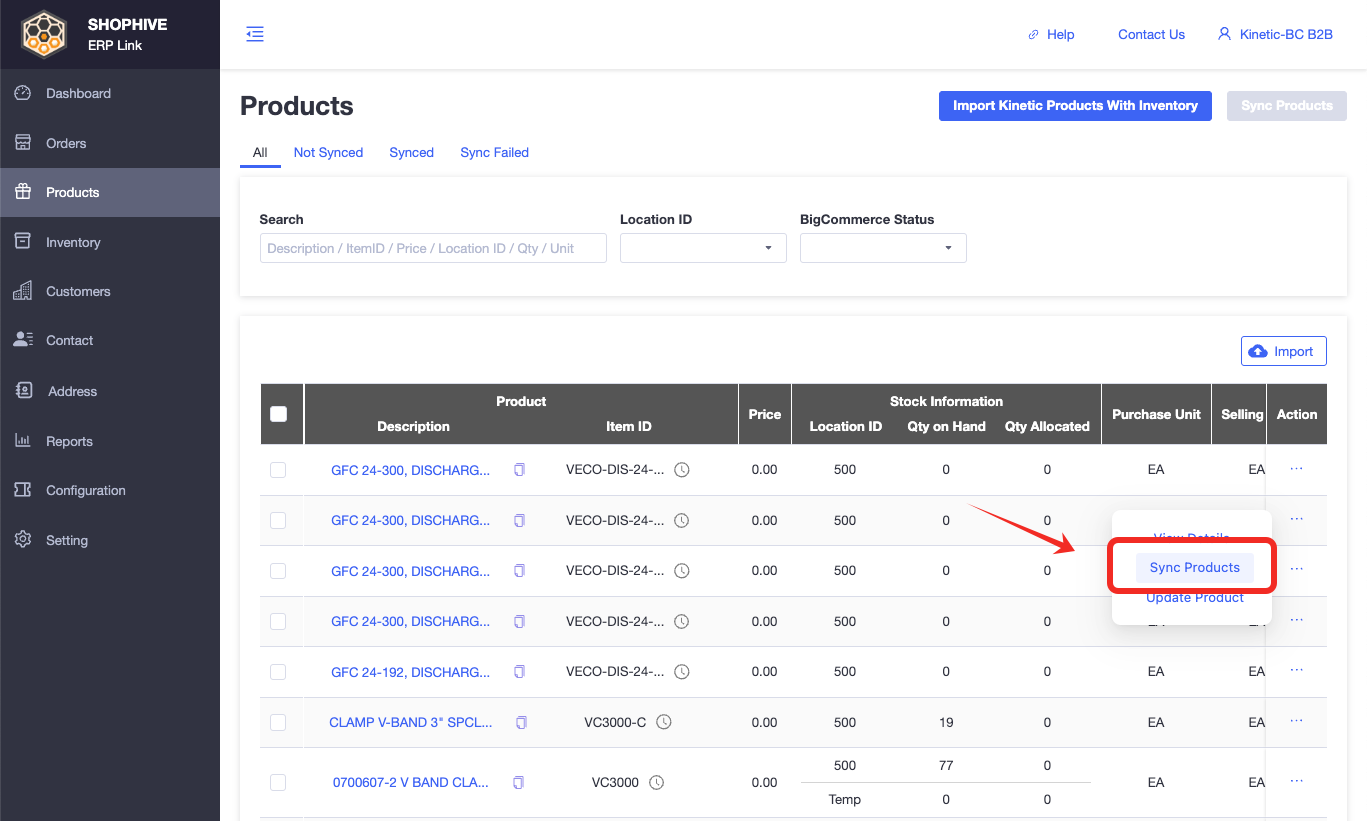
Push One Product:
Check off the box next to the product description -> (...) under 'Actions' -> "Sync Product"
Push Multiple Products:
Check off the box next to the multiple product description -> Click the 'Import Kinetic Products' on the top of product page.
Sync Products to BigCommerce:
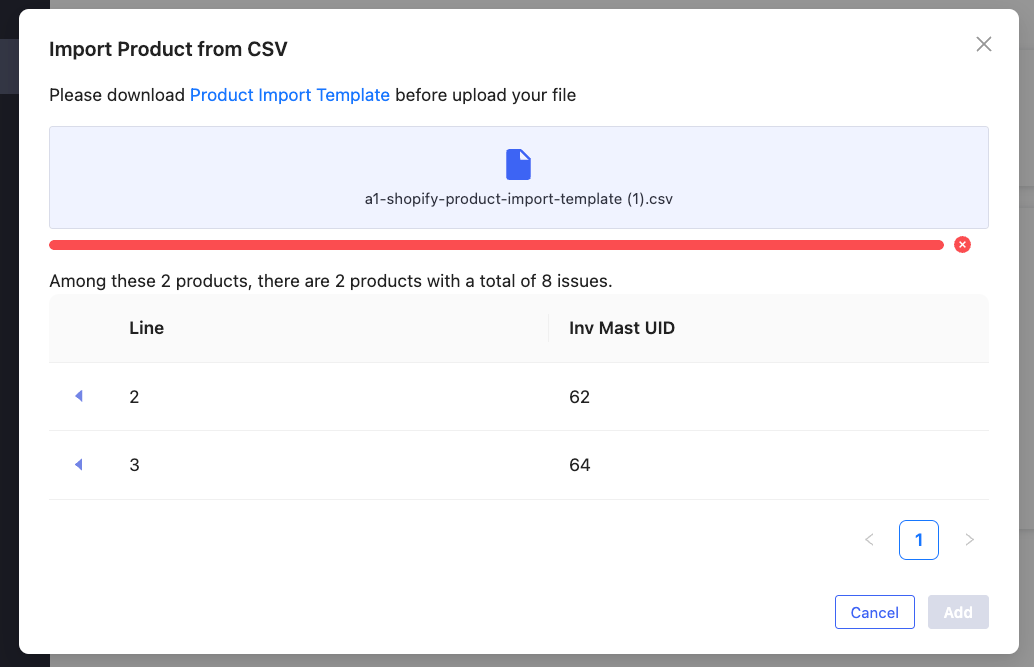
Import Product by CSV
Importing products into your online store has never been easier. ShopHyve lets you quickly upload multiple products at once using a CSV file.
A CSV (Comma-Separated Values) file is a simple text file that contains product data, organized in rows and columns. You can create and edit it using Excel, Google Sheets, or any text editor.
Step 1 — Download the CSV Template
- Navigate to → Products → Import Products.

- Click Download Template to get the correct file format.
Using the template ensures your data matches ShopHyve's required format.
-
Using the template ensures your data matches ShopHyve's required format.
-
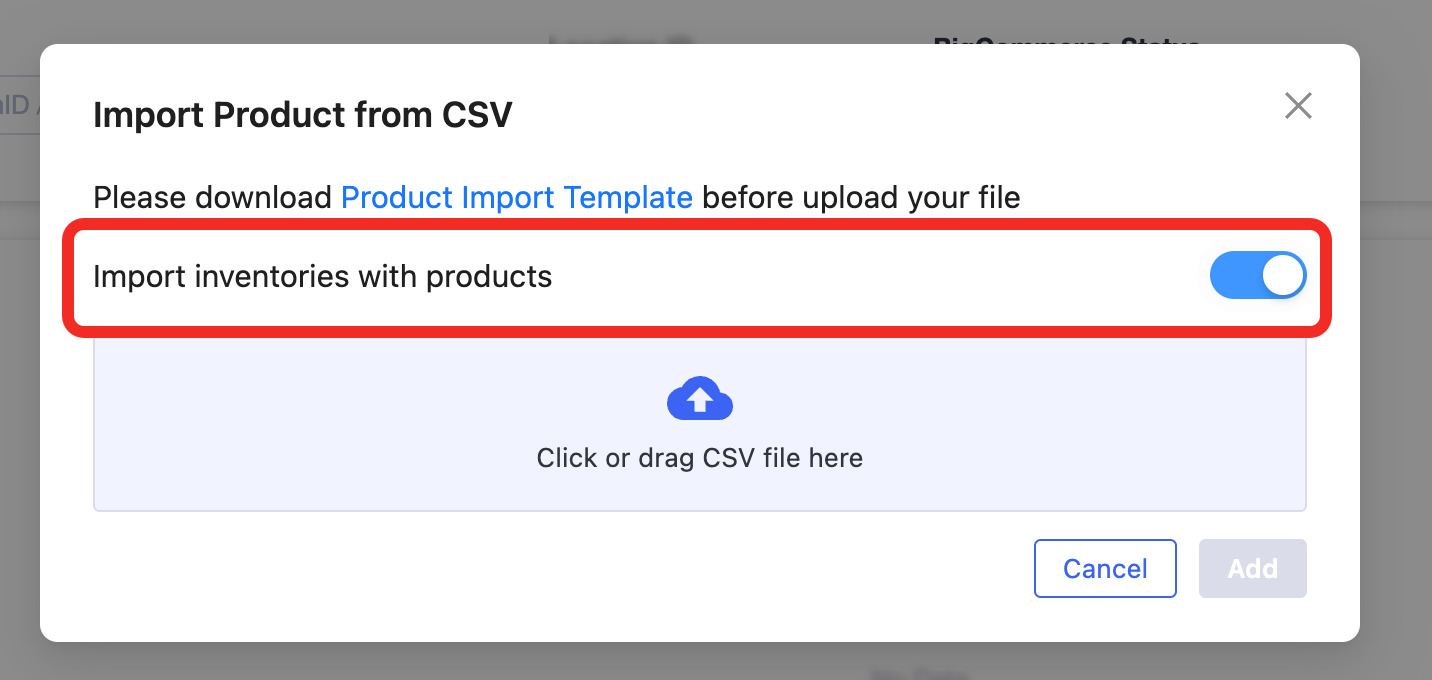
Users can choose whether to import inventories with products a. If with, please input inventory tracking(number) and toggle on the button. b. If not, please leave the inventory column empty and toggle off the button.
-
If the user toggle off and import products without CSV, please go to the Inventory tab on the left sidebar, and import inventory separately.
Step 2 — Fill in Your Product Information
Optional fields can be left blank if not needed.
Open the downloaded CSV file and fill in your product details. Common fields include:
CSV Content (BigCommerce Feed)
| Column Name | Description | Example 1 |
|---|---|---|
| Title | The name of the product displayed on your store and product detail pages. | 116-test-mobile-phone-case |
| Body (HTML) | The product description. Supports HTML formatting for rich text (bold, lists, links, etc.). | Mobile phone case/ |
| Vendor | The name of the product’s manufacturer, supplier, or brand. | shopify Ai app test |
| Product Category | The standard product category from Shopify’s taxonomy used for classification (e.g., “Apparel & Accessories > Clothing”). | Electronics Communications Telephony Mobile & Smart Phone Accessories Mobile Phone Cases |
| Type | A custom category or product type used for grouping within your store (e.g., “T-Shirt”). | test pull product |
| Tags | Keywords used to help with search filtering on your store. Separate multiple tags with commas. | "Conquer the snow with our top-notch snowboard!", "Ride the slopes with our high-performance snowboard!" |
| Published | Determines if the product is live on your storefront. Set to “TRUE” to publish. | TRUE |
| Option1 Name | The label for the first product option (e.g., “Size”). | Size |
| Option1 Value | The value for the first product option (e.g., “Medium”). | 125cm |
| Option2 Name | The label for the second product option (e.g., “Color”). | Color |
| Option2 Value | The value for the second product option (e.g., “Blue”). | blue |
| Option3 Name | The label for the third product option. | |
| Option3 Value | The value for the third product option. | |
| Variant SKU | The unique identifier for a specific product variant, used for inventory and tracking. | BDA24015Y2 |
| Variant Grams | The weight of the variant in grams, used for shipping calculations. | 272.155422 |
| Variant Inventory Tracker | Indicates if BigCommerce or an external service tracks inventory (e.g., “shopify”). | shopify |
| Variant Inventory Qty | The current stock level of the variant. | 970 |
| Variant Inventory Policy | Determines behavior when inventory reaches zero (“deny” = cannot sell; “continue” = allow overselling). | deny |
| Variant Fulfillment Service | The service used to fulfill the variant (e.g., “manual” or a third-party fulfillment provider). | manual |
| Variant Price | The selling price of the variant. | 0.01 |
| Variant Compare At Price | The original price shown alongside a discounted price (optional). | 2.30 |
| Variant Requires Shipping | TRUE/FALSE. Indicates if the variant is a physical product that requires shipping. | TRUE |
| Variant Taxable | TRUE/FALSE. Indicates if the variant is subject to tax. | TRUE |
| Variant Barcode | Barcode or identifier (e.g., UPC, ISBN) for the variant. | 89898989 |
| Image Src | The URL of the product image. | https://cdn.shopify.com/s/files/1/0828/2688/7466/files/A164-ENJP_20_22_02_24V320_1_-dsvislhk |
| Image Position | The order in which the image appears in the product gallery. | 1 |
| Image Alt Text | Descriptive alt text for the image to improve accessibility and SEO. | Cover |
| Gift Card | TRUE/FALSE. Marks the product as a gift card. | TRUE |
| SEO Title | Custom title tag for the product page (optional, for search engine optimization). | "Extreme All-Mountain Snowboard with High Performance Features for Thrilling Winter Adventures" |
| SEO Description | Meta description for the product page (optional, for search engine results). | Snowboarding is a thrilling winter sport. |
| Google Shopping / Google Product Category | Google-defined product category for shopping feeds. | |
| Google Shopping / Gender | Intended gender audience for Google Shopping (e.g., “male”, “female”, “unisex”). | |
| Google Shopping / Age Group | Target age group for Google Shopping (e.g., “adult”, “kids”). | Adult |
| Google Shopping / MPN | Manufacturer Part Number for Google Shopping. | |
| Google Shopping / AdWords Grouping | Custom grouping field used in Google AdWords campaigns. | |
| Google Shopping / AdWords Labels | Tags to filter products within AdWords. | |
| Google Shopping / Condition | The product’s condition for Google Shopping (e.g., “new”, “used”). | New |
| Google Shopping / Custom Product | TRUE/FALSE. Indicates if the product is custom-made. | |
| Google Shopping / Custom Label 0 | Additional custom fields for Google Shopping segmentation. | |
| Google Shopping / Custom Label 1 | Additional custom fields for Google Shopping segmentation. | |
| Google Shopping / Custom Label 2 | Additional custom fields for Google Shopping segmentation. | |
| Google Shopping / Custom Label 3 | Additional custom fields for Google Shopping segmentation. | |
| Google Shopping / Custom Label 4 | Additional custom fields for Google Shopping segmentation. | |
| Variant Image | The specific image associated with a variant. | |
| Variant Weight Unit | The unit of measurement for weight (e.g., “g”, “kg”, “lb”, “oz”). | lb |
| Variant Tax Code | Tax code for automatic tax services (if applicable). | |
| Cost per item | The product’s cost to you (for margin and profit reporting). | |
| Price / International | The variant price for international markets (if using international pricing). | TRUE |
| Compare At Price / International | Original international price for comparison with discounted price. | |
| Status | Product visibility status: “active”, “draft”, or “archived”. | active |
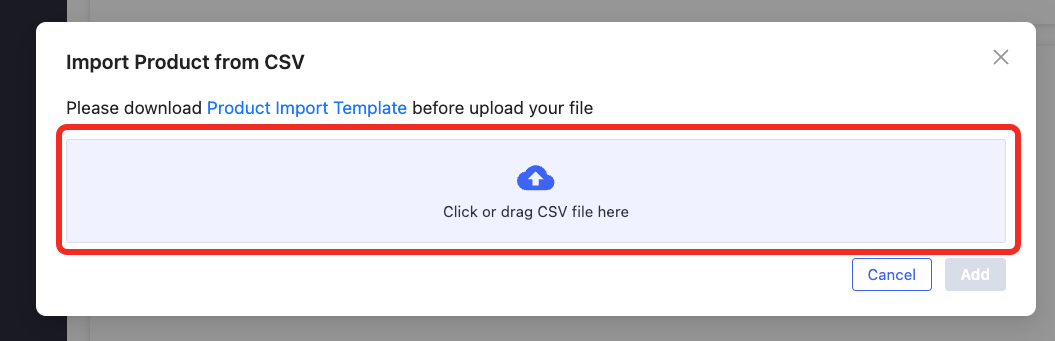
Step 3 — Upload Your CSV File
-
In the Import Products page on ShopHyve, click Upload CSV.
-
Select your completed CSV file.
-
Click Next to preview your data.
What happens if I upload the same SKU twice?
→ ShopHyve will update existing products with the same SKU instead of creating duplicates.
Can I import product images ?
→ Yes! Add image links in the Image URL column. Make sure they are publicly accessible.
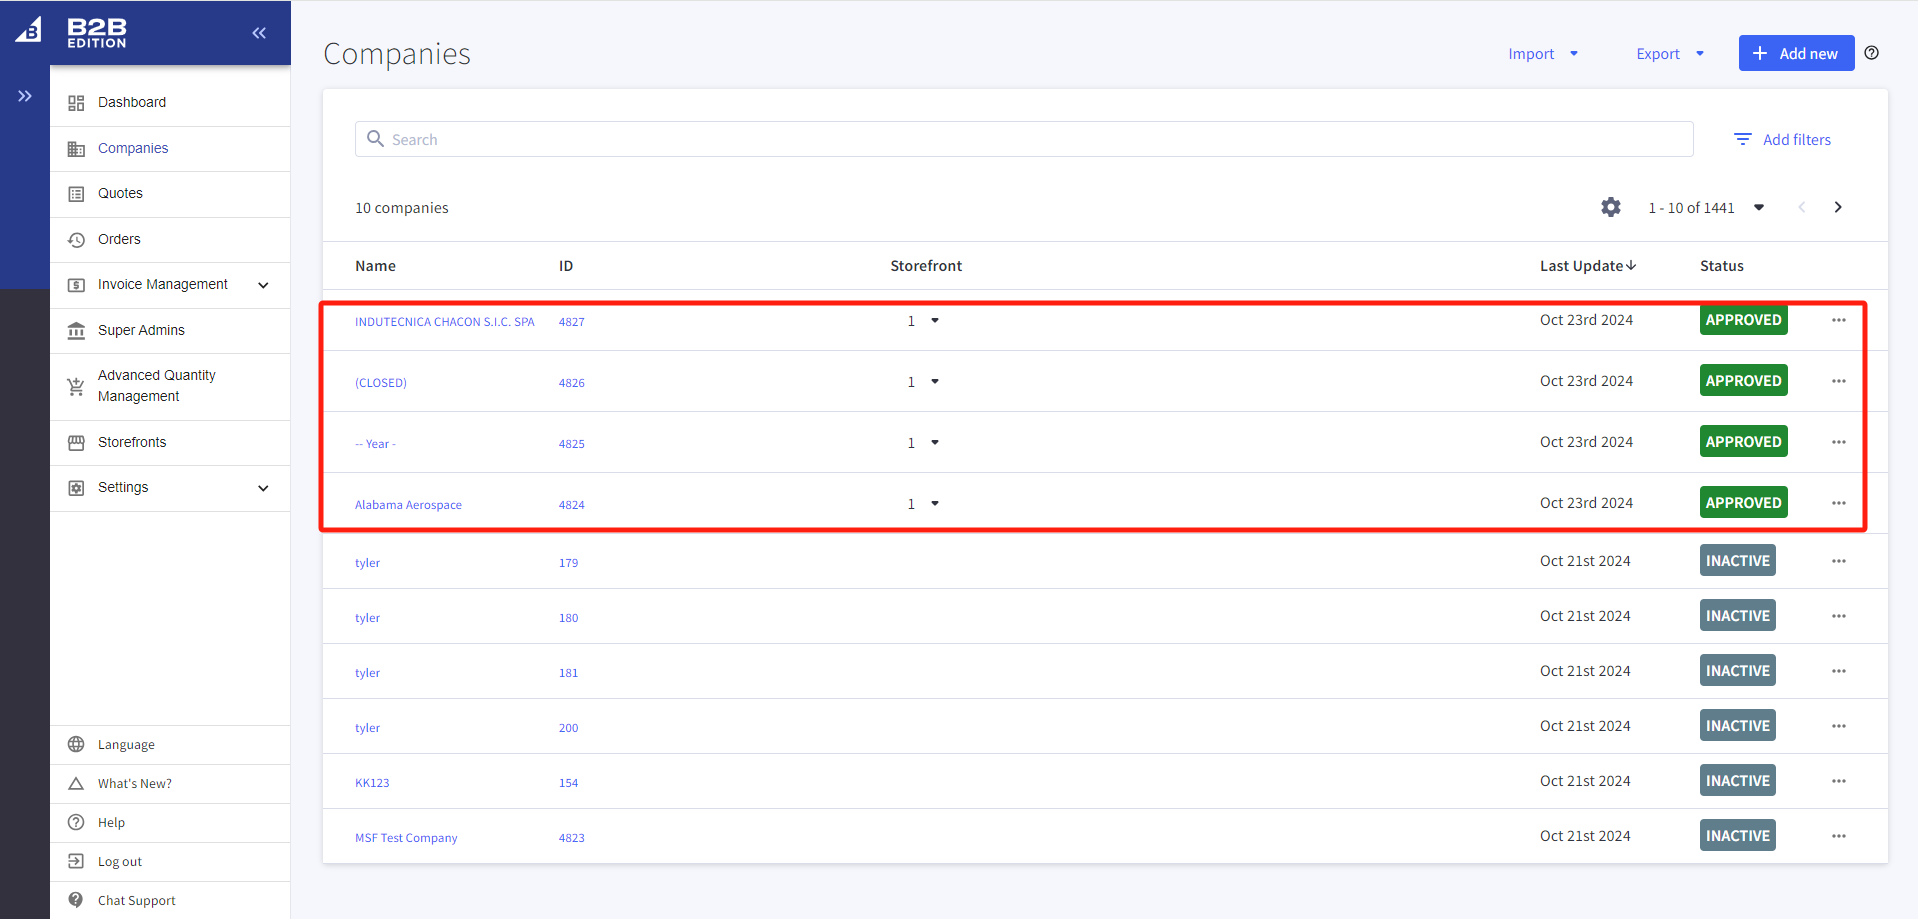
How to Sync Customer
When Kinetic customers are imported into ShopHyve, they are automatically pushed to your BigCommerce Plus store as BigCommerce companies.
Flow
- Kinetic customers are imported into ShopHyve (manually or automatically).
- ShopHyve attempts to create corresponding companies in your BigCommerce store using the available data.
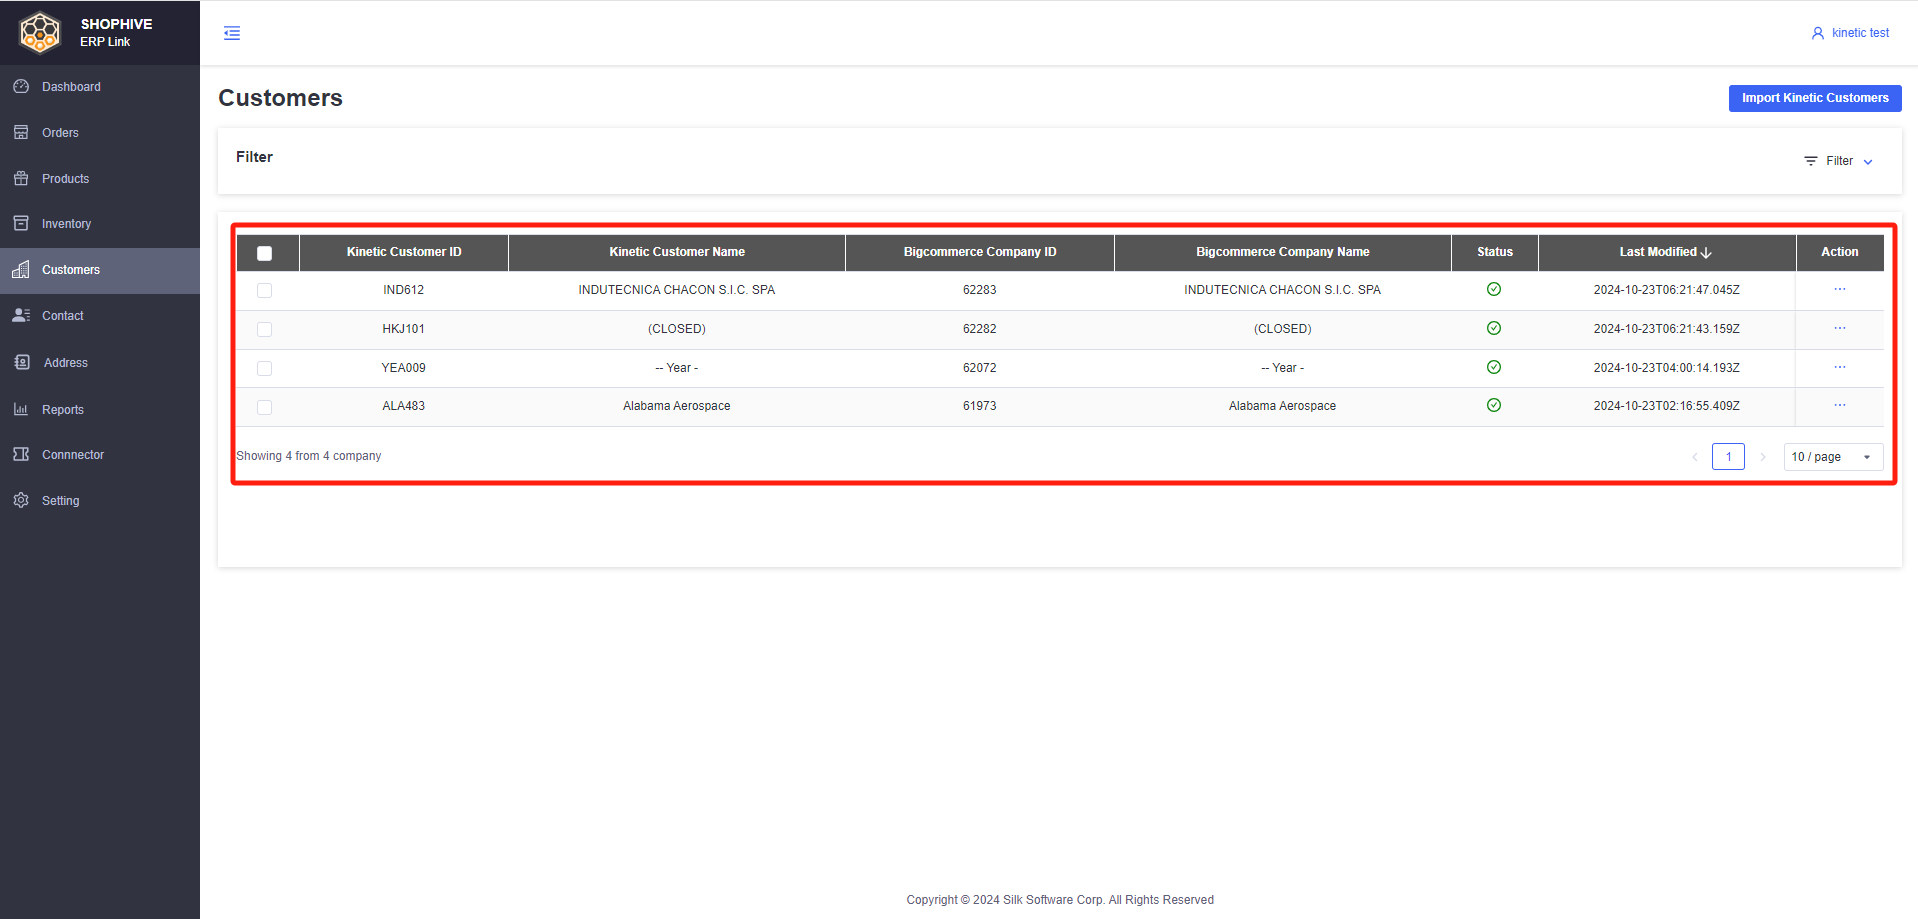
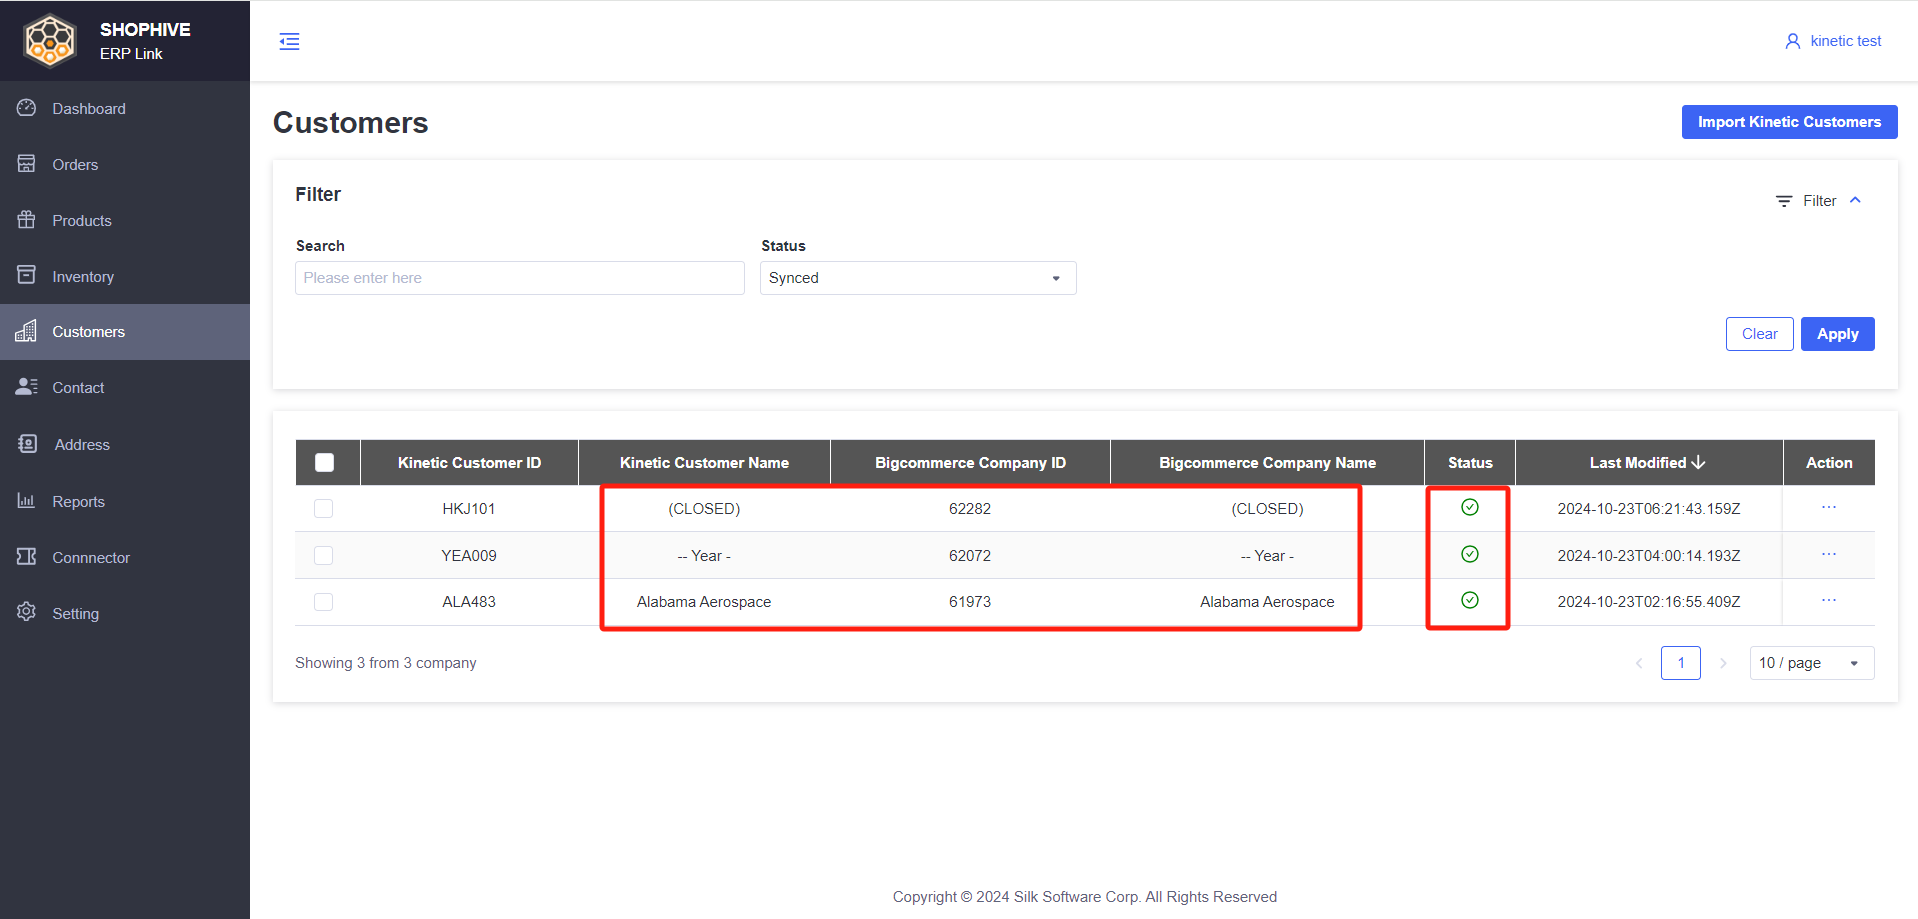
- if the sync is successful:
-
The BigCommerce Company ID and Company Name will be displayed in the company list within ShopHyve.
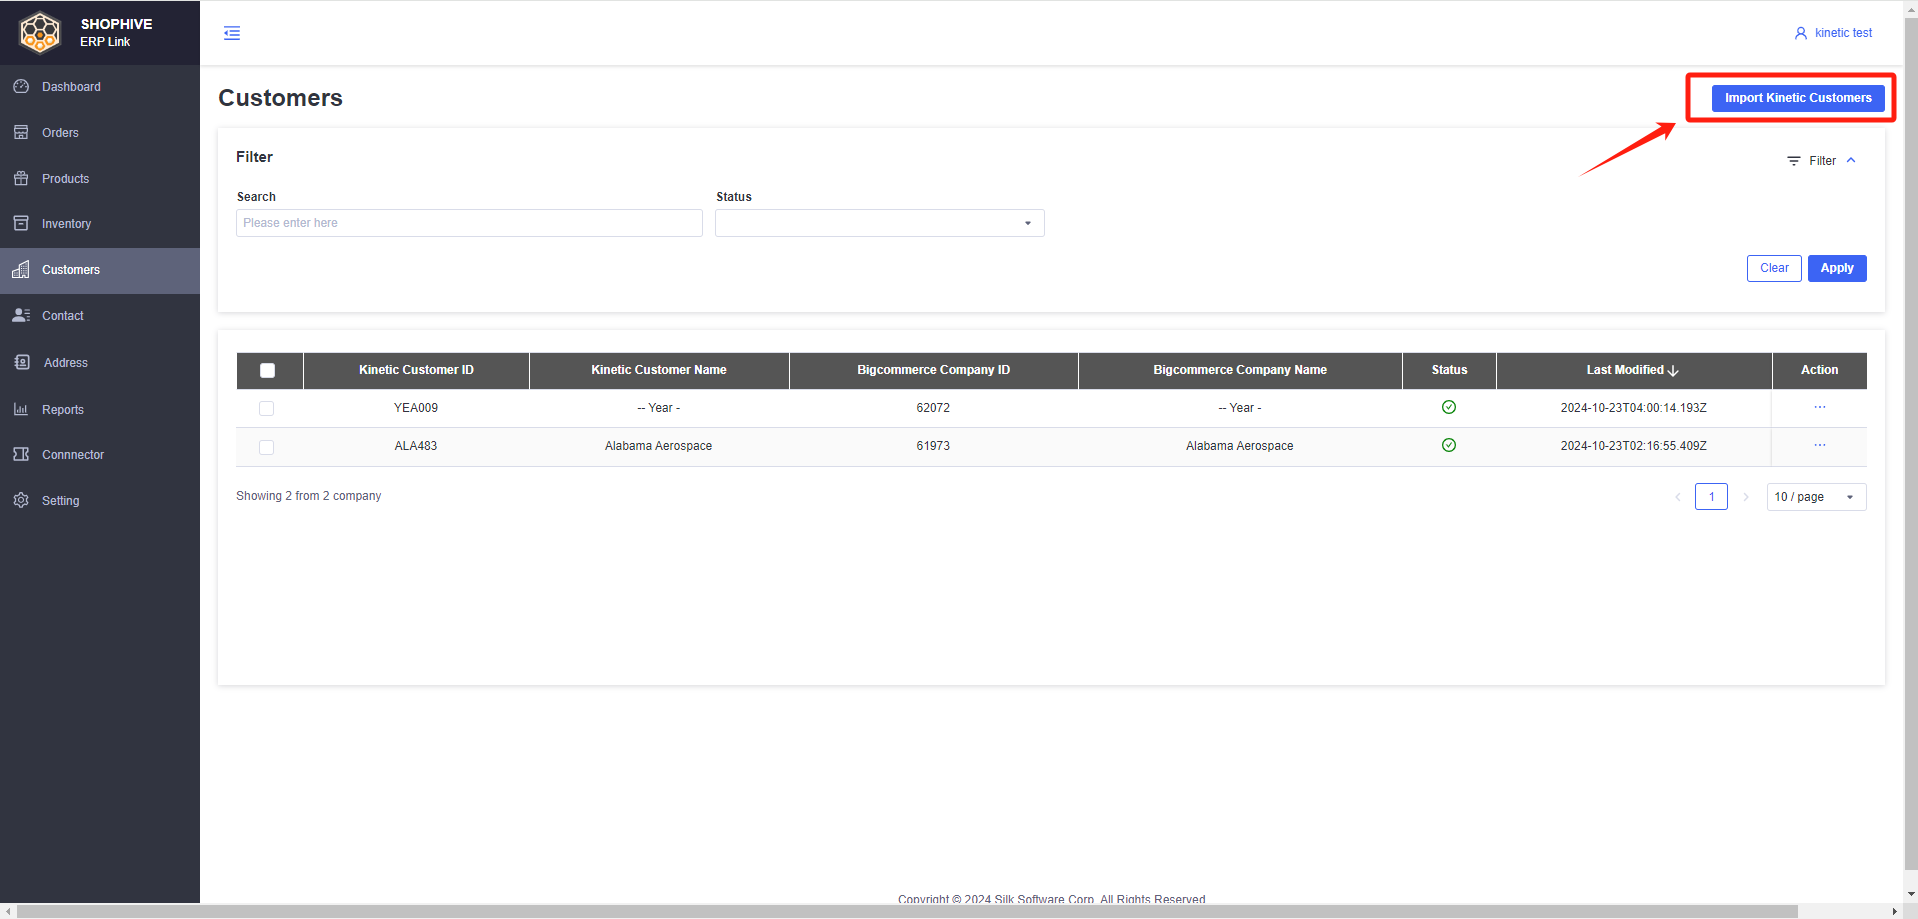
Users only need to click the "Import Kinetic customers" button to sync manually for the first time. After that, ShopHyve will automatically update every 1 hour.
- Create a company in BC (B2B) using Kinetic "erp_customer_id" -> BC (B2B) returns "BC_company_id".
- BC creates an order -> queries "erp_customer_id" using "bc_company_id" and synchronizes the order to this customer.
- If "BC_company_id" does not have a corresponding "erp_customer_id", synchronize the order to a fixed Kinetic customer.
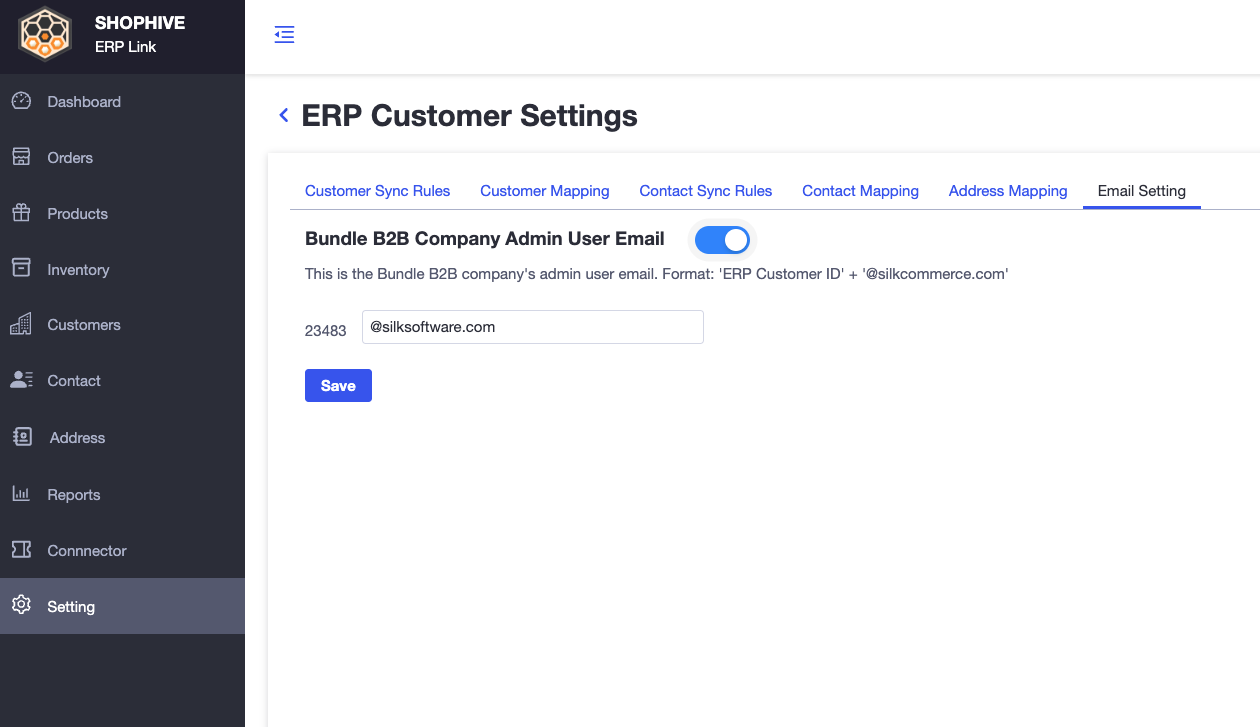
- When creating a Company in Bundle B2B, there must be an Admin User. So we use a virtual email to create a super admin for the bundle B2B company, in order to create the company. a. virtual email: "Kinetic customer id + @silkcommerce.com" b. Email suffix can be changed in settings
- The customer on Kinetic does not have an email, only the contact on Kinetic has an email.
- For the B2B model, Kinetic customers correspond to the e-commerce company, which must have an email address.
- Handling method: Since the contact of Kinetic has an email, it defaults to the email of the first contact of Kinetic customer or the user can choose to fill in their own email.
Retrying Failed Syncs
If a customer sync fails or remains unsynchronized, you will see a status indicator.
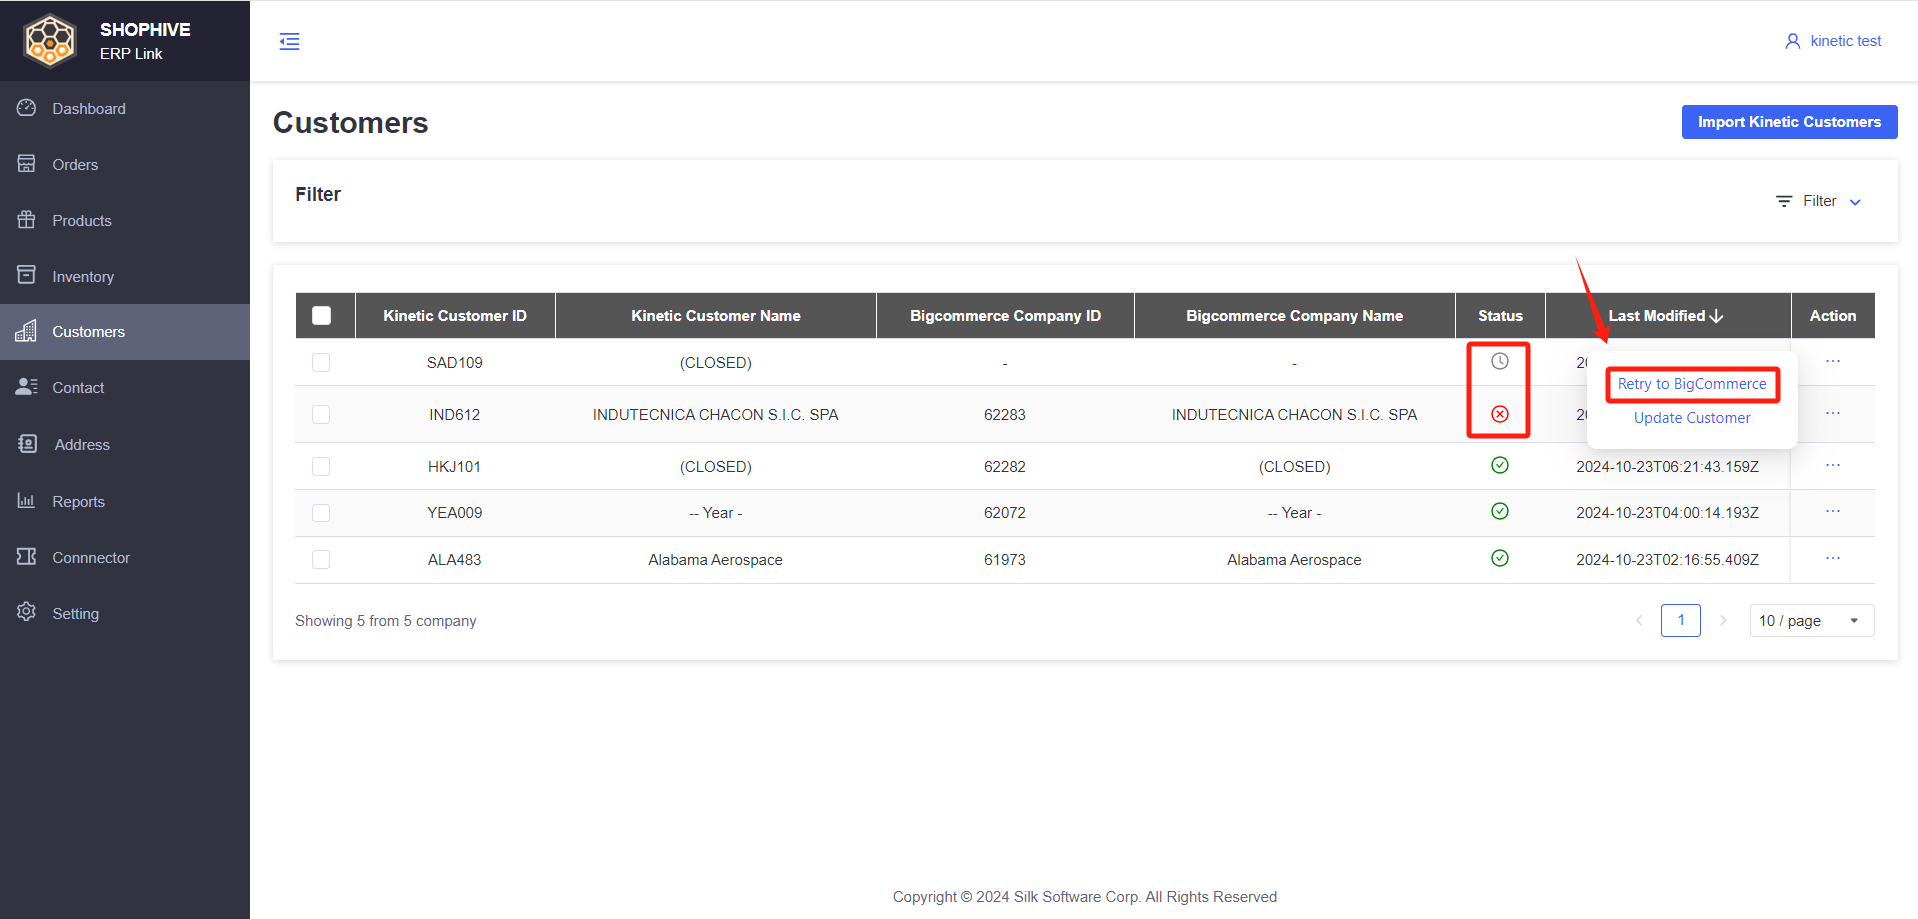
- Click "Retry to BigCommerce" to reattempt sending the customer data to BigCommerce.
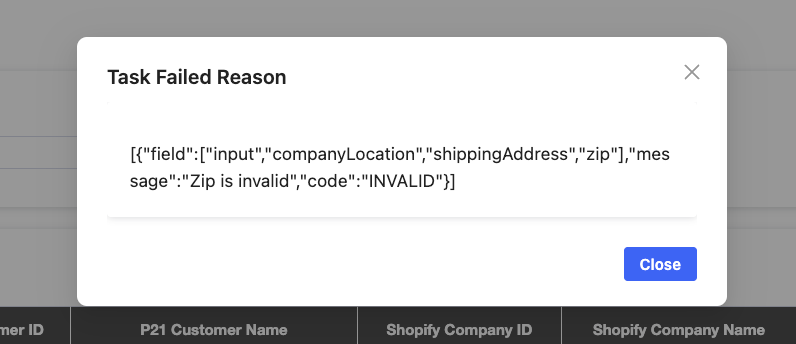
Failed Reasons for Sync Customer:
-
Clicking on the error icon will result in a pop-up window displaying detailed error information
Error Message (errMsg)
Description
Admin user's already in another company
This company admin users' emails and information already exist in another company.
Admin user not exist
Cannot find contact beyond this Kinetic customer.ShopHyve will create virtual contact as Bundle B2B company admin user.
Admin user's already in another company

This company admin users' emails and information already exist in another company.(Bundle B2B requires)
[{"field":["input","companyLocation","shippingAddress","zip"],"message":"Zip is invalid","code":"INVALID"}]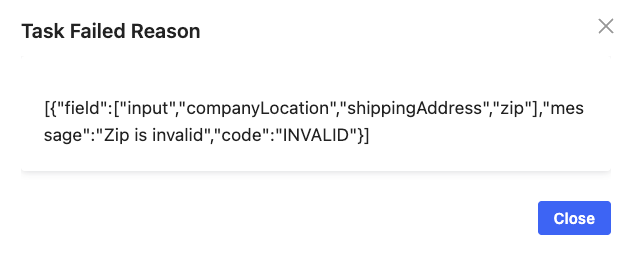
Your shipping address Zip Code is invalid. Please modify your ShipTo on Epicor Kinetic.
Admin user not exist

Cannot find contact beyond this P21 customer.ShopHyve will create virtual contact as Bundle B2B company admin user.
How to Sync Contact
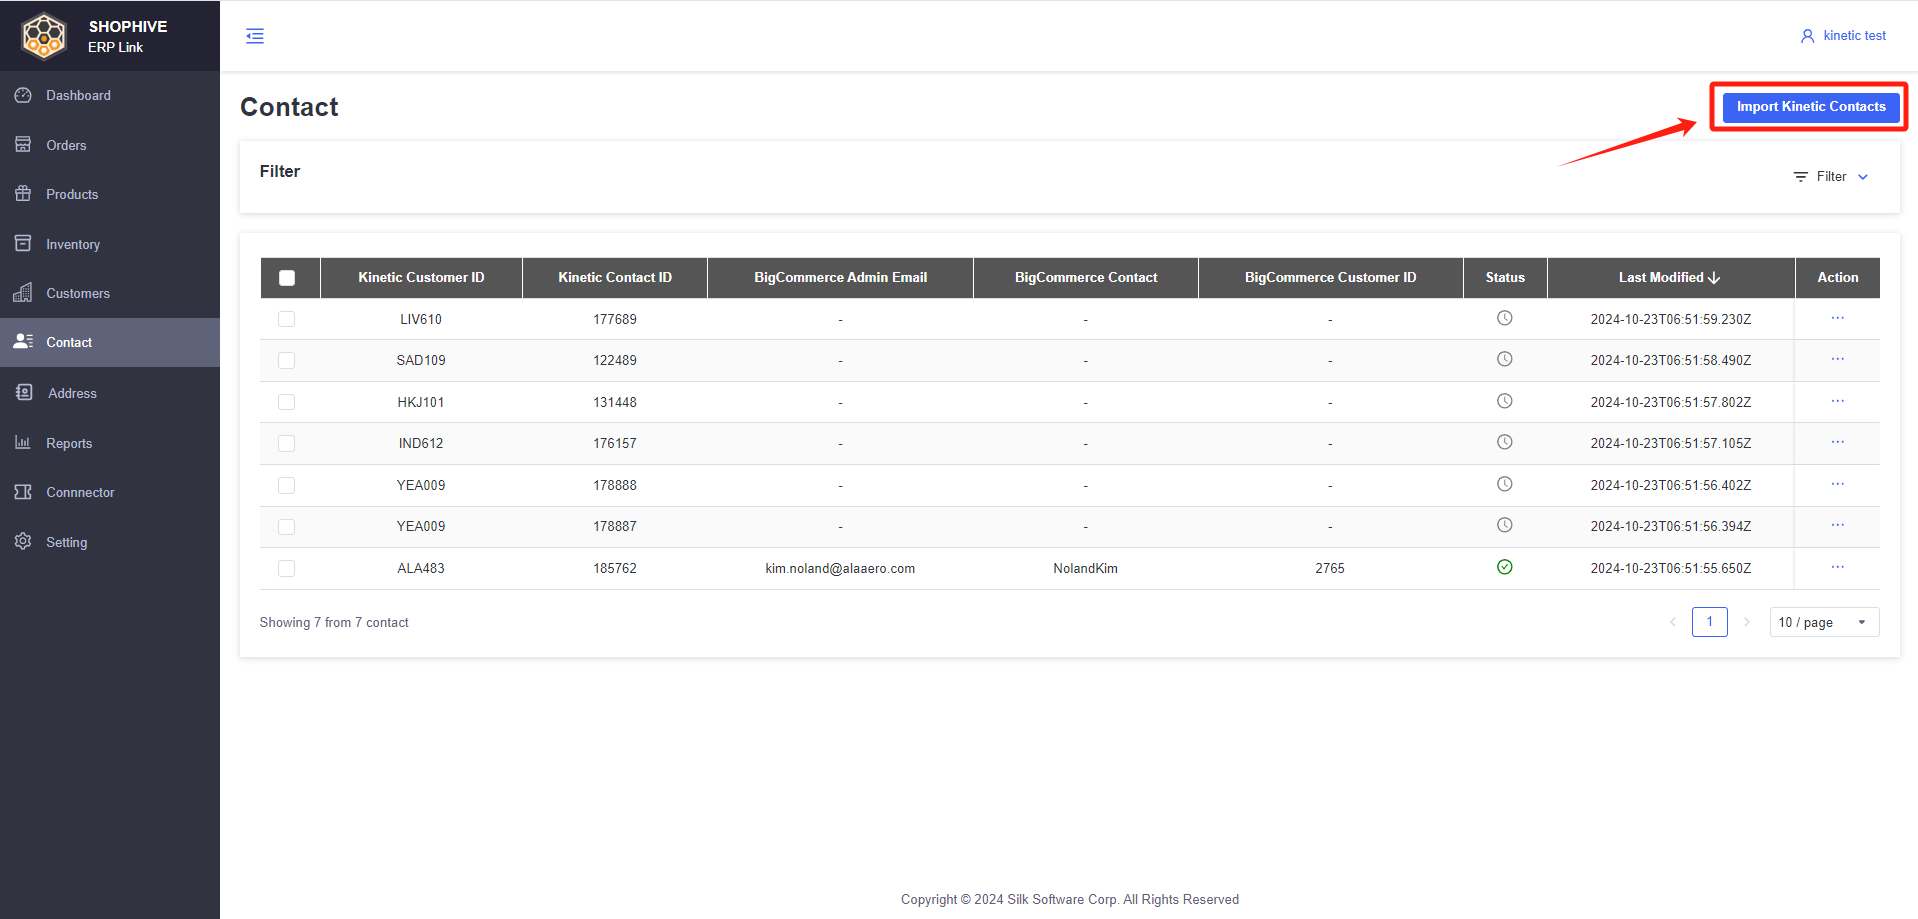
Import Kinetic Contact to ShopHyve ERP Link:
- Click the 'Import Kinetic contacts' button to pull contacts for the first time.
- Afterwards, Kinetic contacts will automatically synchronize.
- Automatically pull contacts every hour.
- Automatically push contacts to BigCommerce every half-hour.
- Display the imported Kinetic Contact information in the ShopHyve Contact Grid
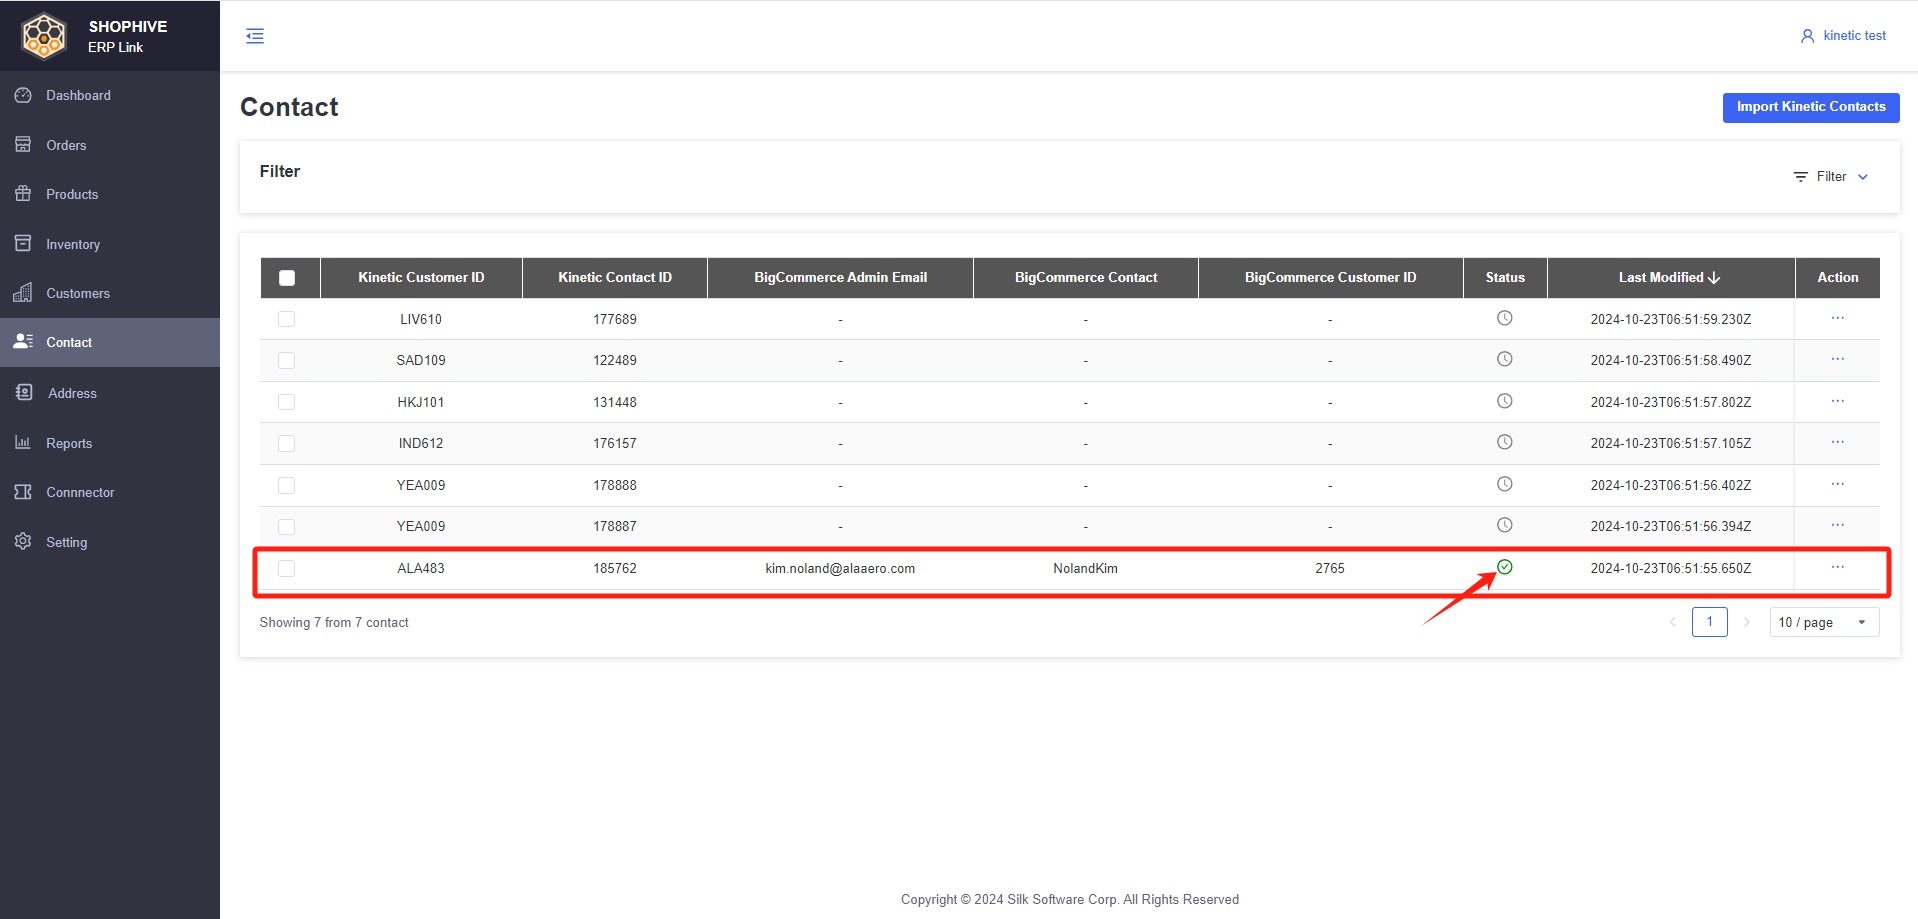
Sync Kinetic Contact to BigCommerce:
- When Kinetic contacts are imported into ShopHyve, they will be automatically pushed to the BigCommerce store.
- Map Kinetic contact to BigCommerce customer fields

- Create a company user on BigCommerce using Kinetic "erp_contact_id" -> BigCommerce returns "bc _customer_id".
- BigCommerce creates an order -> queries "erp_contact_id" and "erp_customer_id" using "bc _customer_id", and synchronizes the order to specific contacts and customers.
- Contact has a corresponding Customer in Kinetic, which corresponds to "erp_customer_id" and "erp_contact_id".
- When synchronizing contacts, first we will check if the company corresponding to the contact exists in BC. If it does not exist, contact synchronization will not be successful. If it exists, we will synchronize the contact with the company user under the corresponding company
- If there is no email address for contact in Kinetic, create a virtual email address for contact through the settings email configuration a. virtual email: "Kinetic contact id + @silkcommerce.com" b. Email suffix can be changed
Failed Reasons for Sync Contact:
- Clicking on the error icon will result in a pop-up window displaying detailed error information
| Error Message (errMsg) | Description |
|---|---|
| Contact's email already existed in Ecommerce | |
 | User needs to sync company that contact belongs to first |
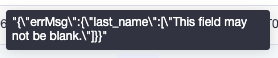 | The required field is empty. |
//TODO: update image
How to Sync Address
Import Kinetic Address to ShopHyve ERP Link:
- Kinetic ShipToAddress will automatically synchronize.
- Automatically pull ShipToAddress every hour.
- Automatically push ShipToAddress to BigCommerce every twenty minutes.
- Display the imported Kinetic Address information in the ShopHyve Contact Grid.
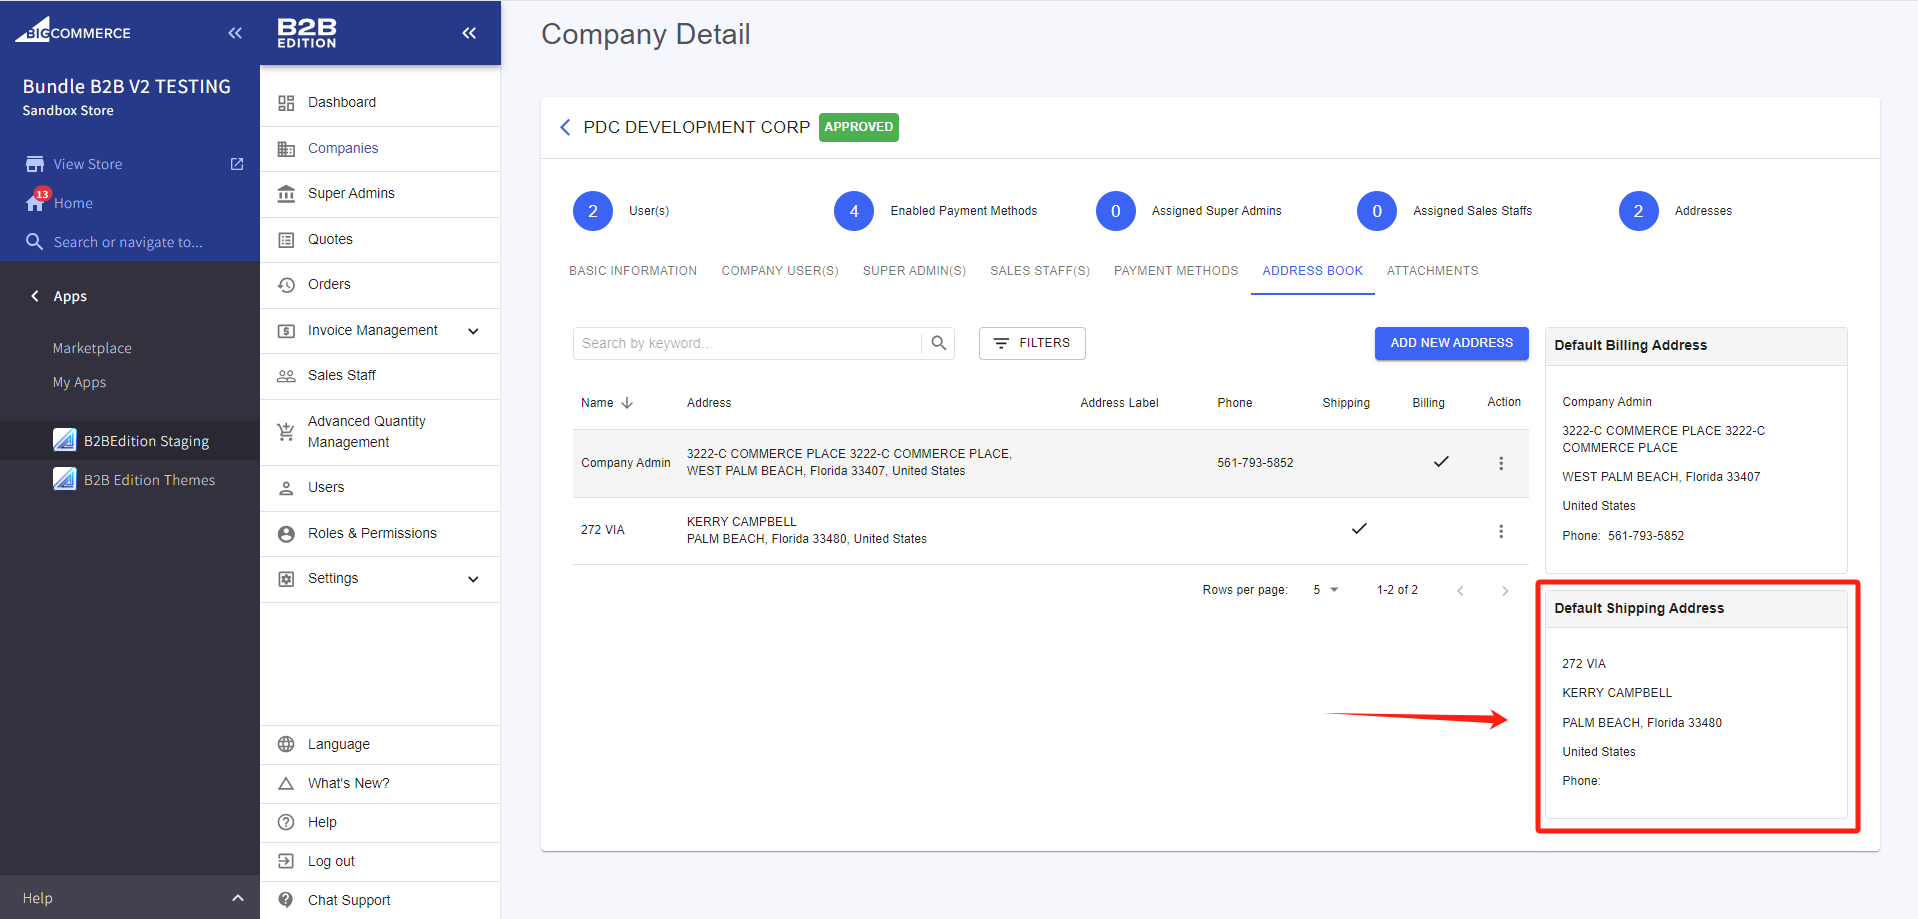
Sync Kinetic Address to BigCommerce:
- Create a corresponding company address for the pulled address information on BigCommerce.
- Billing Address using Basic Information (Kinetic Customer Address)
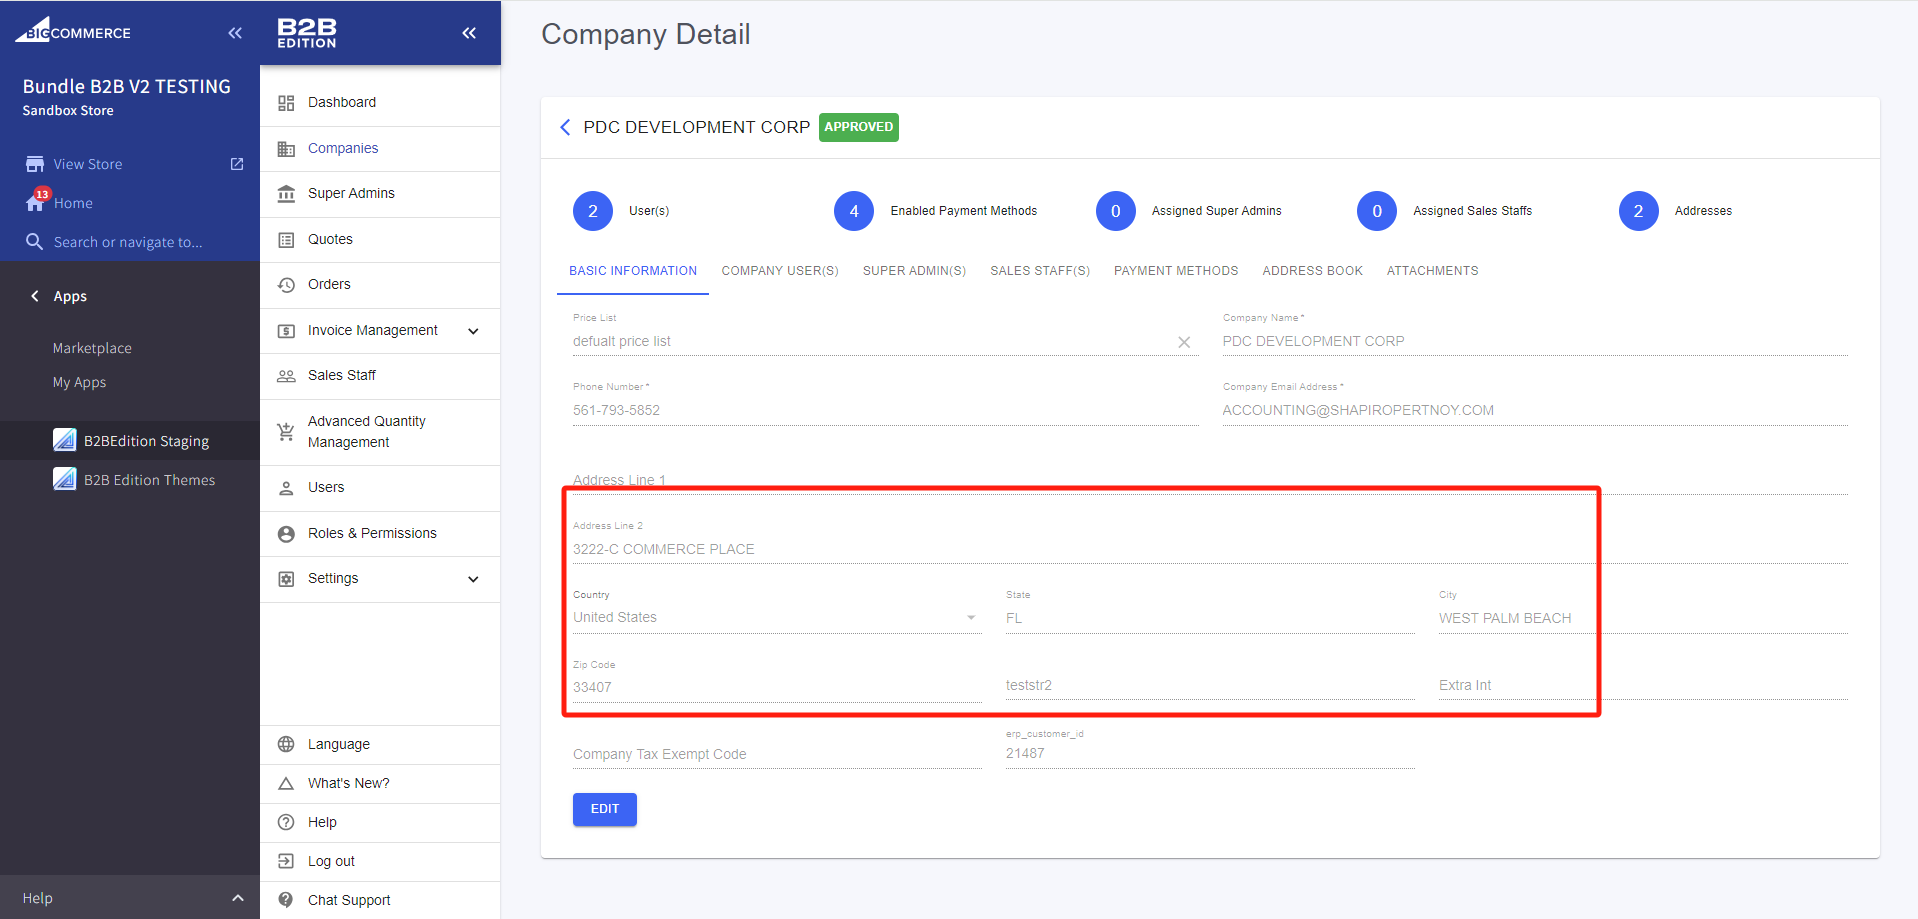
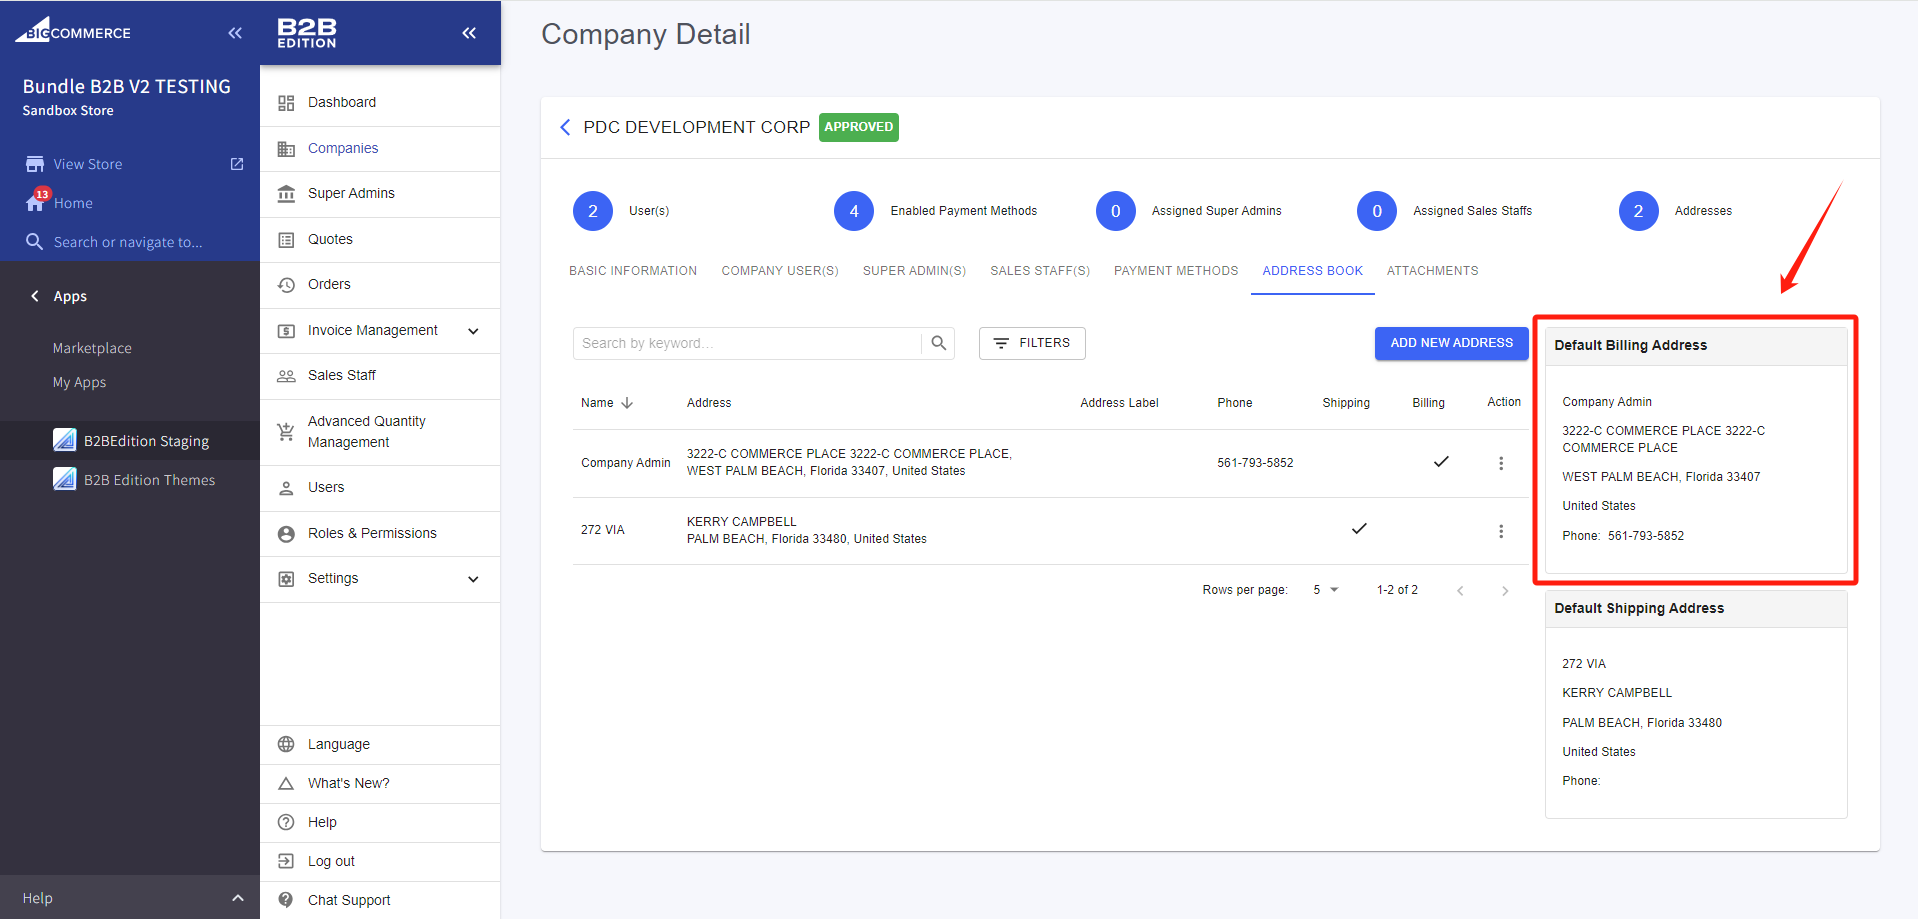
- Shipping Address using Shipto Address
Failed Reasons for Sync Address:
- Clicking on the error icon will result in a pop-up window displaying detailed error information
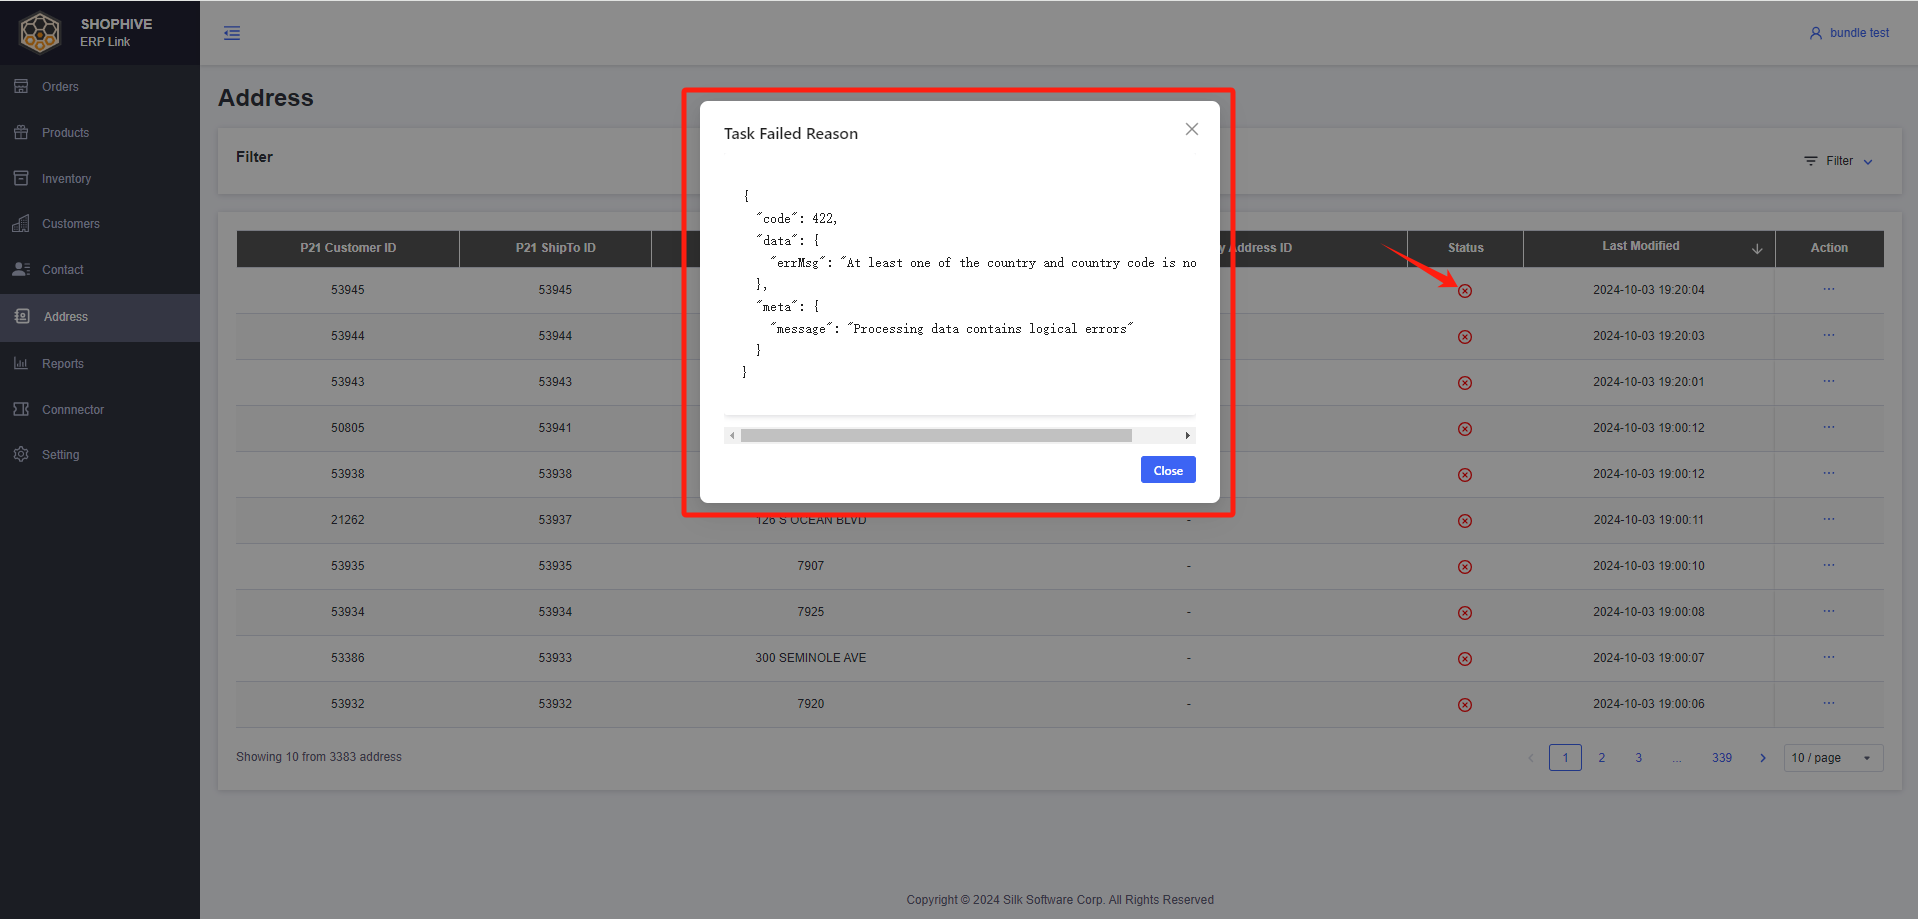
| Error Message (errMsg) | Description |
|---|---|
| BigCommerce requires country or country code to create an address.Please add country information for ShipTo in Kinetic. | |
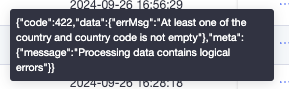 | That address's related company has not been created by BigCommerce. |
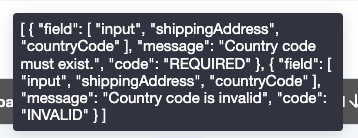 | The shipping address is missing a country code. Please provide a valid country. Country Code: Ensure the address includes a valid ISO 2-letter country code.
|
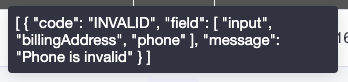 | The billing address phone number format is invalid. Ensure the phone number follows international or local format standards.
|
How to Sync Orders
Import Orders to ShopHyve ERP Link:
- After creating an order on the BigCommerce Store, it can automatically be imported into the ShopHyve ERP Link.
Sync orders to Kinetic automatically
- After an order is imported into the ShopHyve ERP Link, it can automatically synchronize the order to Kinetic.
- If the order is not synchronized successfully, show failed message for order syncing.
- Click on the error icon , the Popup displays synchronization failure information.
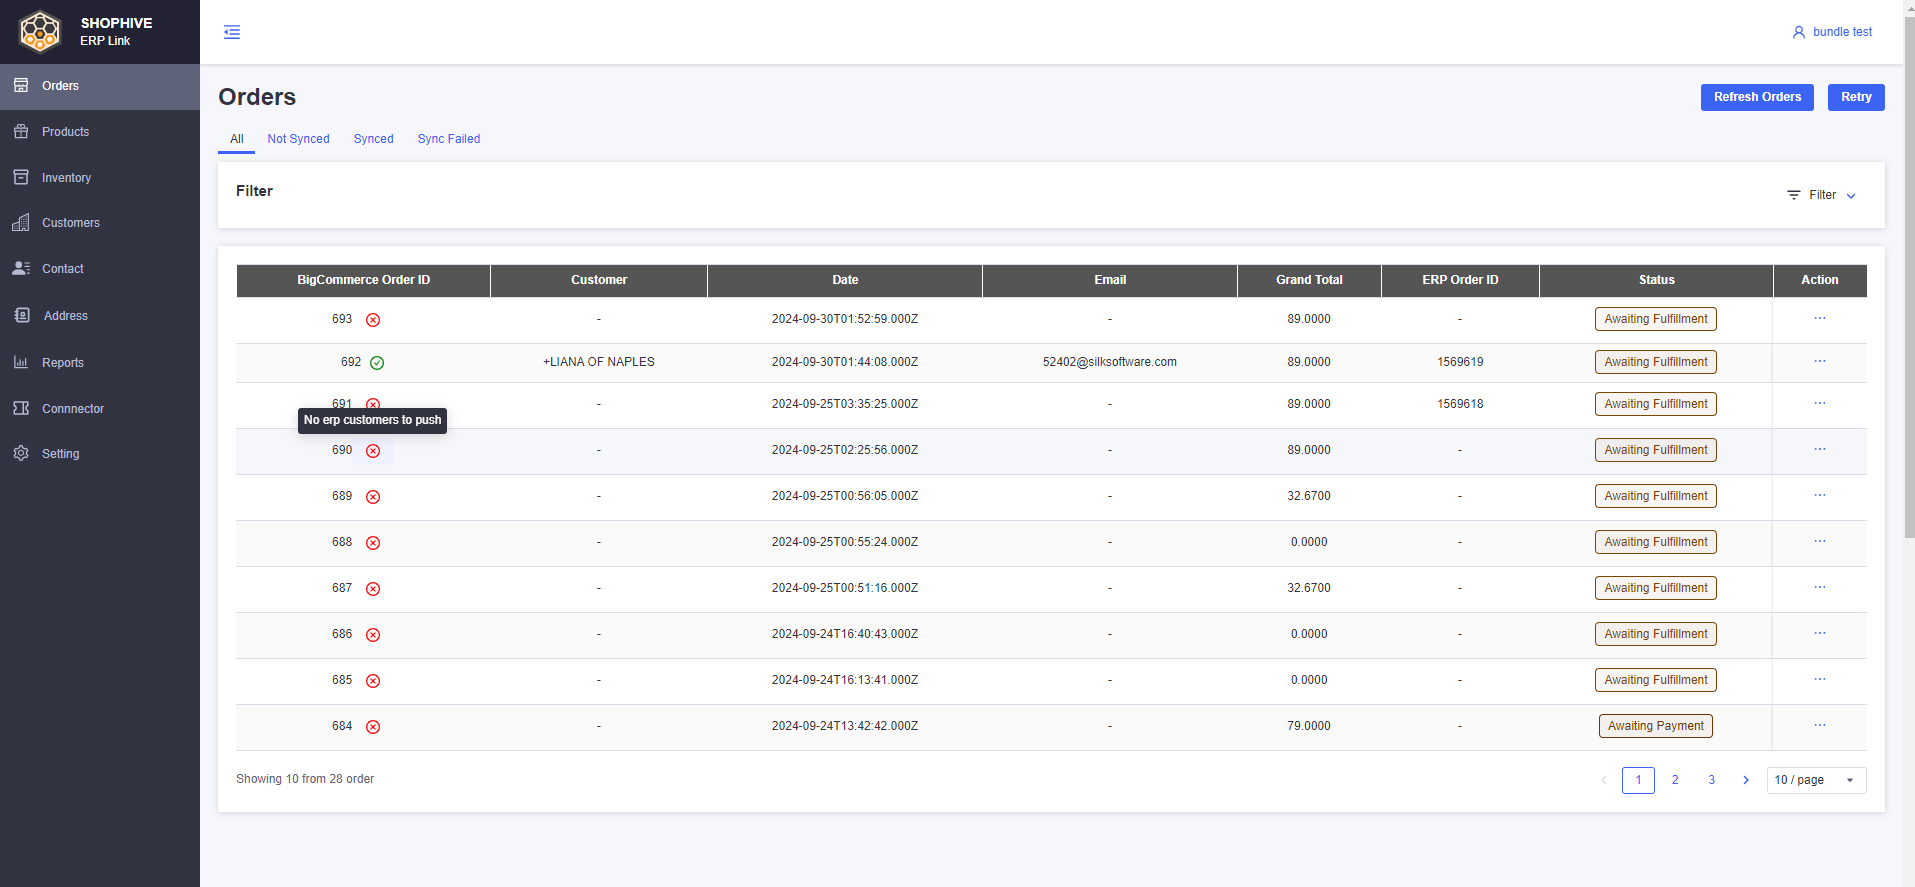
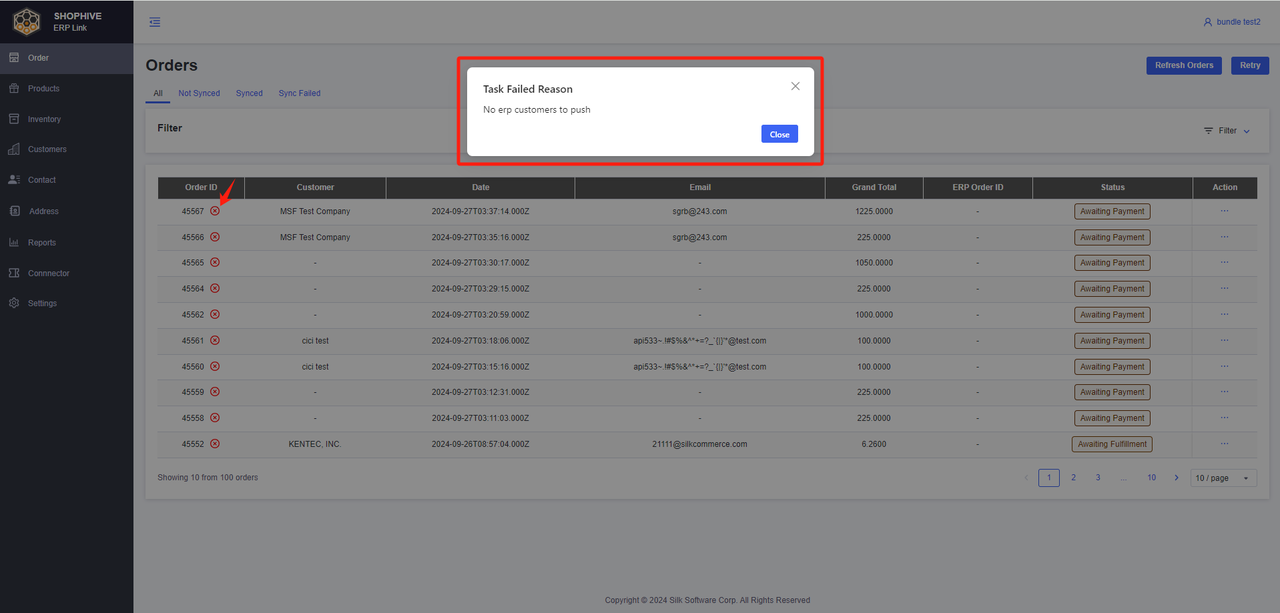
Failed Reasons for Sync Orders:
| Error Message (errMsg) | Description |
|---|---|
 | The order references a customer that hasn’t been synced from BigCommerce to Kinetic. Sync the customer first |
 | The field ZipCode must be a string with a maximum length of 10. |
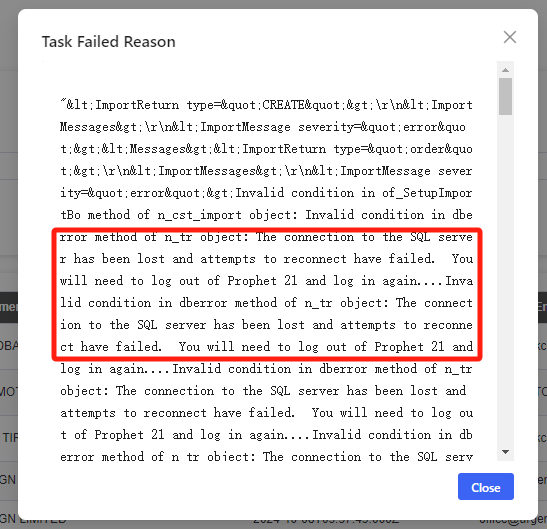 | There is an issue with the Kinetic server. |
| 1: Item is not valid at location. 2: This customer requires a customer PO number. 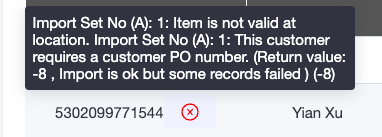 | 1: The item in the order is not assigned to the warehouse/location in Kinetic. Check item availability settings. 2: The customer profile in Kinetic mandates a purchase order number. Ensure the order includes a PO number. |
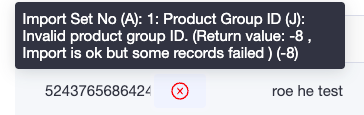 | The product is linked to an invalid or unrecognized product group in Kinetic. Confirm the product group ID. |
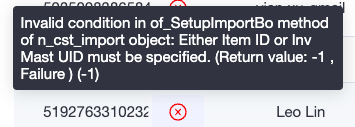 | Kinetic requires either an Item ID or Inv_Mast_UID to be defined. Ensure this field is set properly. |
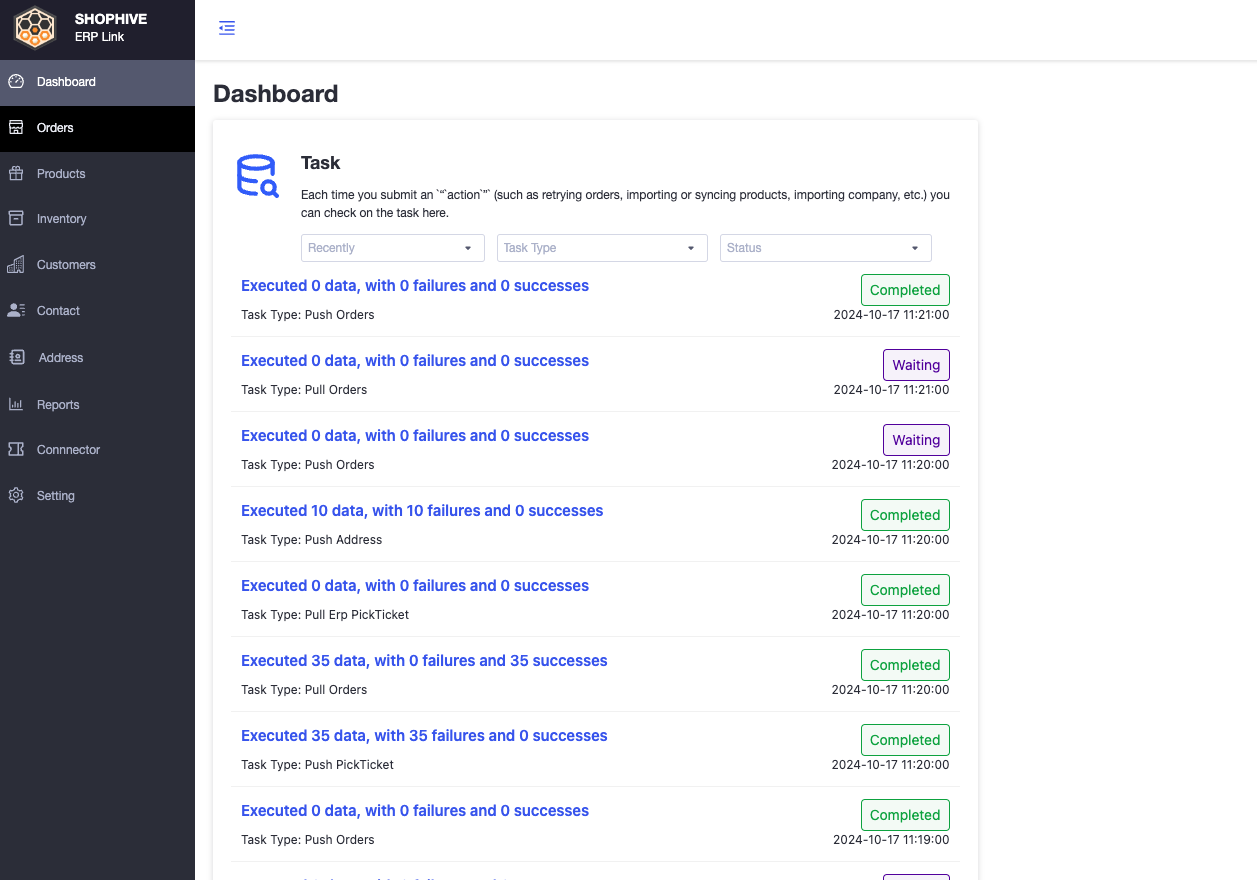
ShopHyve Overview
Dashboard
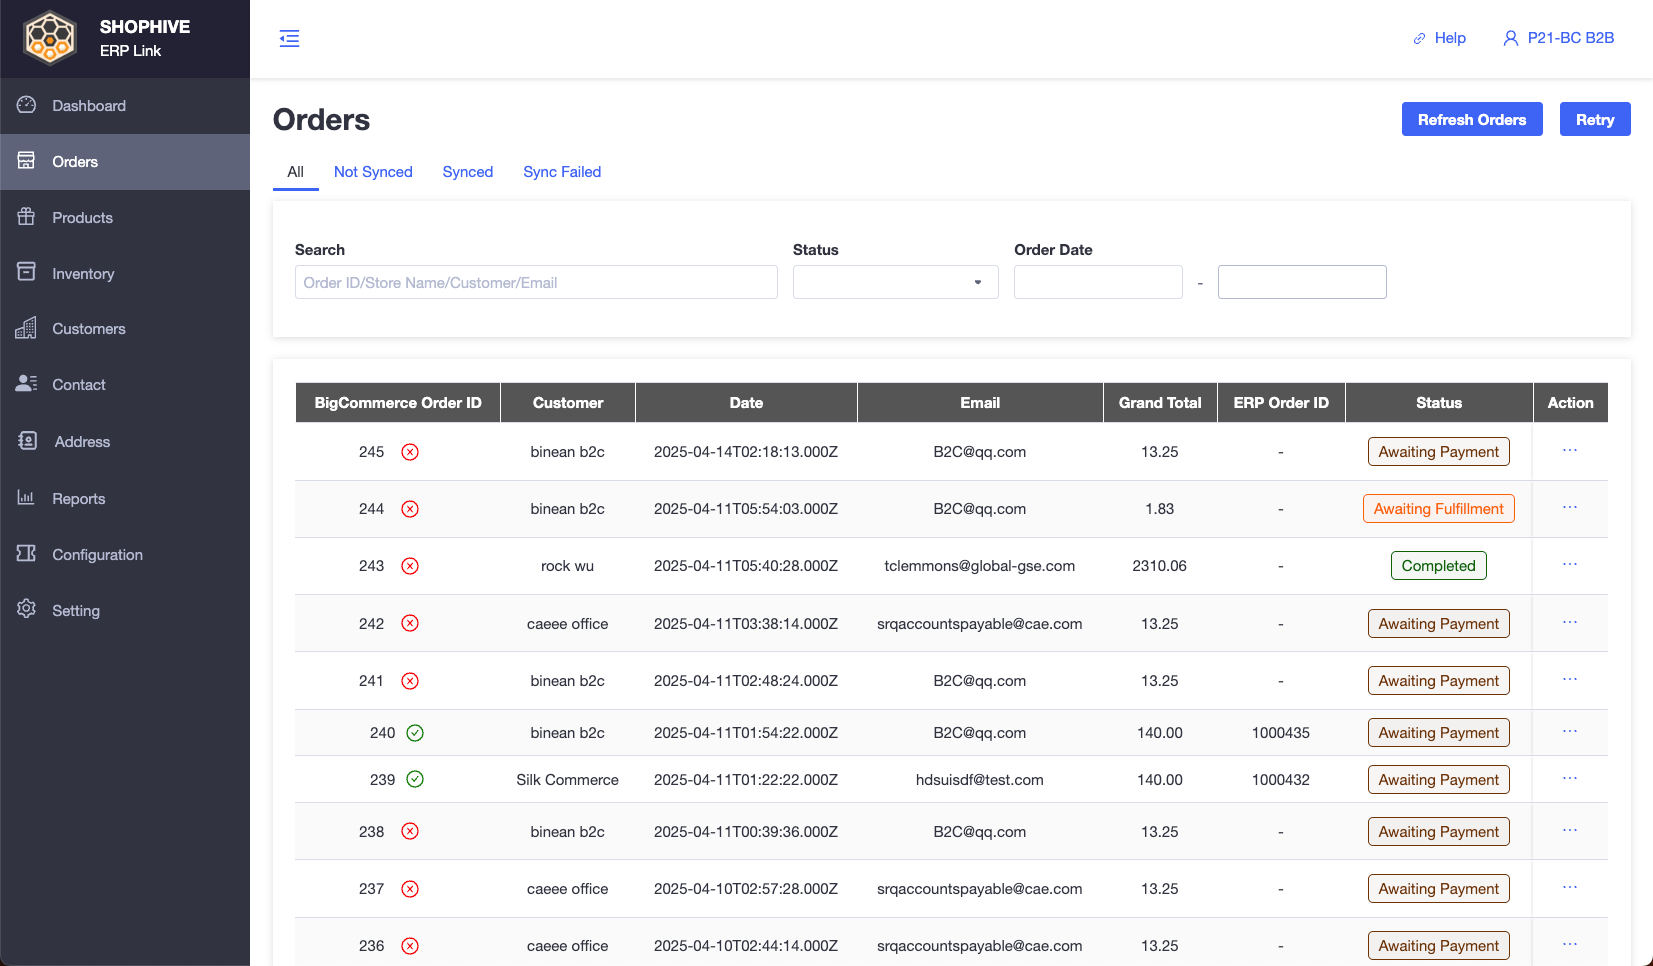
Orders
Filter Orders based on condition
- Tabs - Order Status
- All / Not Synced / Synced / Sync Failed
- The order status includes "All", "Not Sync", "Synced", and "Synced Failed". Based on the order status, display the corresponding order .
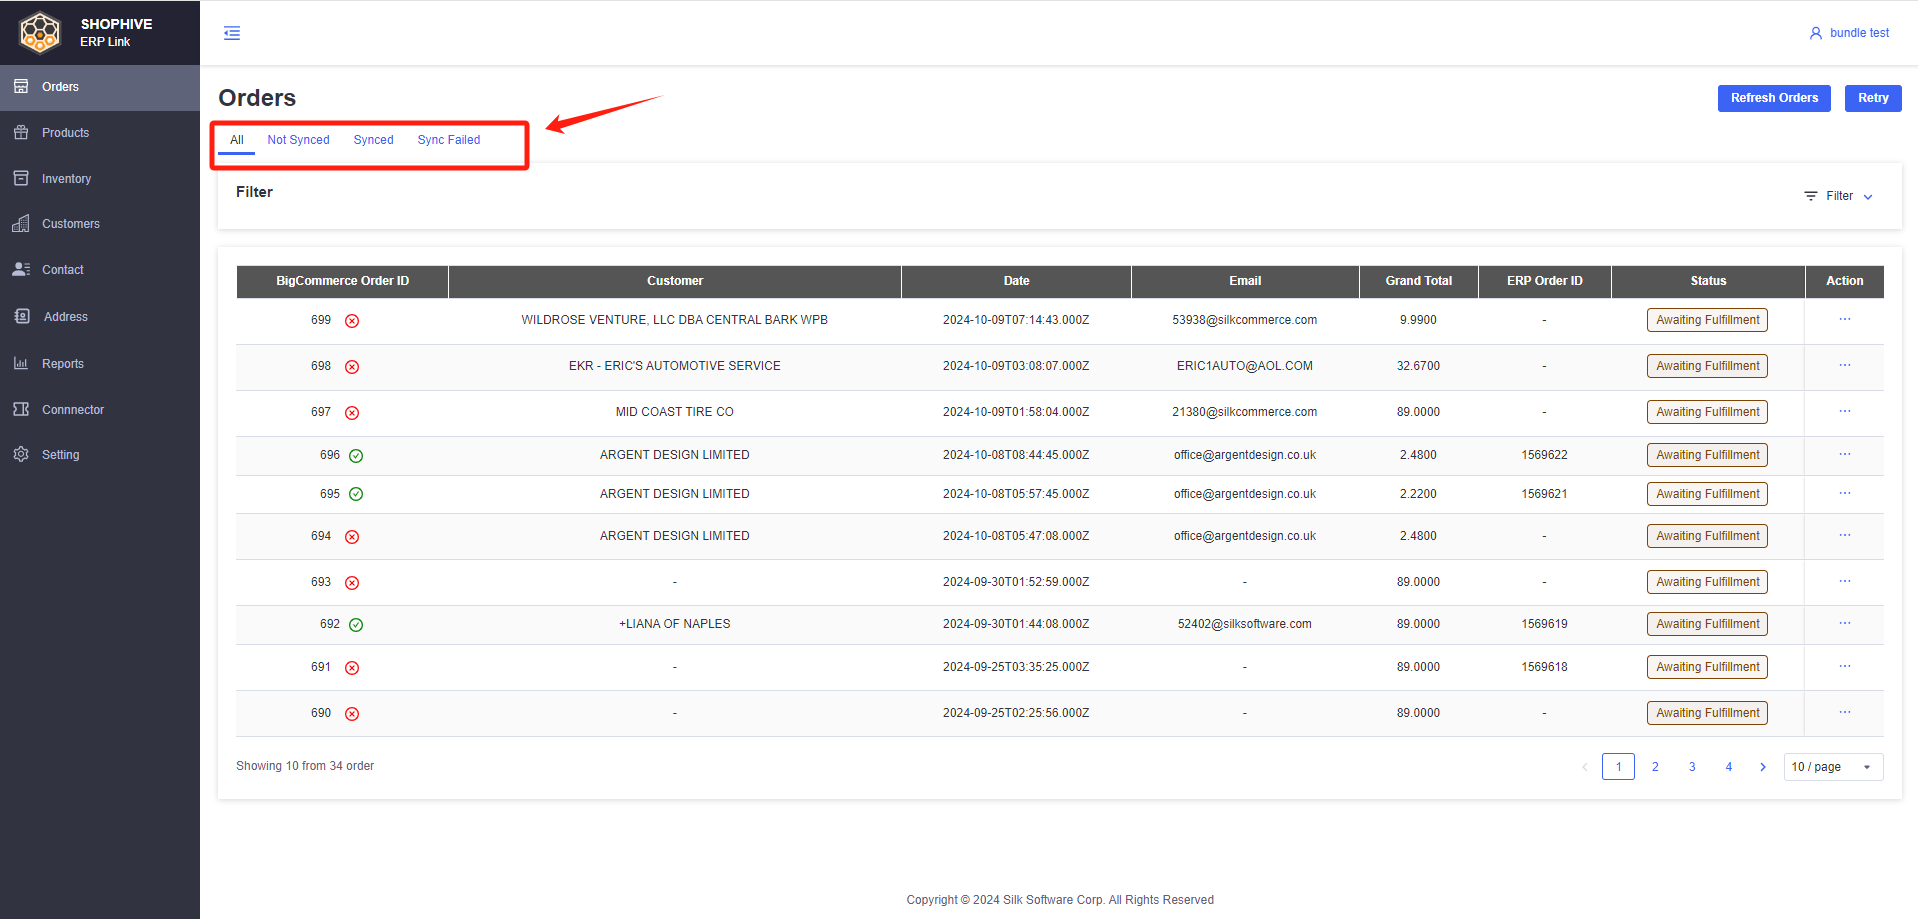
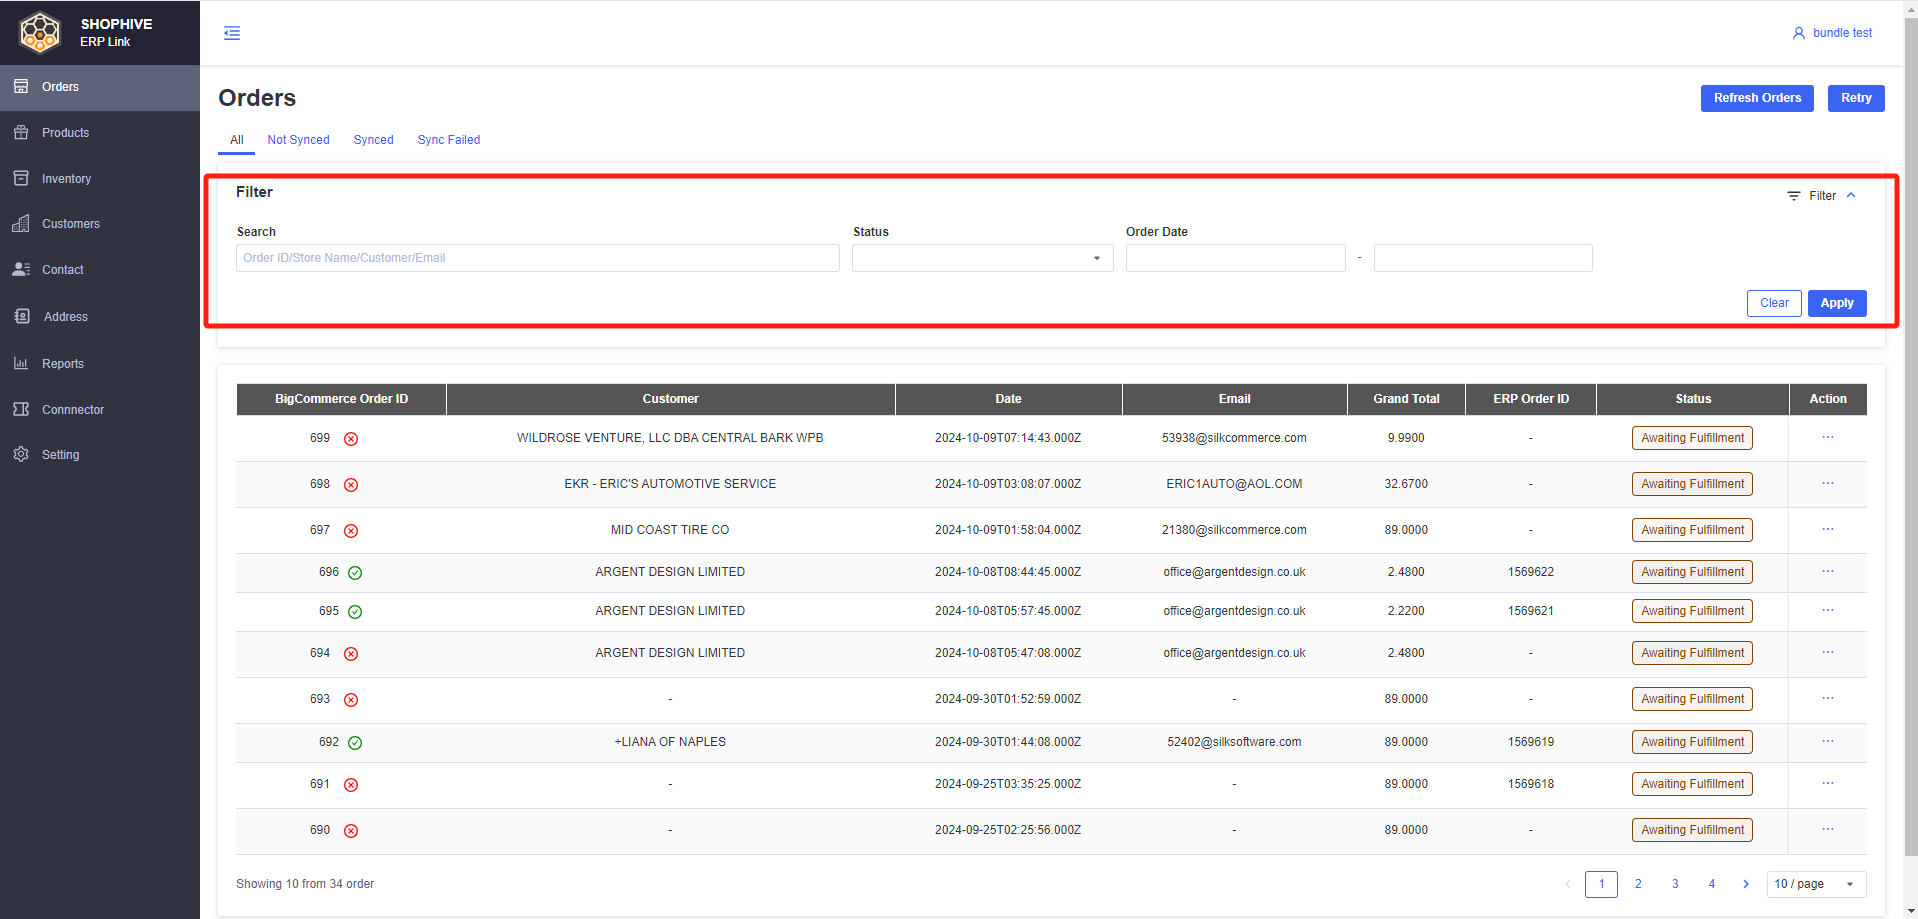
- Allow users to filter orders based on the following criteria:
- Search - BigCommerce Order ID / Customer / Store Name / Email
- Order Date
- Order Status
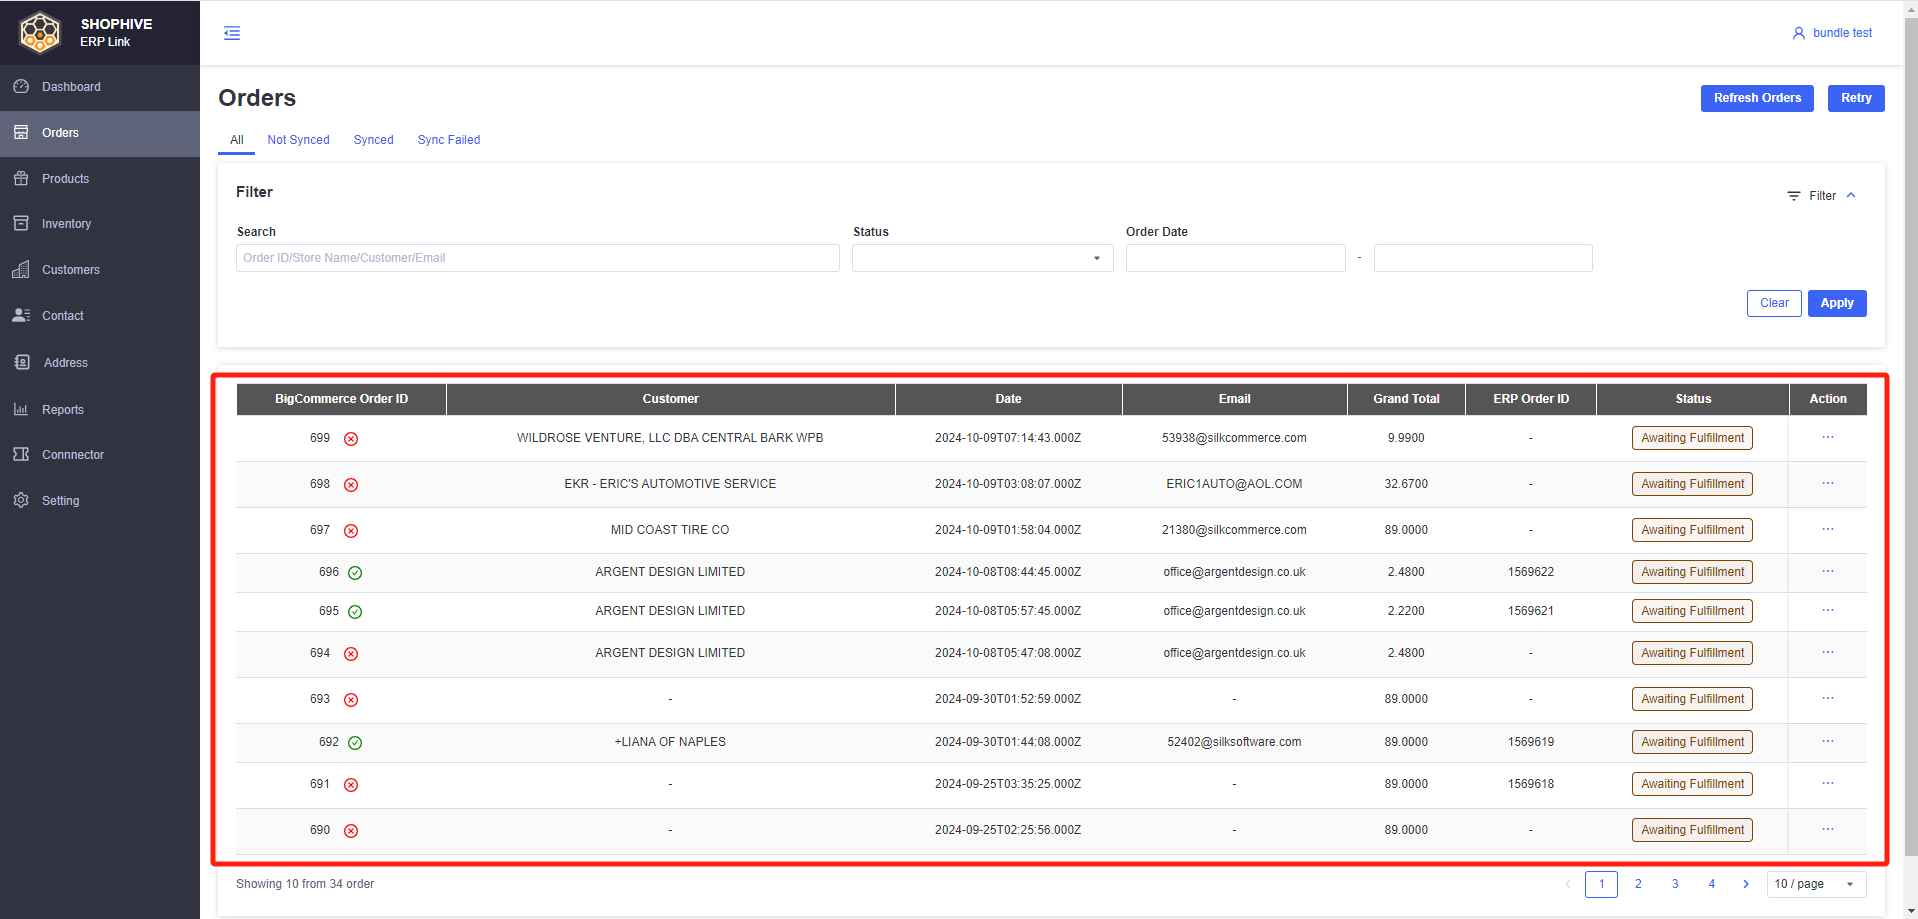
Order List
- The information contained in the order table
- BigCommerce Order ID - The BigCommerce order id of the order, that is the original order id of the connected store.
- Customer - The customer's name of the order.
- Date - The order's original created date.
- Email - The order customer's email.
- Grand Total - The grand total amount of order.
- ERP Order ID - The order ID in Kinetic. Once the order is submitted to Kinetic successfully, there will be a unique ID in the Kinetic.
- Status - The status of the order. The initial status is the one that when the order was imported.
- Action - View Details / Retry to Kinetic
-
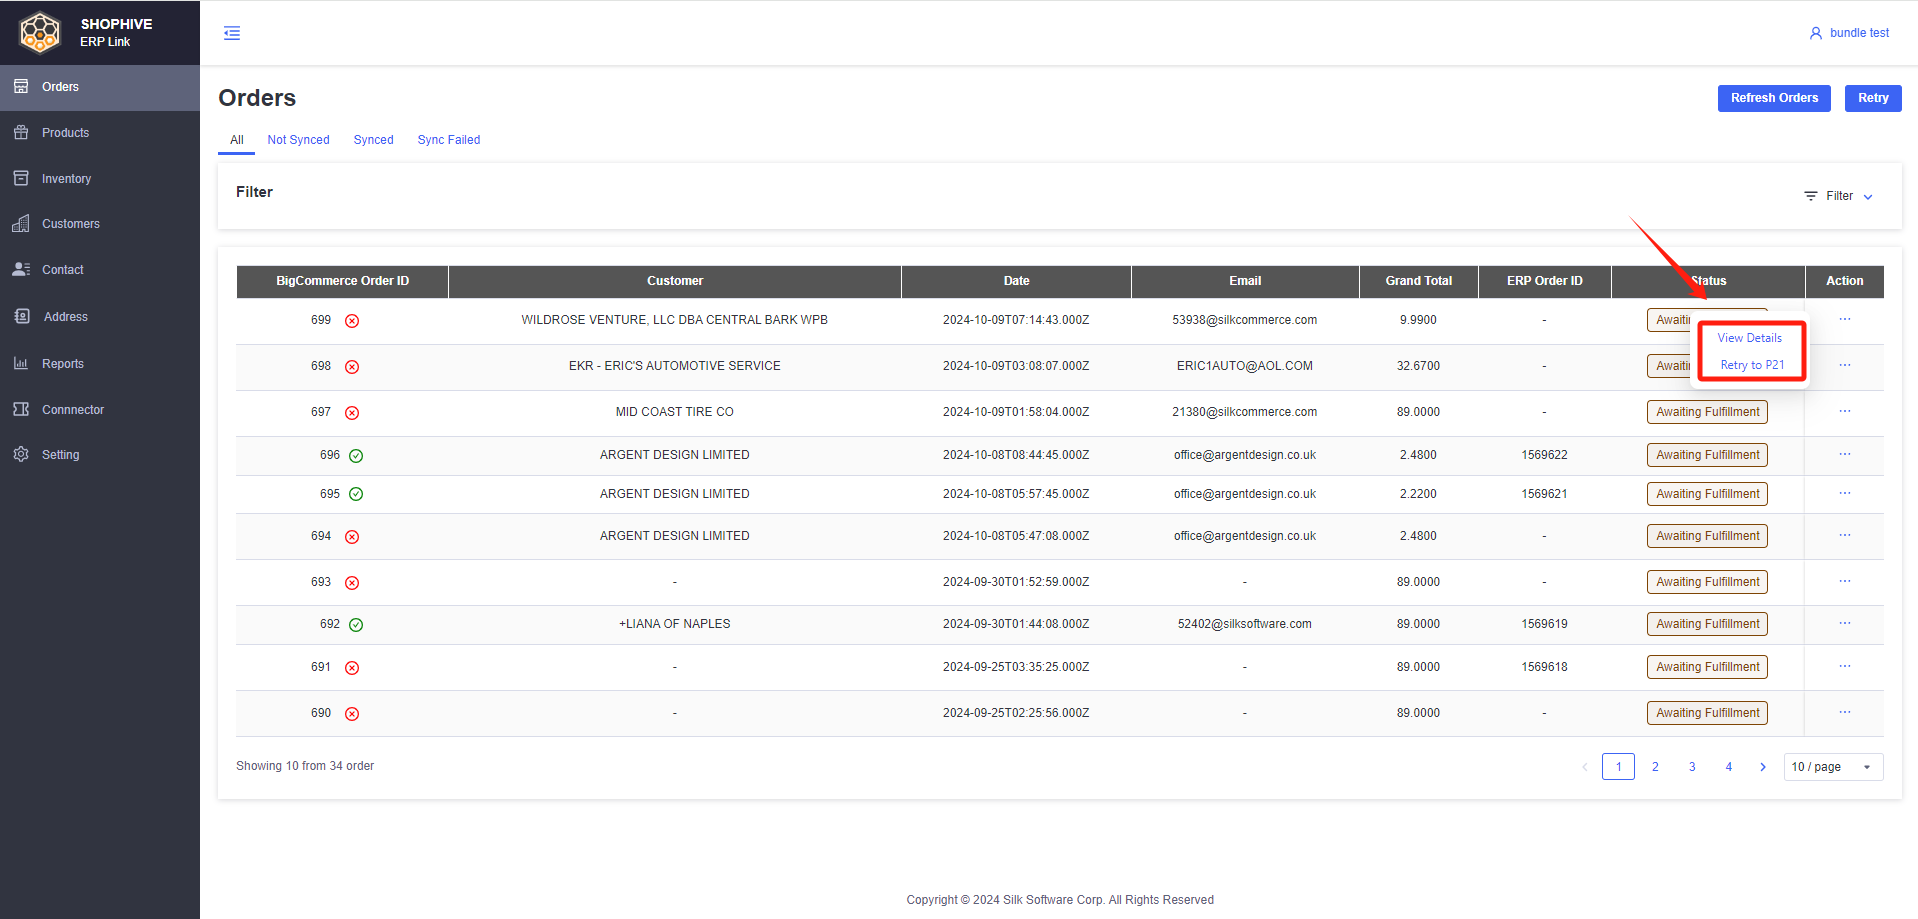
Order table —— Action
-
Actions that can be completed in the products tab:
- View Details: Display order details information
- Retry to Kinetic: Re-push failed orders to Kinetic
-
Products
Filter Products based on condition
- Tabs - Product Status
- All / Not Synced / Synced / Sync Failed
- The product status includes "All", "Not Sync", "Synced", and "Synced Failed". Based on the product status, display the corresponding product.
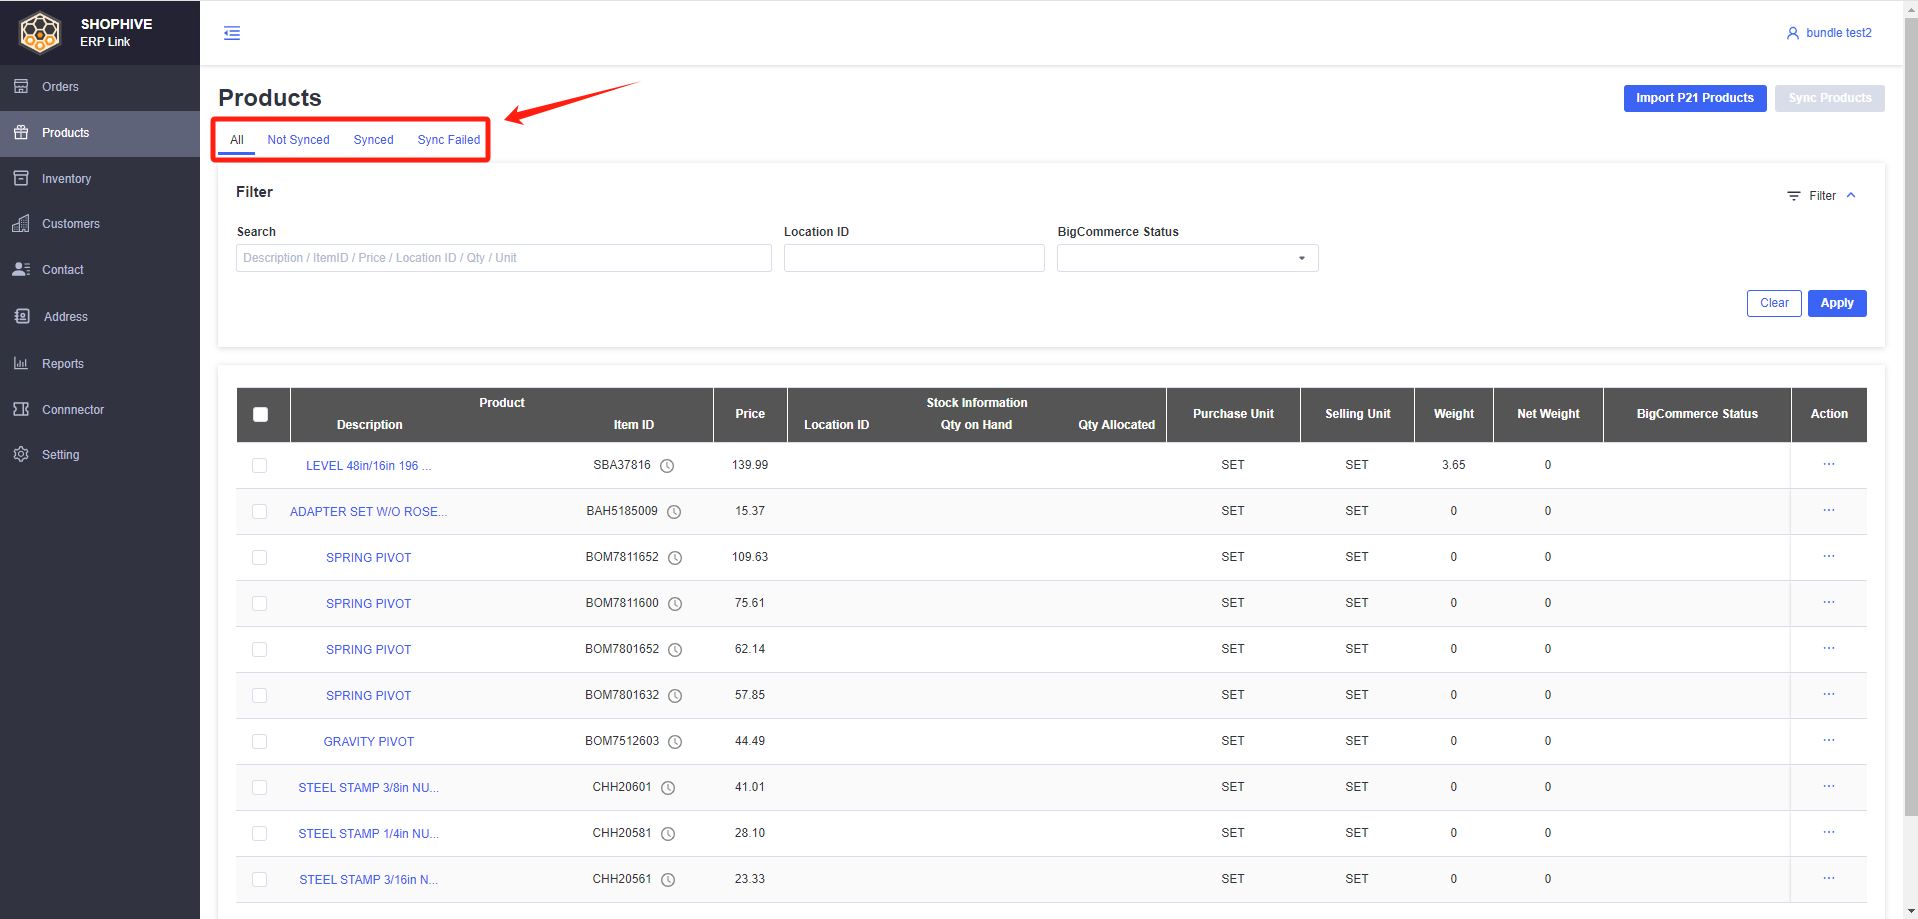
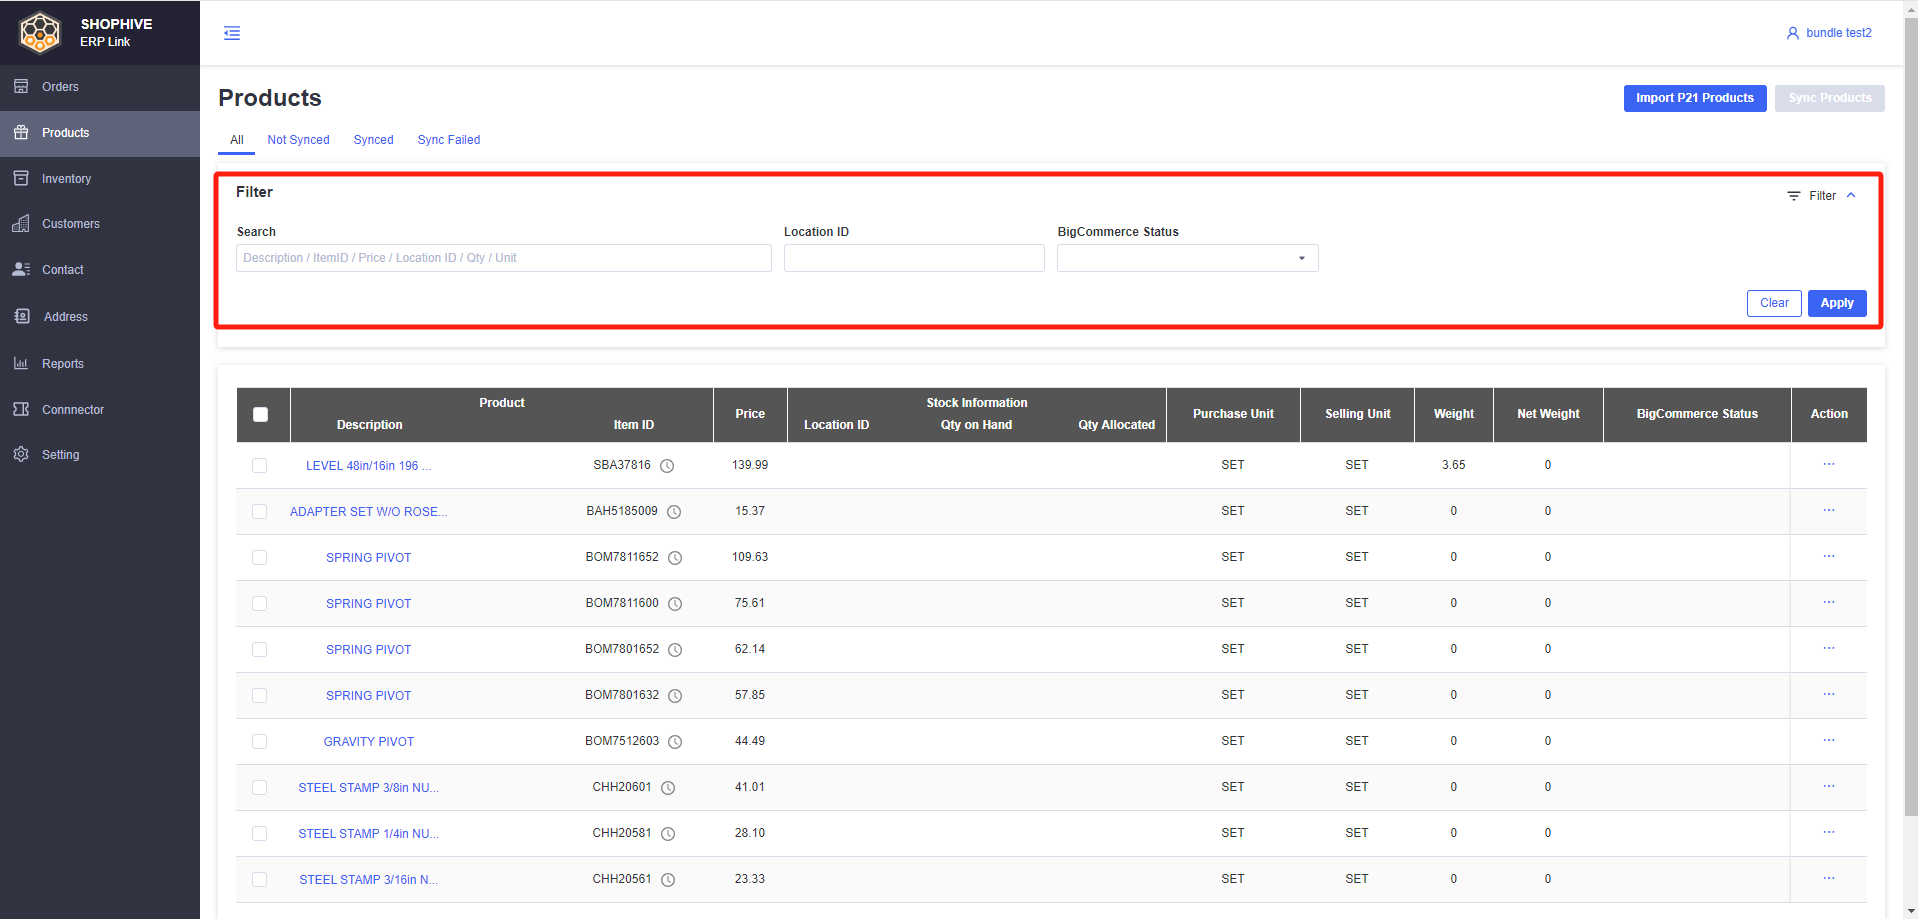
- Allow users to filter products based on the following criteria:
- Search - Description/ ItemID/ Price/ Location ID/ Qty/ Unit
- BigCommerce Status
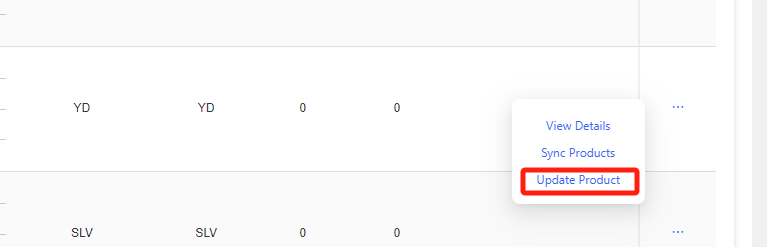
Product List—Action
- Click the '...', you can see this action tab:
- View Details
- Sync Products
- Update Product
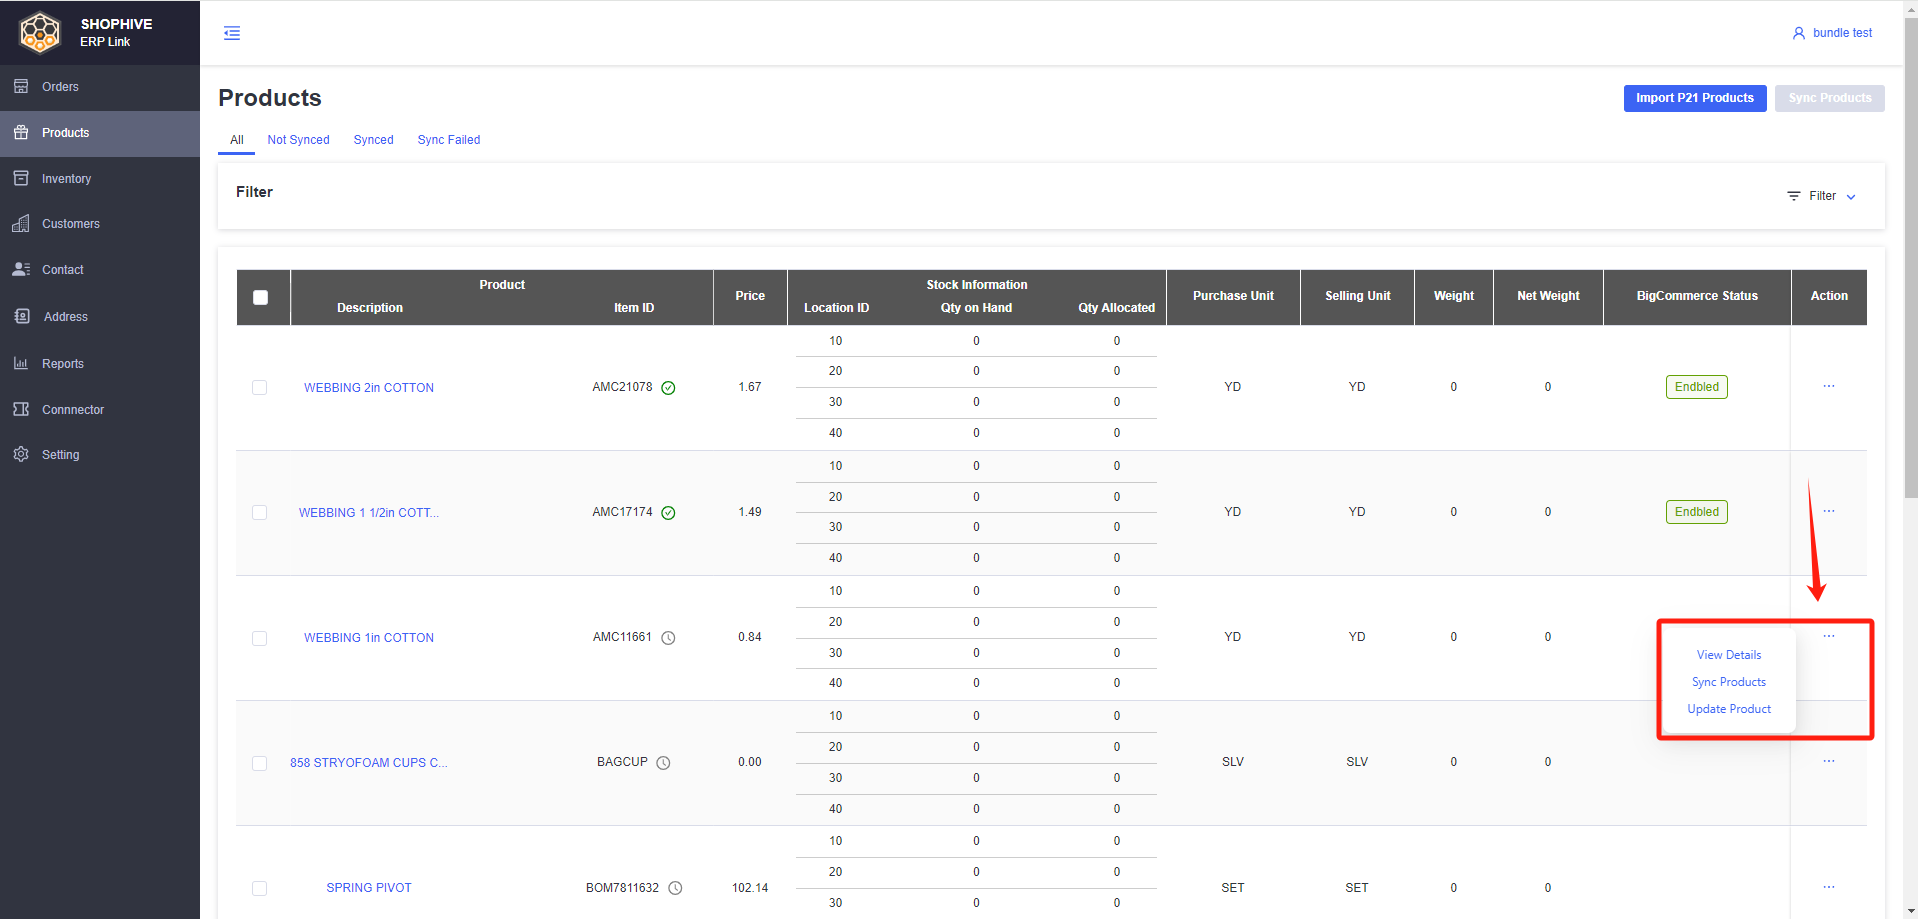
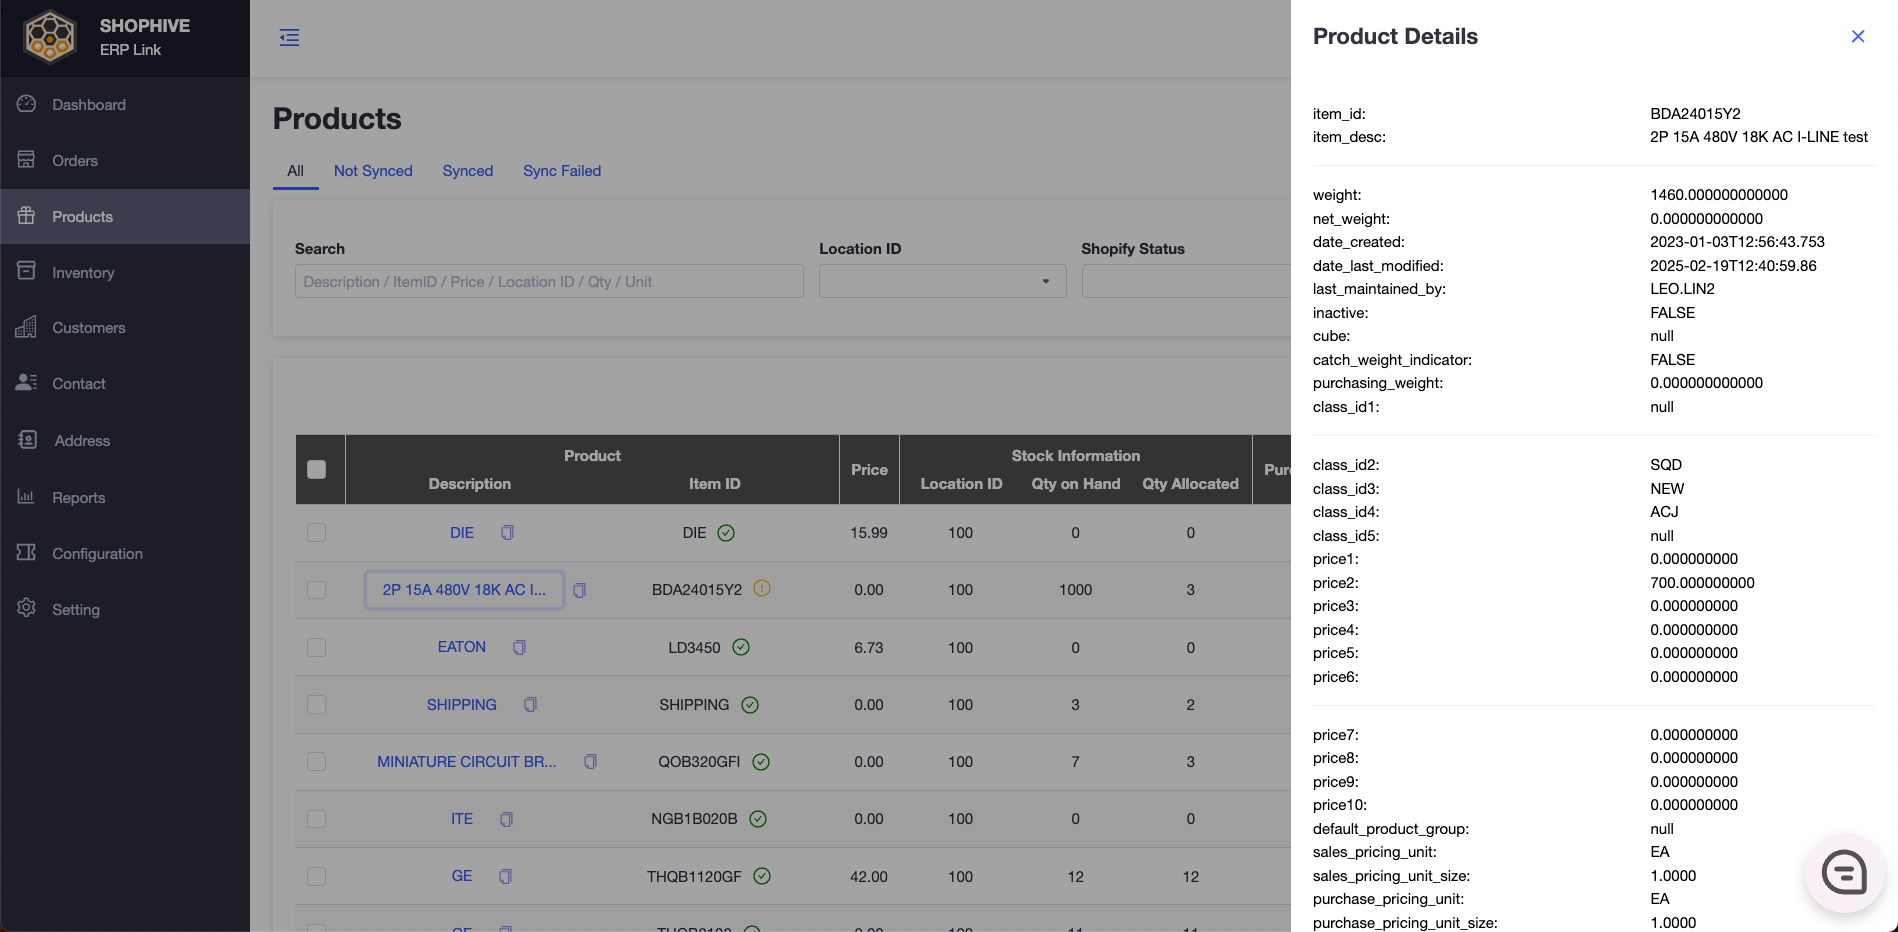
- View Details
- When you want to view detailed information about one product, simply click the '...' on the corresponding product tab and choose the "View Details" link , and the detailed information for that product will pop up on the right side.
- Sync Products
- When you want to synchronize a product to a specific ecommerce platform, click the '...' on the corresponding product tab and choose the "Sync Products" link to synchronize one product at a time.
- When the "sync product" link is clicked, a pop-up window will appear.
- Please confirm the target store for synchronization in the pop-up window.
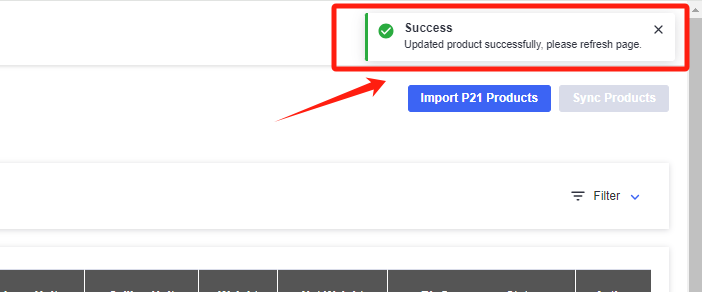
- Update Product
- Clicking on the "Update Product" link , a prompt message will appear and this product will be pulled from Kinetic again, updating the current product information.
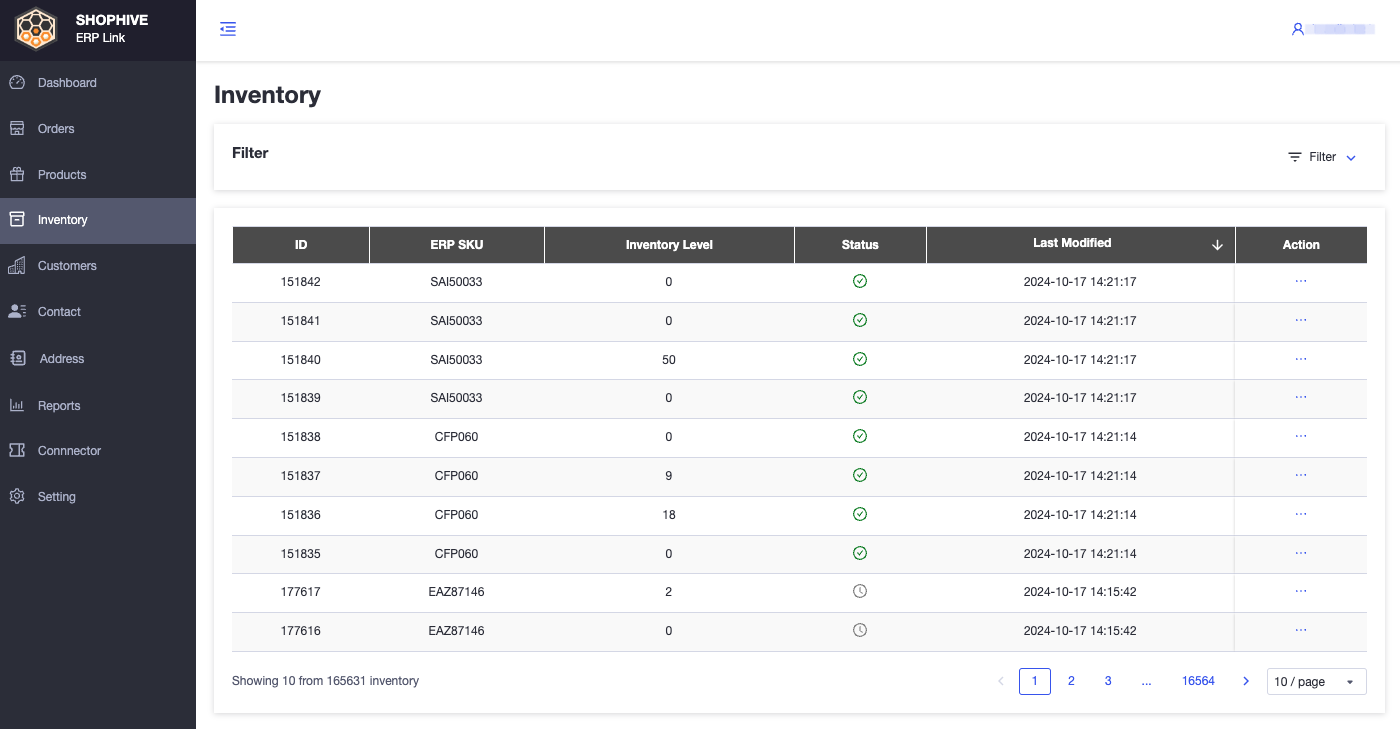
Inventory
ShopHyve automatically syncs inventory levels from your ERP system (Epicor Kinetic) to your BigCommerce Store
Inventory Sync Behavior
-
Inventory levels sync from Kinetic to BigCommerce automatically.
-
Sync frequency can be:
- Real-time (instant updates)
- Or configurable intervals (ex: every 5 minutes, hourly, etc.)
-
Only inventory quantity is updated during sync.

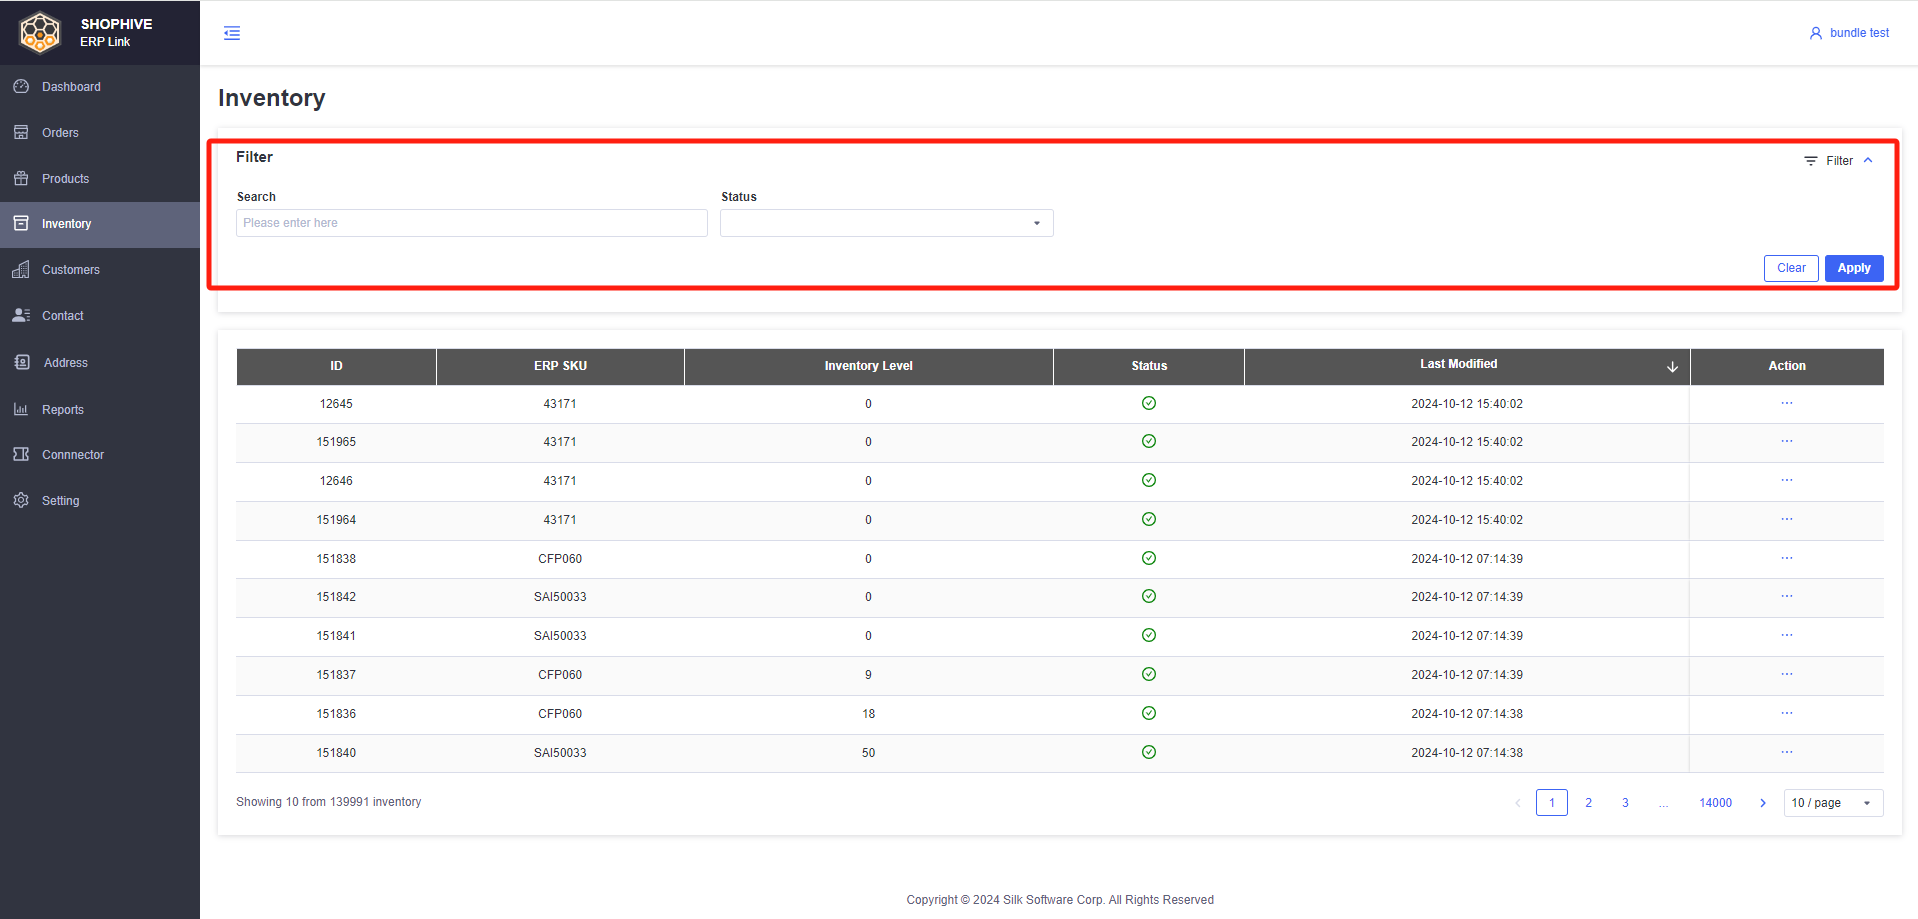
Filters
- Allow users to filter inventory based on the following criteria:
- Search - Search by Inventory Record ID.
- Status - Filter by sync status: Synced, Pending, Failed.
Inventory List
-
Inventory Table:
- ID: Unique identifier for the inventory record.
- ERP SKU: Product Item ID from your ERP (Kinetic).
- Inventory Level: Current stock quantity in ERP.
- Status: Sync status: Synced / Pending / Failed.
- Error Message: Error details if the sync failed.
- Last Modified Date: Date & time when the inventory was last updated.
- Action - Options for retrying sync.
-
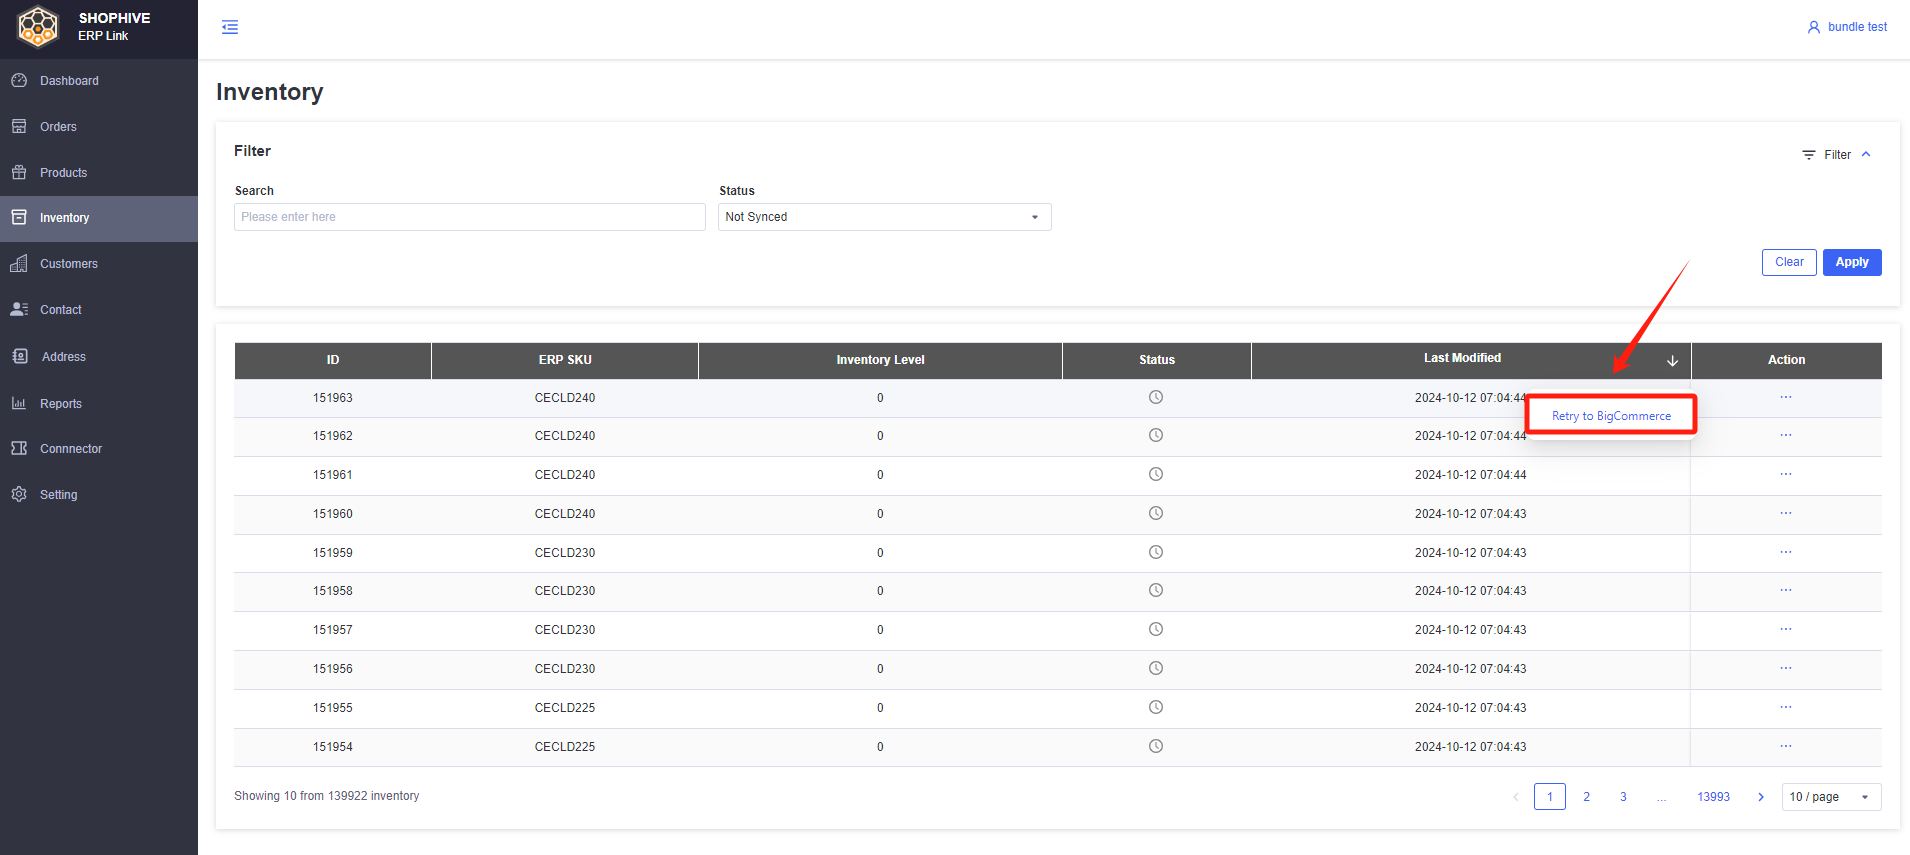
Actions - Retry to BigCommerce:
- Users are able to manually retry syncing specific inventory records.
- If a sync fails, users can retry only the failed tasks without affecting successfully synced records.
How to Retry Sync:
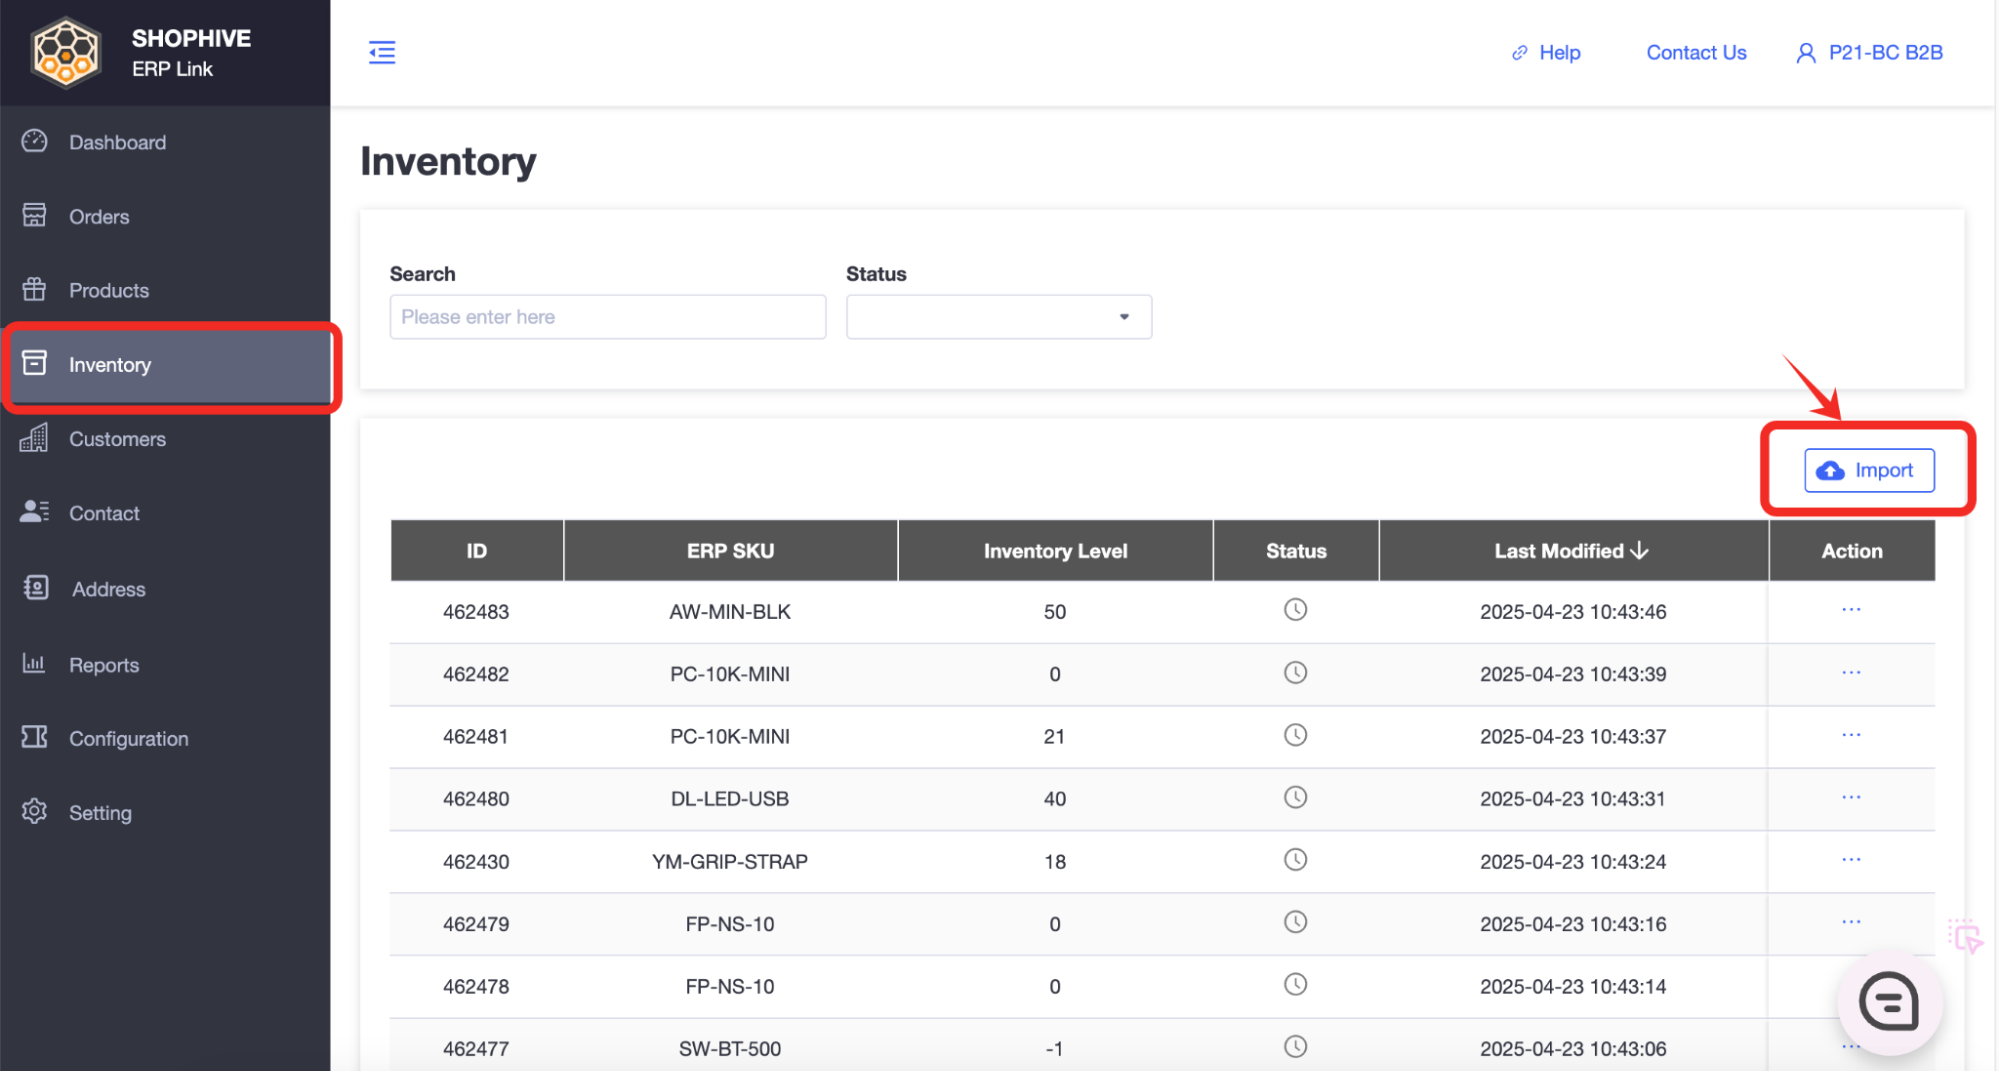
- Go to → Inventory page.
- Locate the failed record (Status = Failed).
- Click Retry to BigCommerce or Retry to BigCommerce in the Actions column.
- The system will attempt to resync the selected record.
Successful records will not be affected when retrying failed records.
Customers
Search / Filter
- Allow users to filter customers based on the following criteria:
- Search - Kinetic Customer ID
- Status - Synced / Not Synced
Company List
- The information contained in the Kinetic Customer(Company) Table
- Kinetic Customer ID
- BigCommerce Company ID
- BigCommerce Company Name
- Status
- Tooltip - Show the reason for the error.
- Last Modified
- Action - Retry to BigCommerce - Update Customer

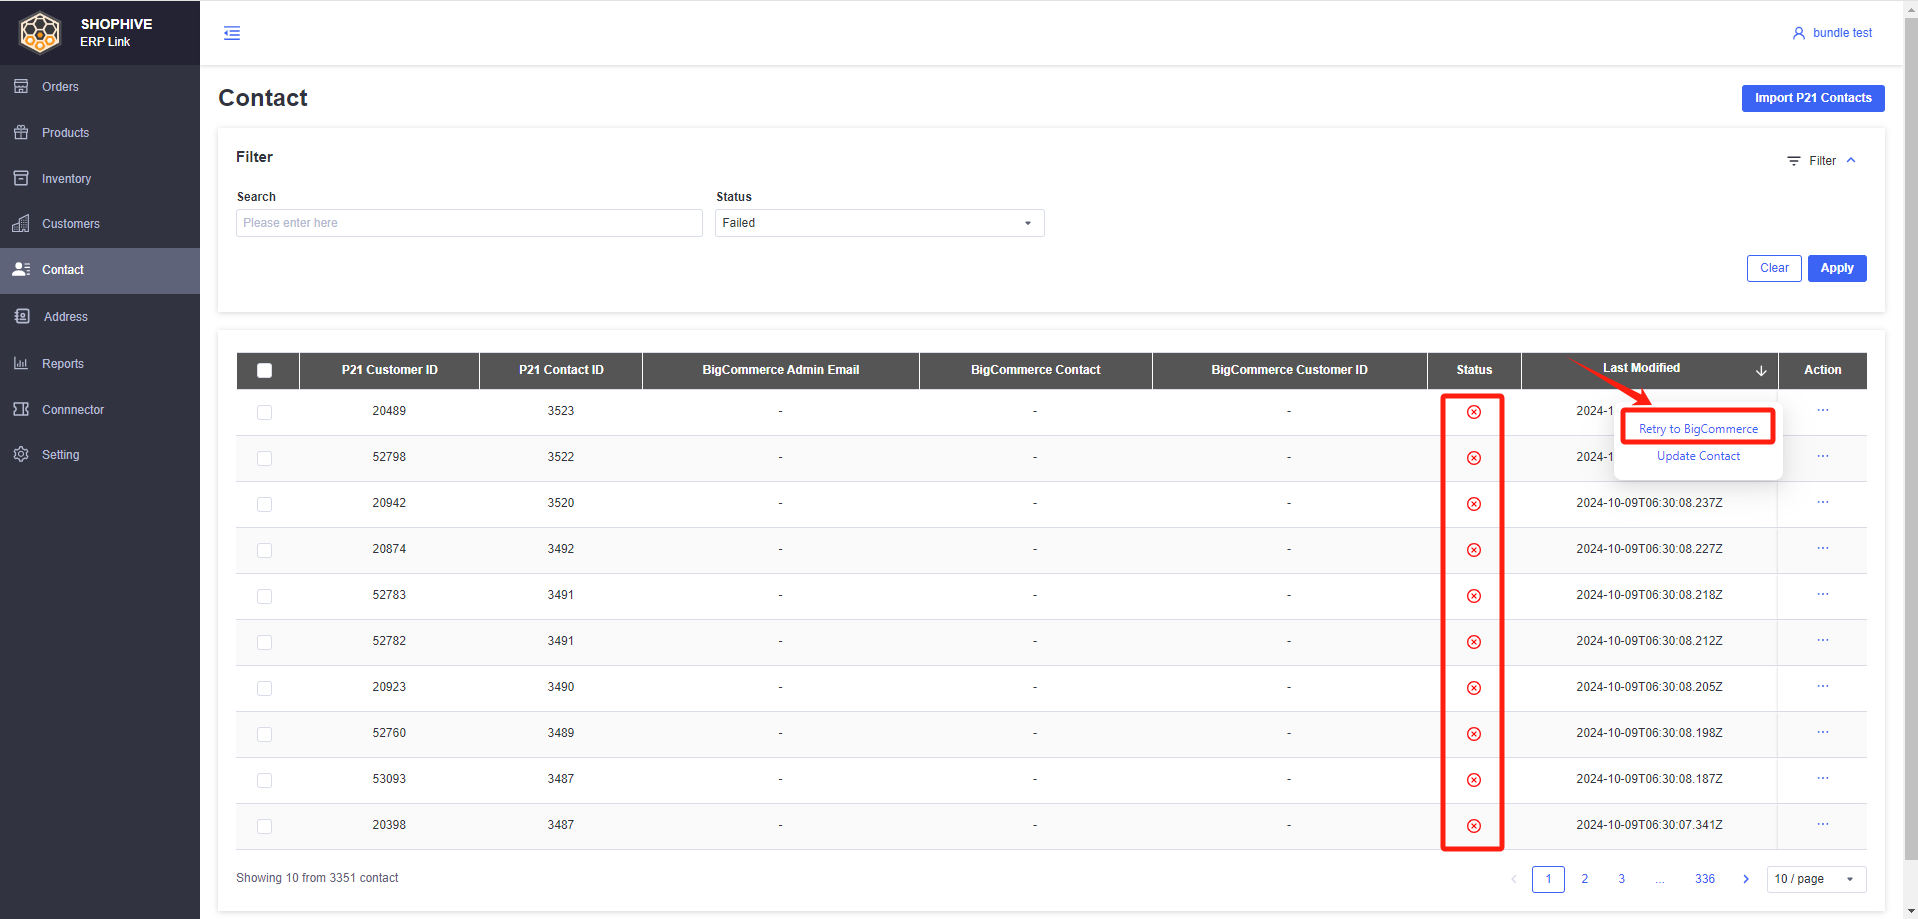
Contact
The Contact module in ShopHyve allows you to manage contact records from your ERP system (Epicor Kinetic) and sync them to your BigCommerce store.
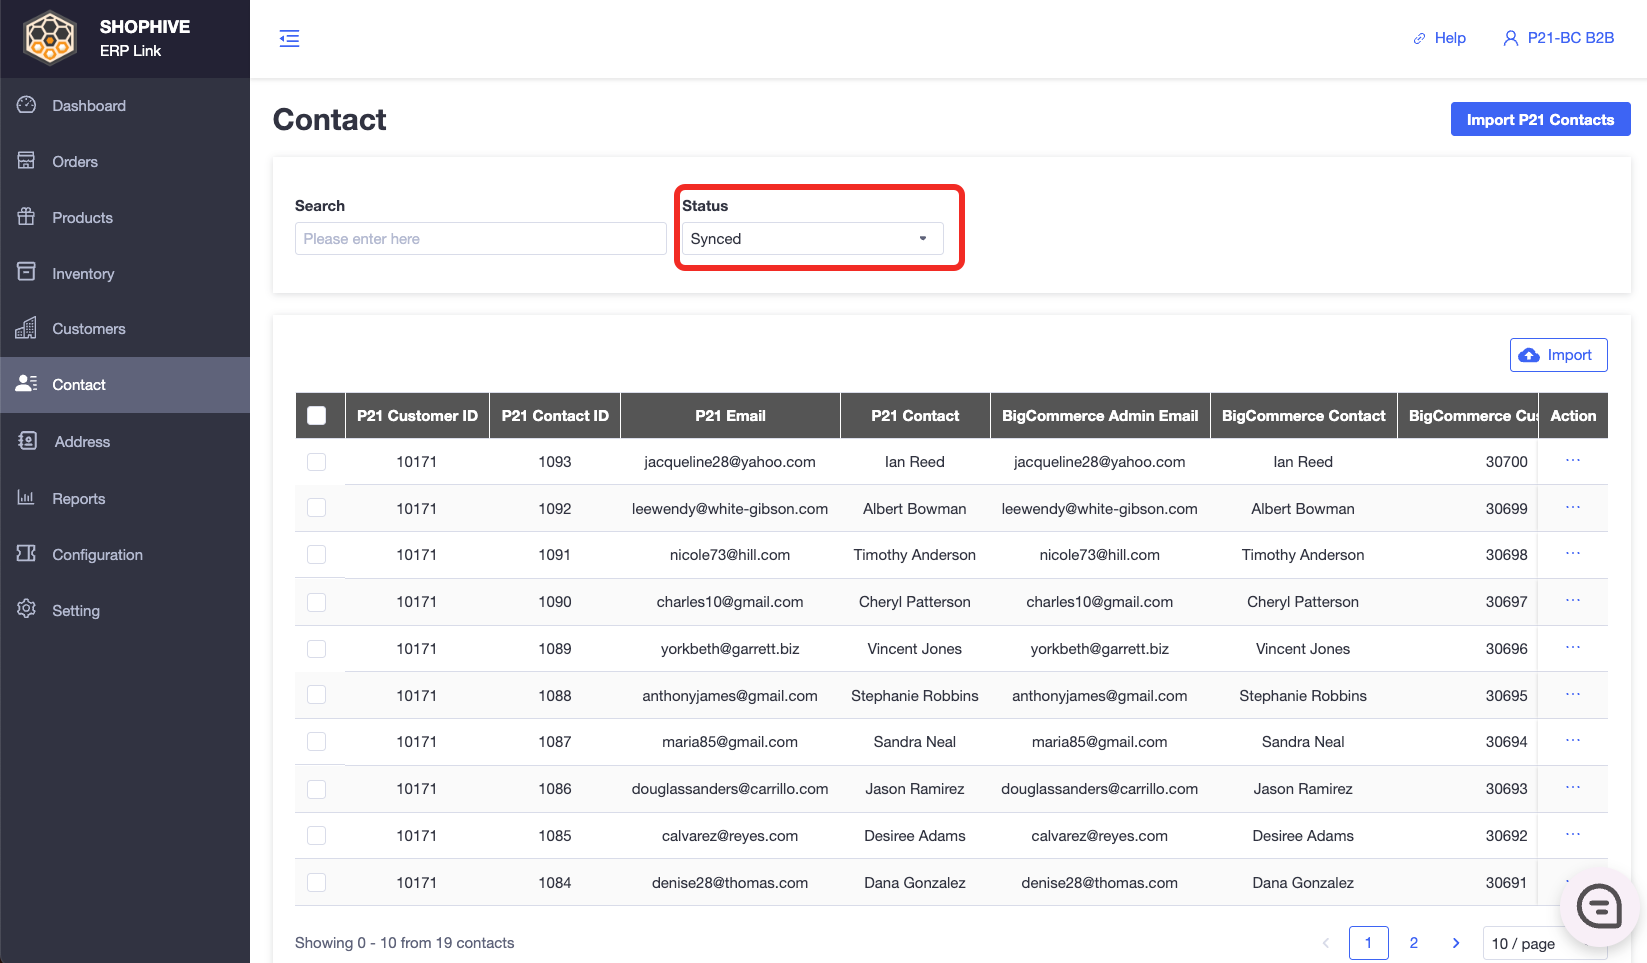
Search / Filter
- Allow users to filter contacts based on the following criteria:
- Search - Search contacts using Kinetic Customer ID or Contact ID
- Status - Filter by Sync Status: Synced / Not Synced
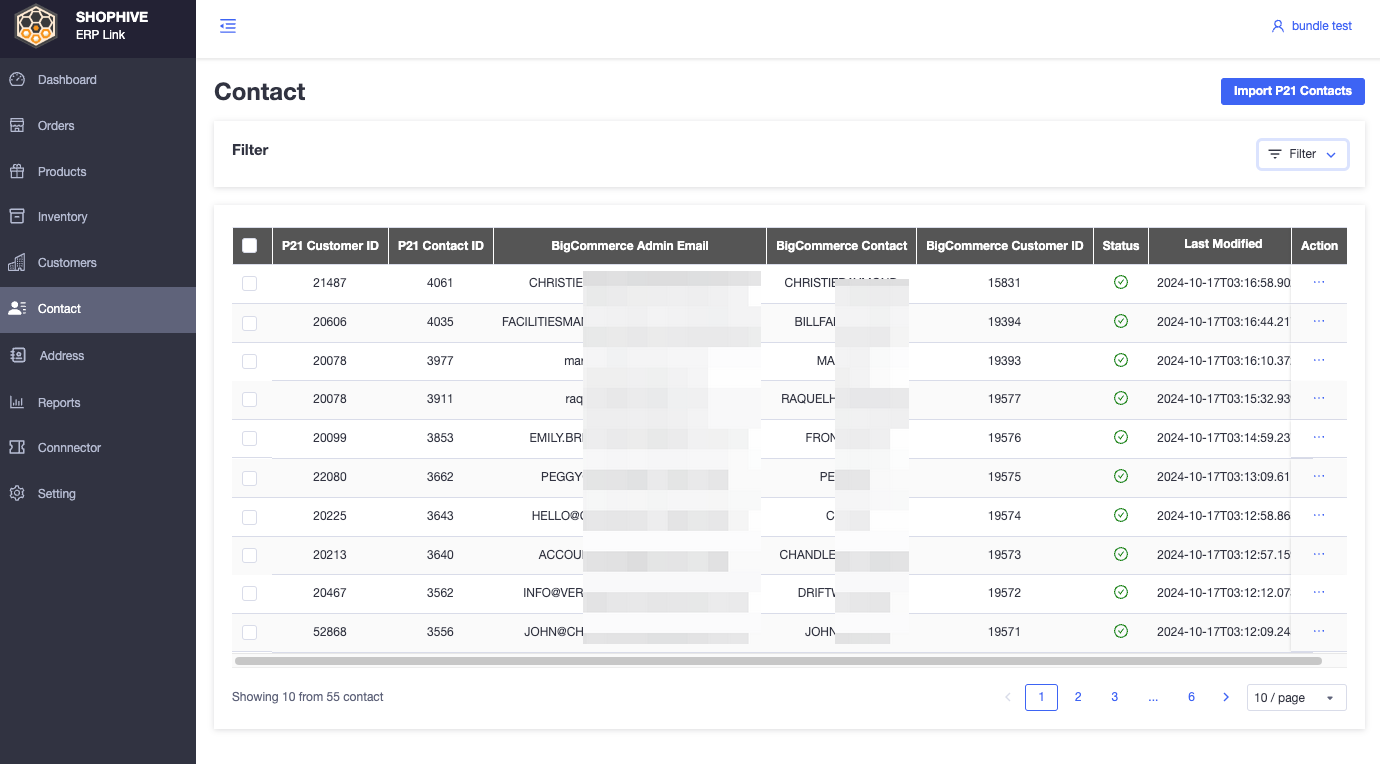
Contact List
- The information contained in the Kinetic Contact Table
- Kinetic Customer ID: Customer ID from Kinetic that the contact belongs to.
- Kinetic Contact ID: Unique Contact ID from Kinetic.
- BigCommerce Admin Email: Email address assigned to the company admin user in BigCommerce.
- BigCommerce Contact: Contact Name synced to BigCommerce.
- BigCommerce Customer ID: The corresponding BigCommerce Customer ID.
- Status: Shows whether the contact is Synced or Not Synced.
- Last Modified:The last time the contact record was updated.
- Tooltip: Hover to view detailed error messages if sync failed.
- Action: Available action: Retry sync to BigCommerce.
Actions
Retry to BigCommerce
When a contact fails to sync or is in Not Synced status, users can manually retry syncing the contact to BigCommerce.
how to Retry Sync:
- Go to → Contact page.
- Locate the failed record.
- Click Retry to BigCommerce in the Action column
- Once the contact is successfully synced, the action button will be disabled (Retry cannot be clicked again).
- The synced contact will automatically appear in the corresponding BigCommerce Company (Customer) record.
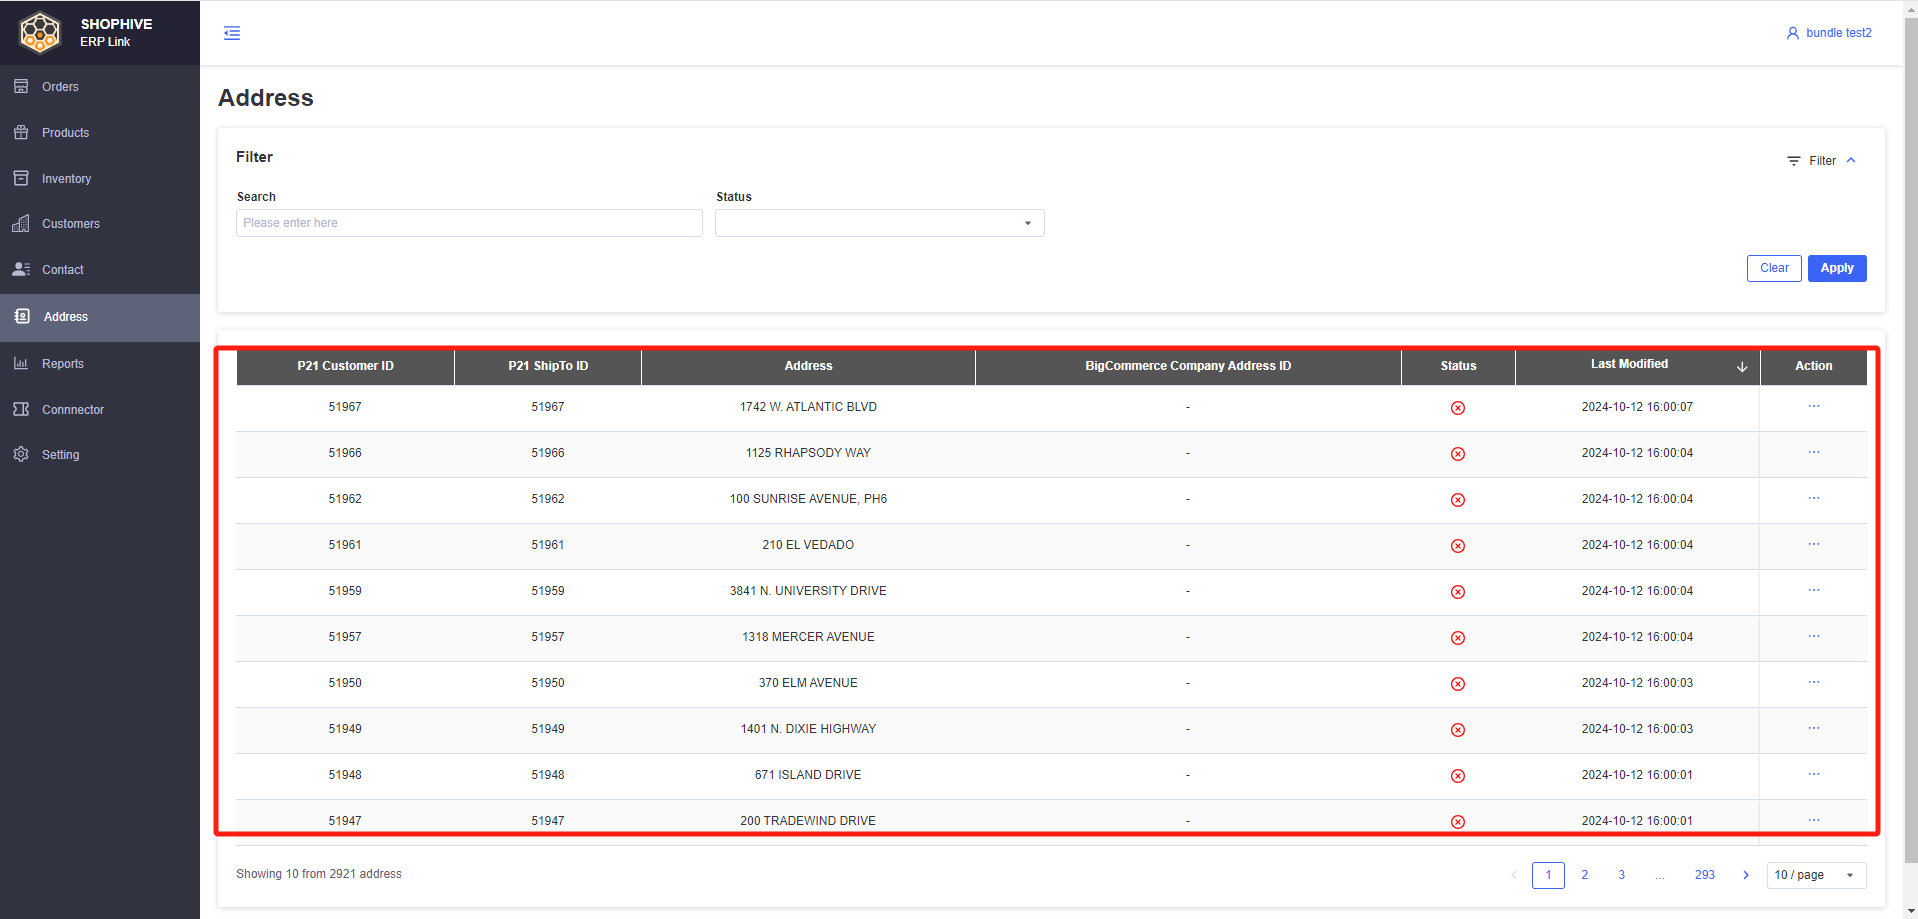
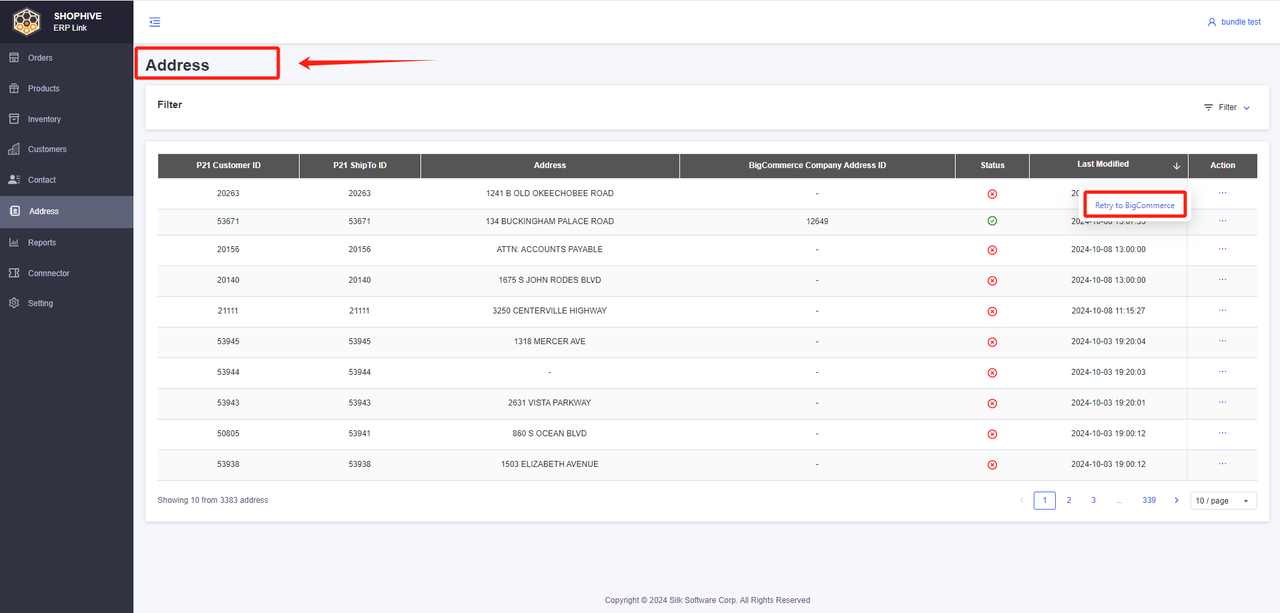
Address
Search / Filter
- Allow users to filter Kinetic ShipToAddress based on the following criteria:
- Search - Kinetic Customer ID / Kinetic ShipToID / Address
- Status - Synced / Not Synced
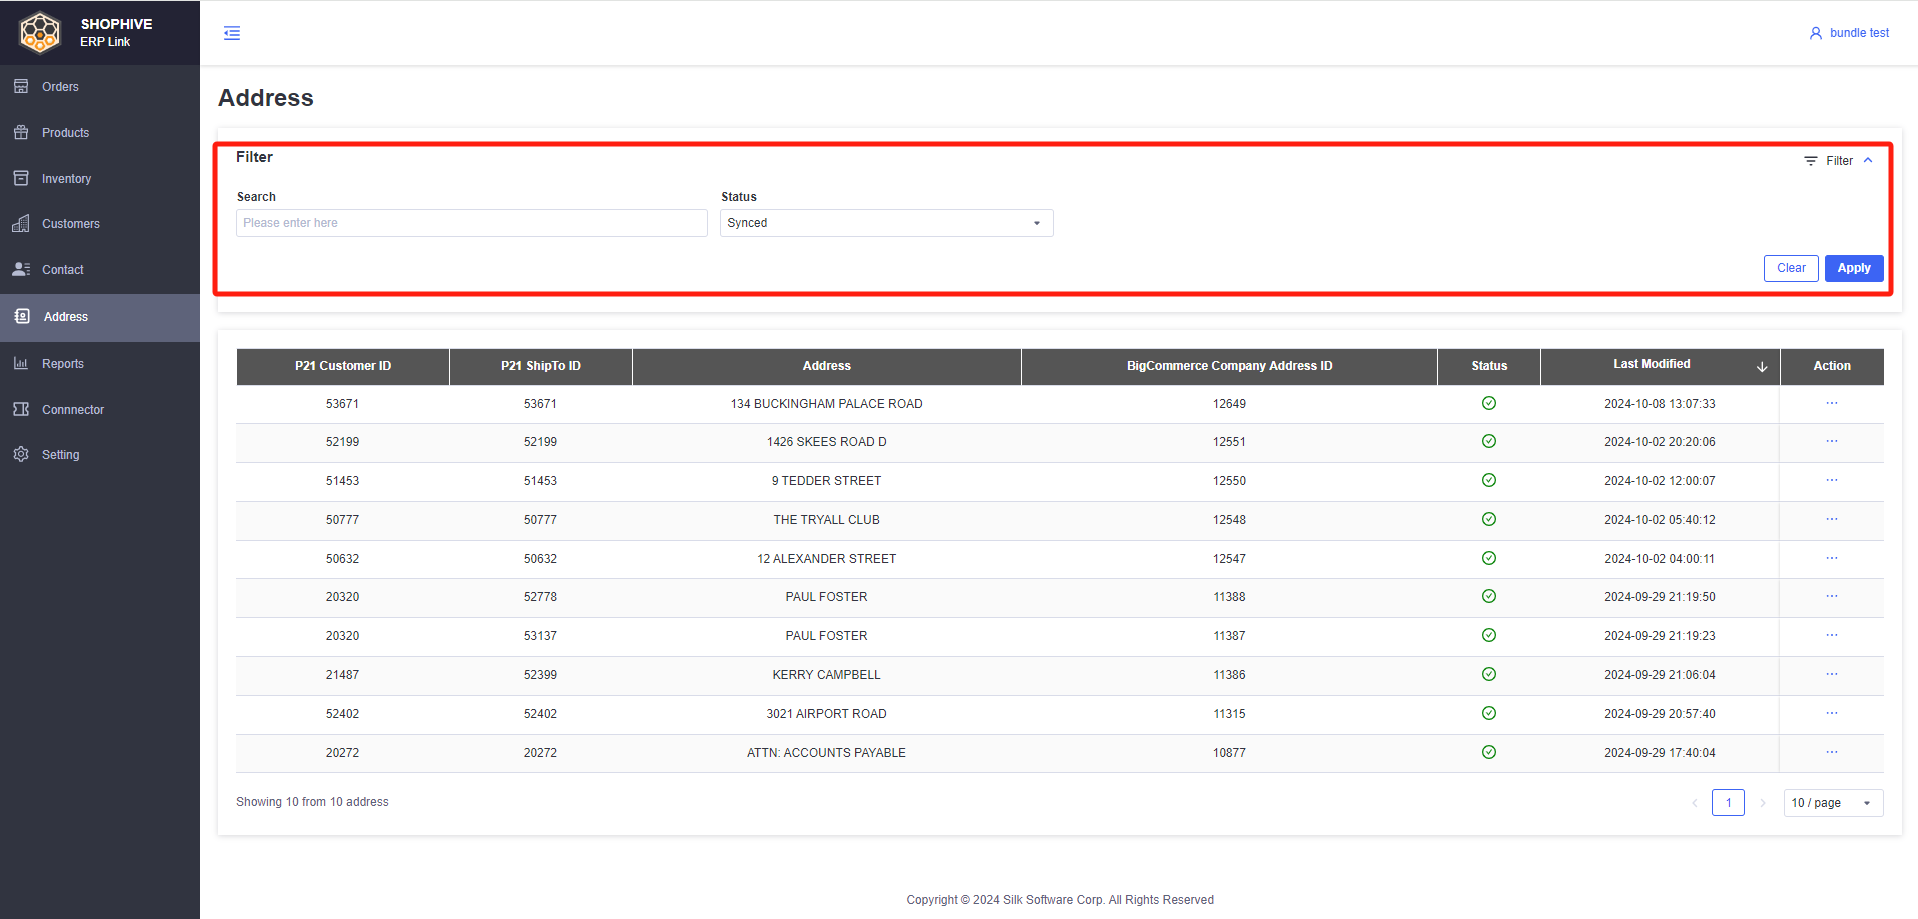
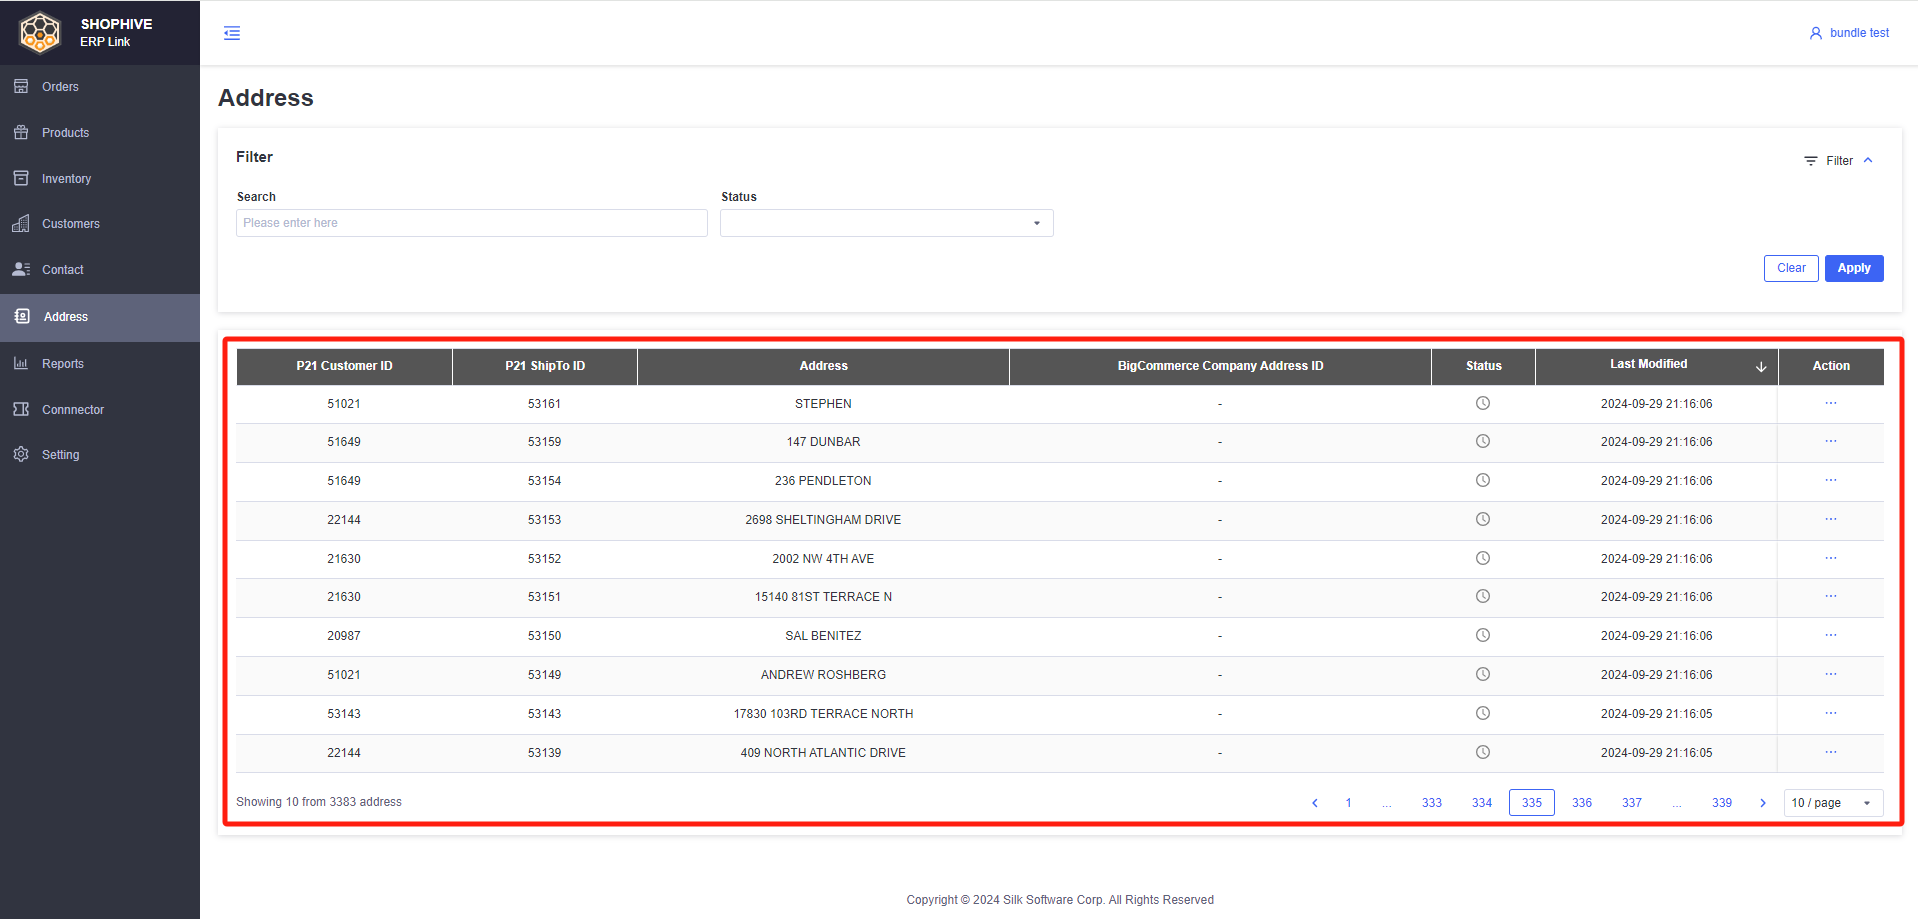
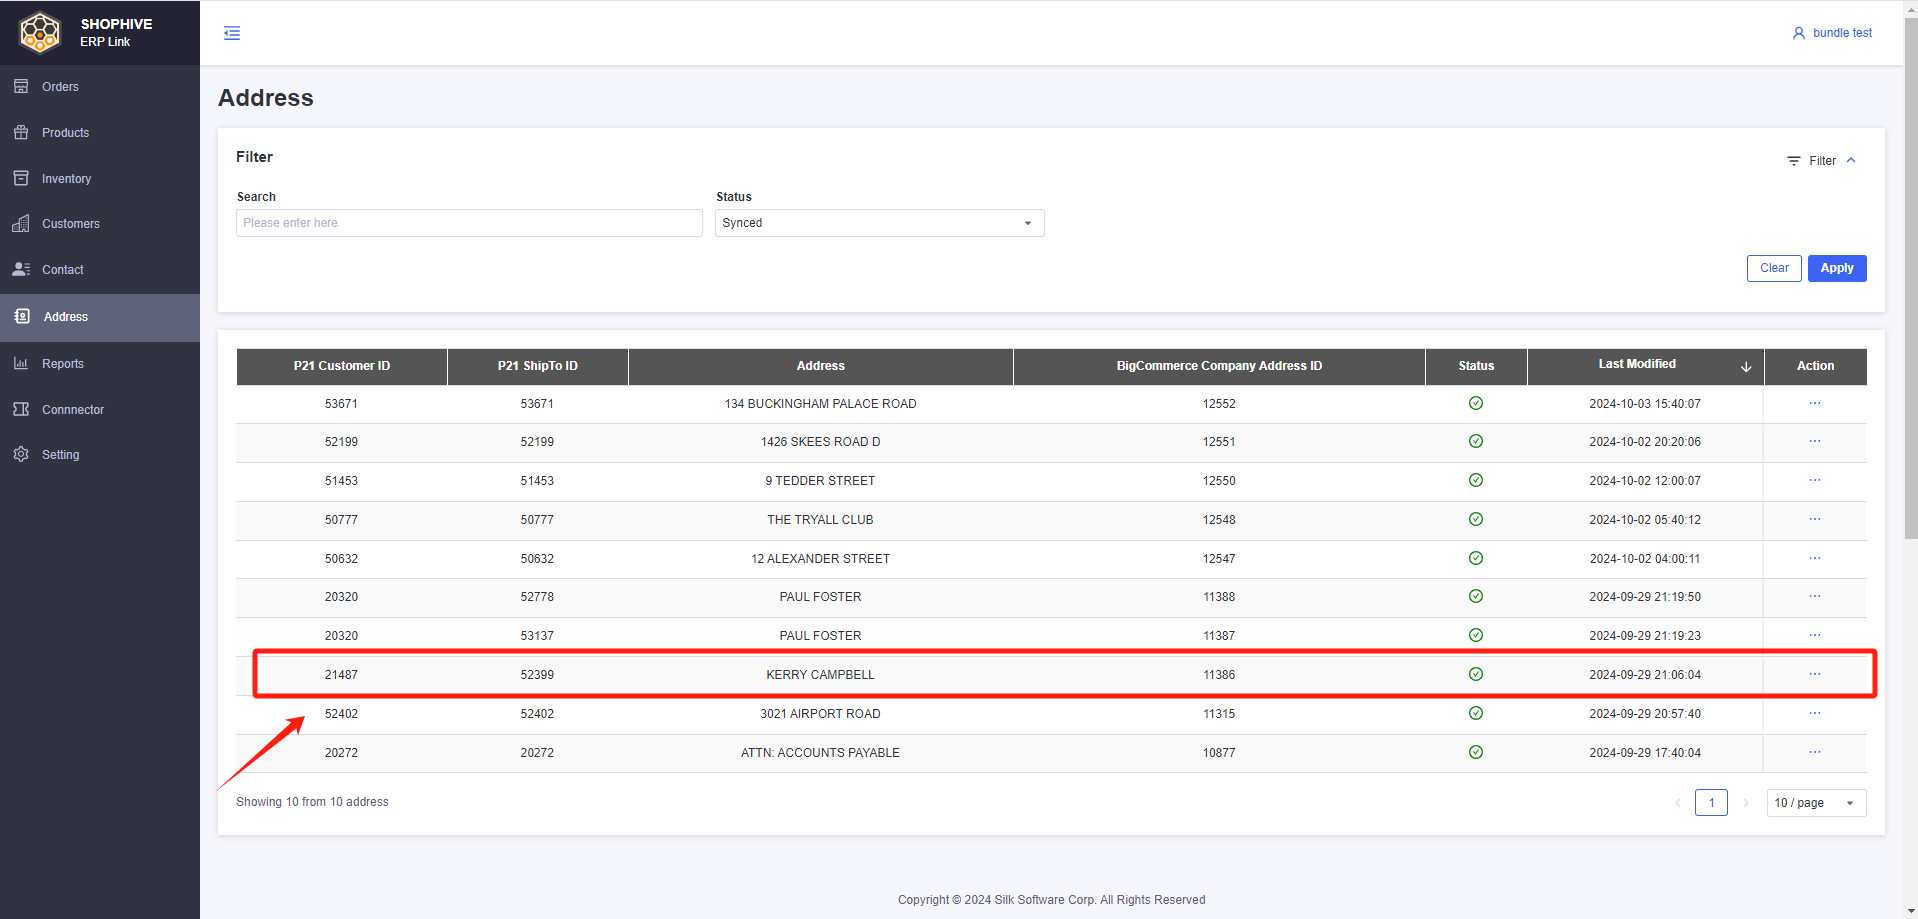
ShipToAddress List
- The information contained in the Kinetic ShipToAddress Table
- Kinetic Customer ID
- Kinetic ShipToID
- Address
- BigCommerce Address ID
- Status
- Tooltip - Show the reason for the error.
- Last Modified
- Action - Retry to bigcommerce
Reports
The Invoice Lookup Page is designed to help users quickly find and manage invoices with ease.
invoice
Search / Filter
- Allow users to filter invoices based on the following criteria:
- Search - ERP Order ID / Order ID / Customer / Store Name / Email
- Order Date
- Order Status

Details
Export
- Select invoice you would like to export
- Click "Export" button
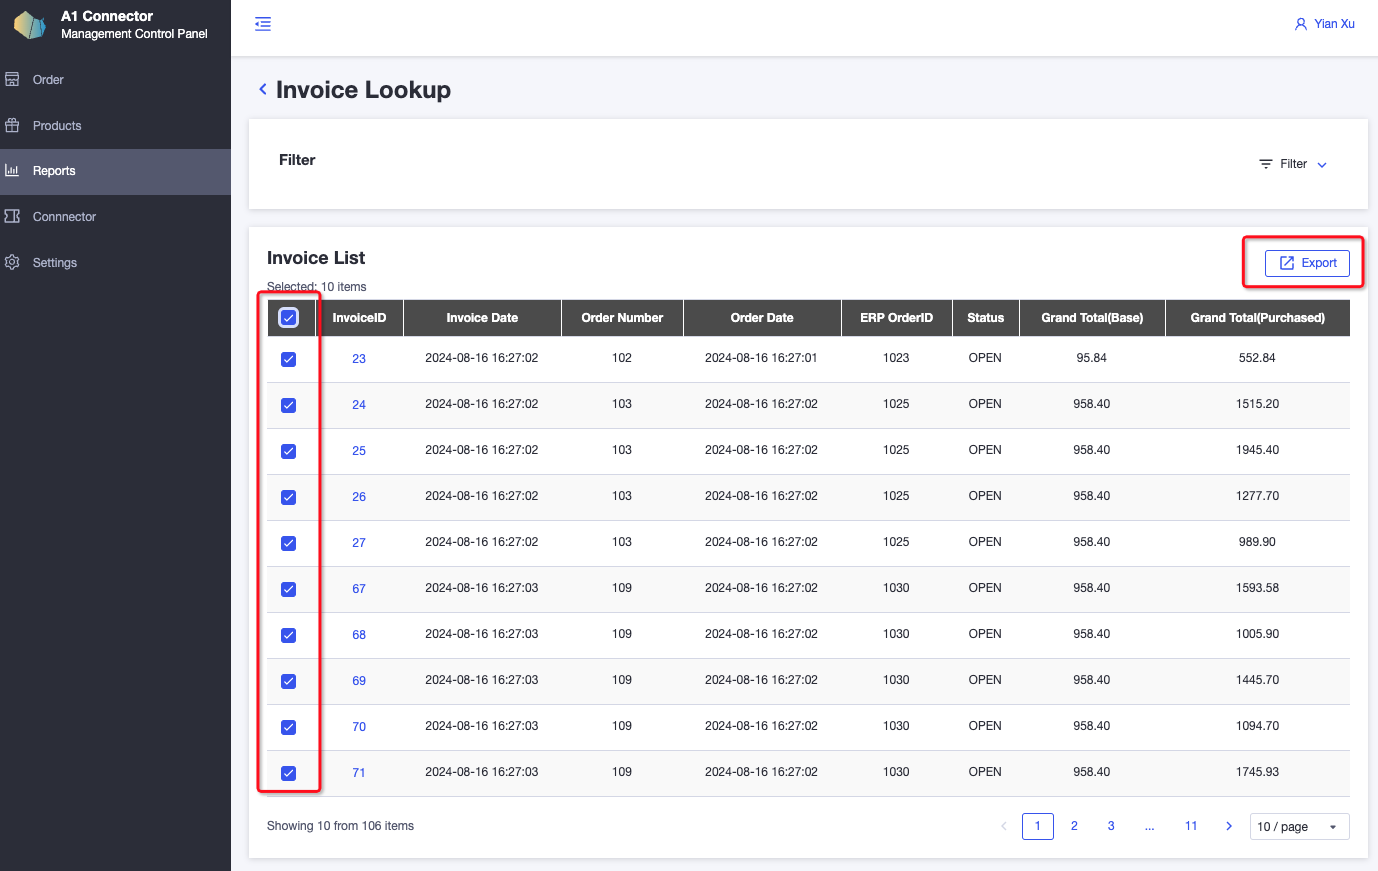
- Confirm with information shown up on the popup

The selected invoice will be downloaded as a CSV file.
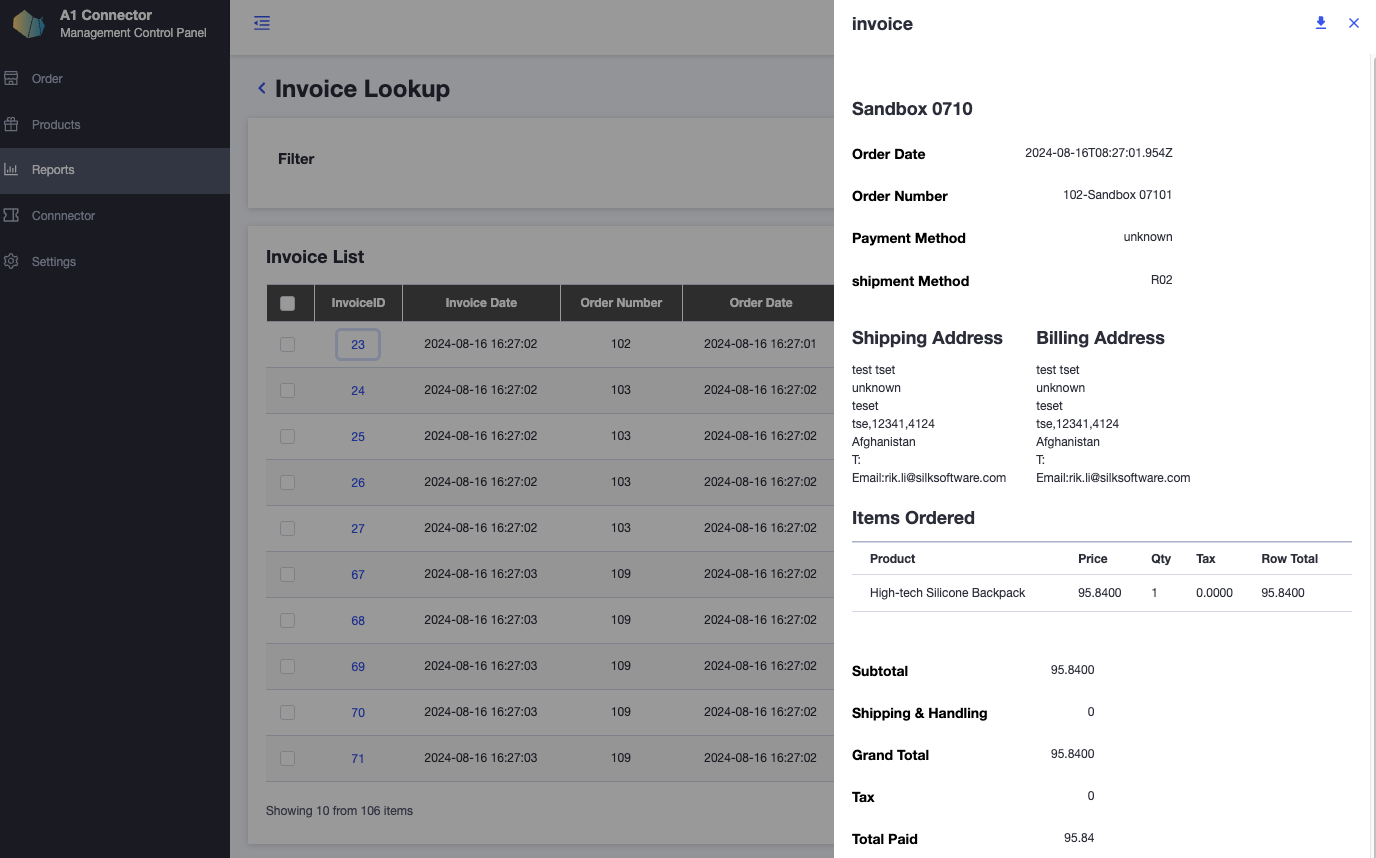
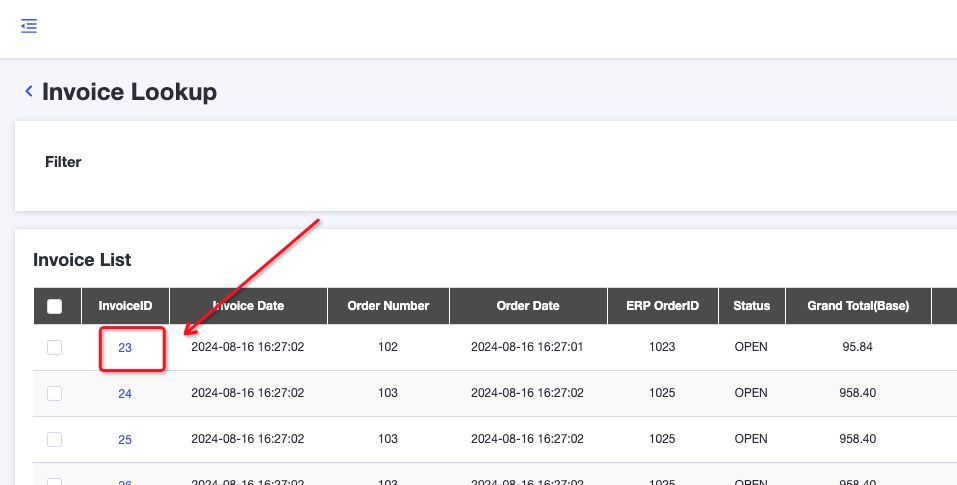
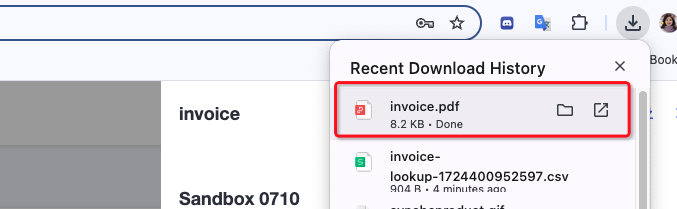
Download
- Click on the InvoiceID in the list.
- Then click on the Arrow icon on the popup window.
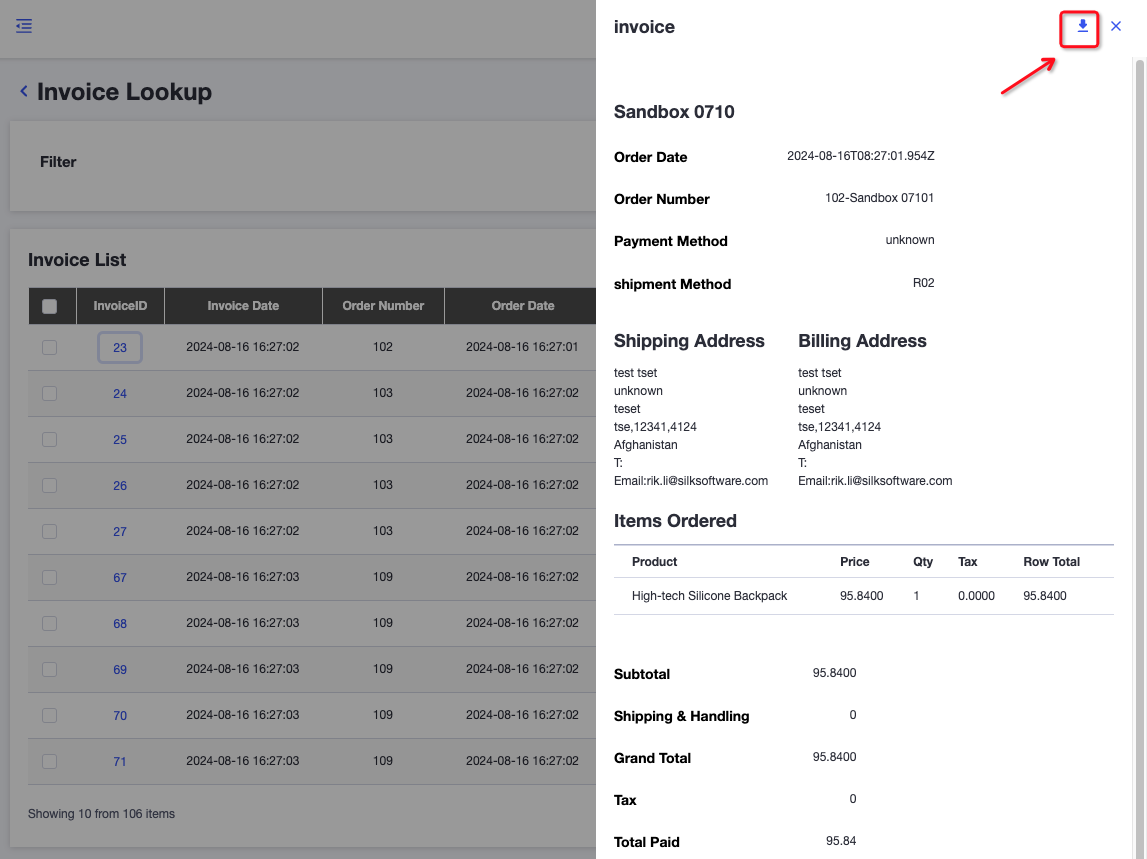
The invoice will be downloaded as a PDF file on your computer.
Connector
Setting
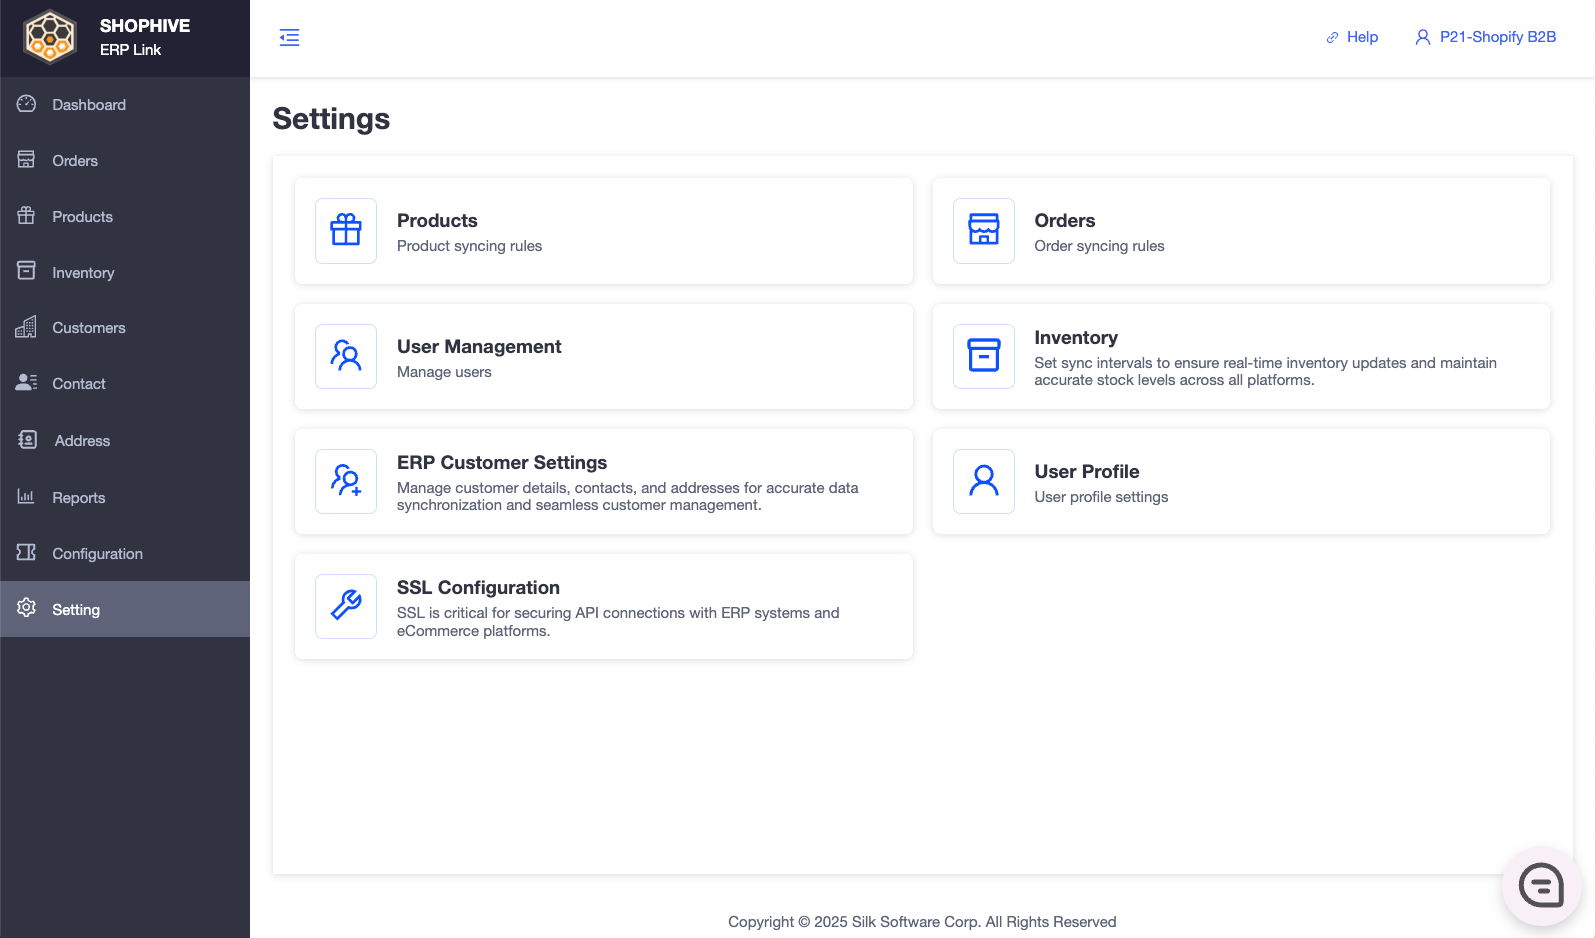
Product Settings
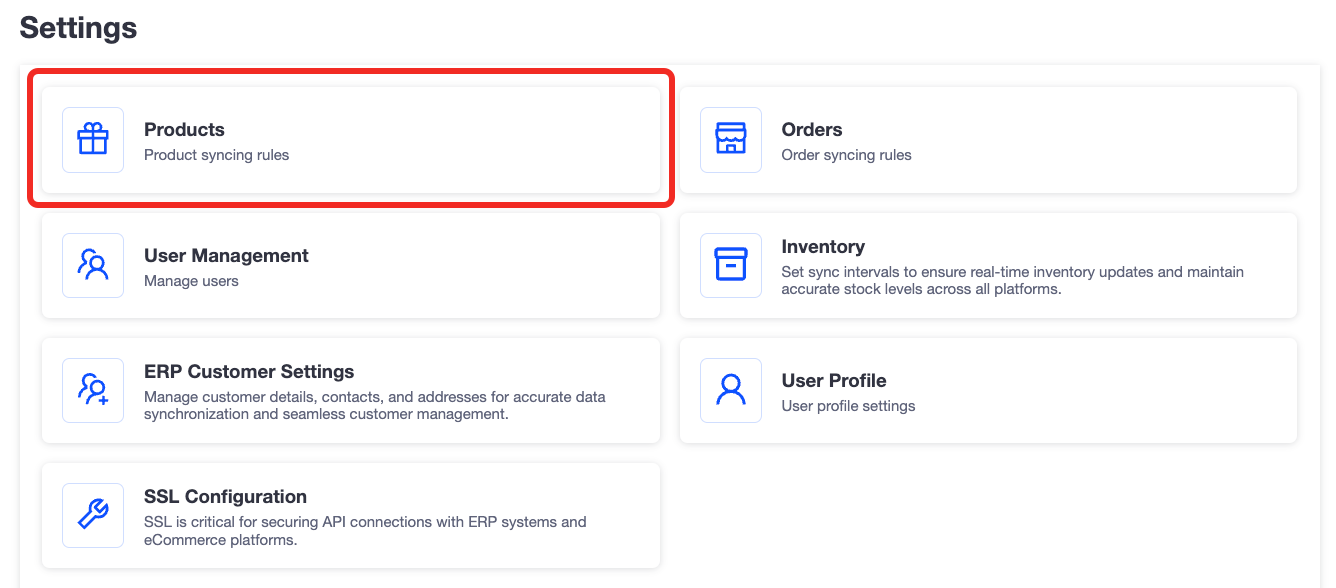
-
Product Sync Rules
The Product Sync Rules section in ShopHyve ERP Link gives you precise control over how and when products are imported from Kinetic and synchronized with your e-commerce platform (BigCommerce, BigCommerce, etc.). You can set conditions based on Kinetic product field values to automate syncing, ensuring only relevant products are processed.
Product Auto-Importing Rules Settings
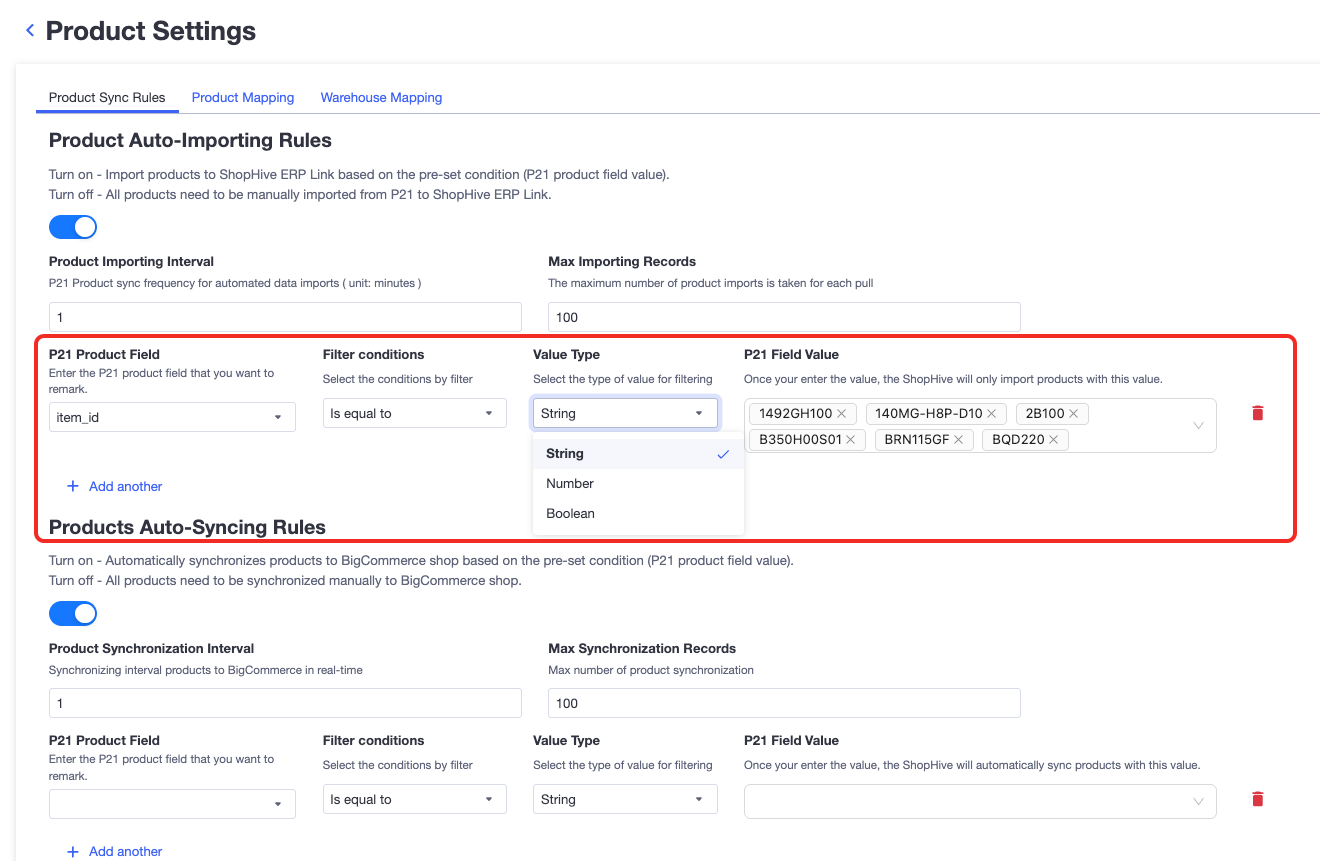
Turn ON
-
Products are automatically imported from Kinetic into ShopHyve ERP Link based on a pre-set condition.
-
This condition is defined by a specific Kinetic product field and its corresponding value.

-
Only products matching the criteria will be imported automatically.
Turn OFF
- No products are imported automatically.
- You will need to manually import all products from Kinetic to ShopHyve ERP Link.
- Kinetic Product Field:
- Enter the name of the product field from your Kinetic system.
- ⚠️ Must be filled in and verified by the user.
- If the field does not exist, an error message will be shown.
- Kinetic Field Value:
- Enter the specific value to filter which products should be imported.
- ⚠️ Must be valid and verified.
- If the value is invalid or not found, an error message will appear.
Product Auto-Sync Rules Settings
Turn ON
- Products are automatically synchronized to your e-commerce store (BigCommerce, BigCommerce) based on a pre-set condition.
- The system will evaluate the Kinetic product field and only sync products that match the defined field value.

- Products that do not meet the sync condition will not sync automatically.
- These products will be listed in the ‘Not Synchronized’ tab for manual action.
Turn OFF
- No automatic product syncing will occur.
- You must manually synchronize all products to your e-commerce platform.
- Kinetic Product Field:
- Enter the product field name from your Kinetic system.
- ⚠️ Field must be valid and will be verified.
- If not found, an error will be shown.
- Kinetic Field Value:
- Enter the target value to sync products based on this filter.
- ⚠️ Must be correctly entered and verified.
- Errors will appear if the value is invalid.
-
Product Mapping
The Product Mapping feature allows you to define how product data from Kinetic maps to your BigCommerce store. By setting up these mappings, you ensure accurate and consistent product information across systems, which is essential for effective synchronization and inventory management.
How It Works
- Product data is retrieved from Kinetic using the Kinetic Product API.
- You can then map each relevant e-commerce product field to a corresponding Kinetic product field.
- This ensures the correct transfer and display of information such as product name, SKU, price, inventory, category, and more.
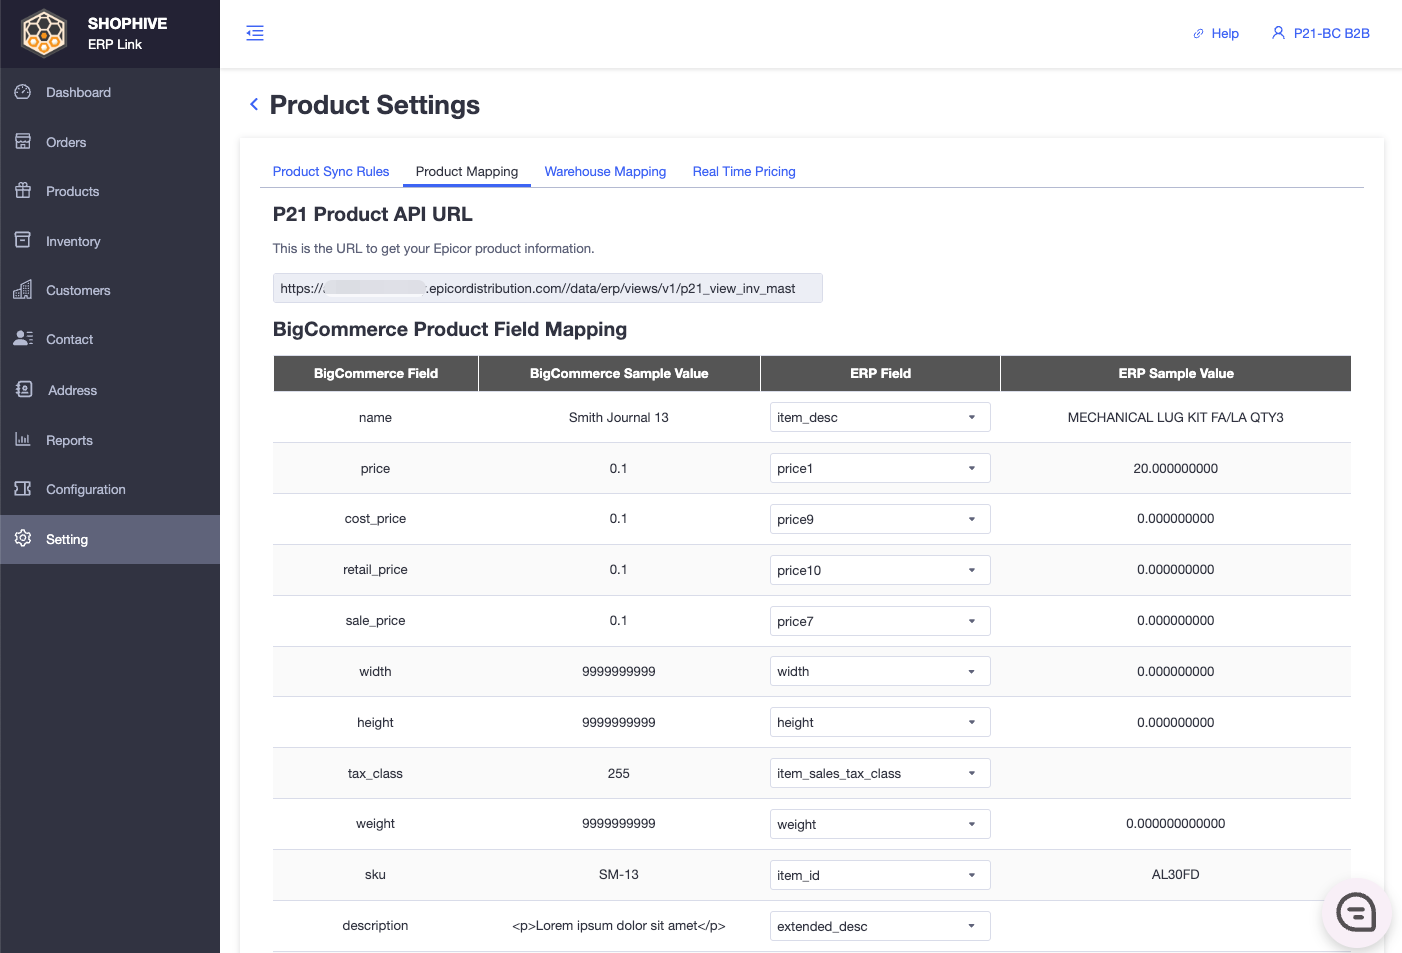
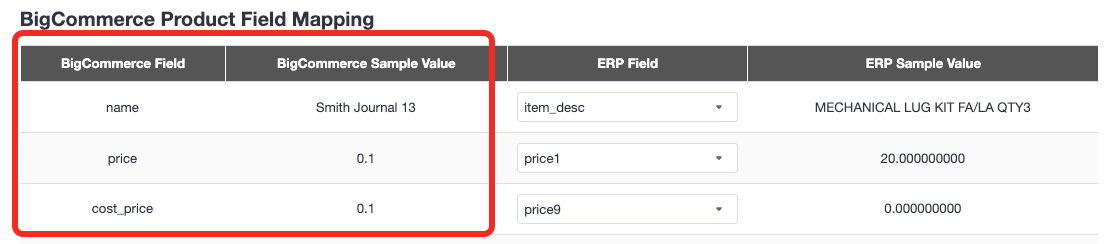
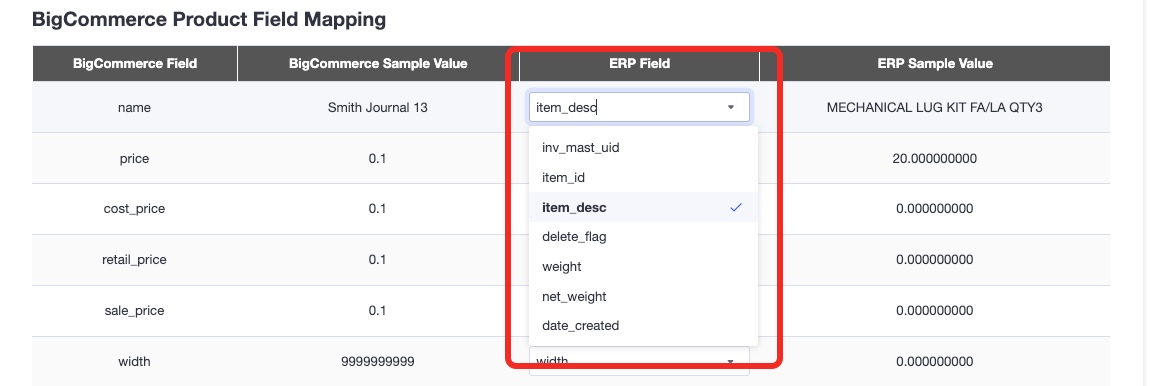
Field Mapping Configuration
-
This section shows the list of BigCommerce product fields that are available for mapping (e.g., Title, Description, Price, SKU, Inventory Level).
-
Each field in this list needs to be mapped to a corresponding Kinetic product field.
-
Once you’ve completed your field mappings, simply click the “Save” button.
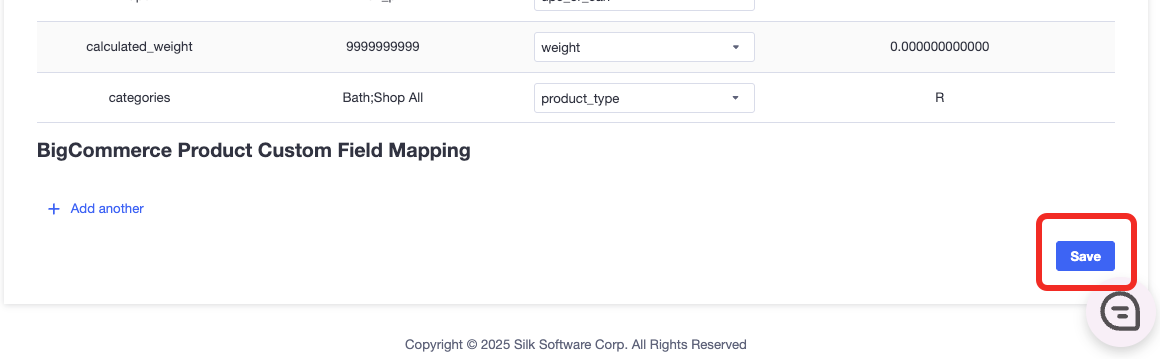
-
This will save the current mapping rule and apply it to product sync operations going forward.
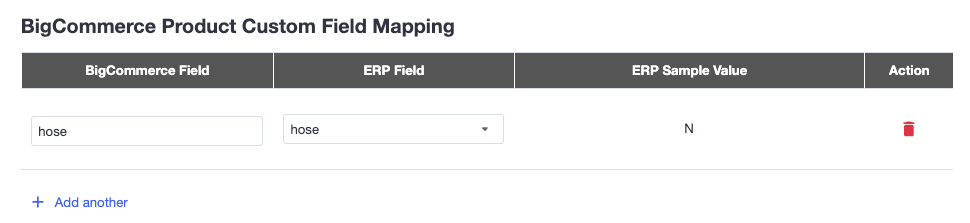
BigCommerce Product Custom Field Mapping
The Custom Field Mapping feature allows you to map product data fields from your ERP system (such as Epicor Kinetic) to custom fields in your BigCommerce store. This ensures that additional, non-standard product information is correctly passed and displayed in your e-commerce storefront.
Enter Kinetic Field Name
In the ERP Field column, enter the name of the field from Kinetic that you want to push to BigCommerce.
Choose BigCommerce Custom Field Name
In the BC Custom Field Name column, specify the label that will appear as the custom field name in your BigCommerce product details.
Add More Mappings (Optional)
Click “Add another” to define additional mappings between Kinetic fields and BigCommerce custom fields.
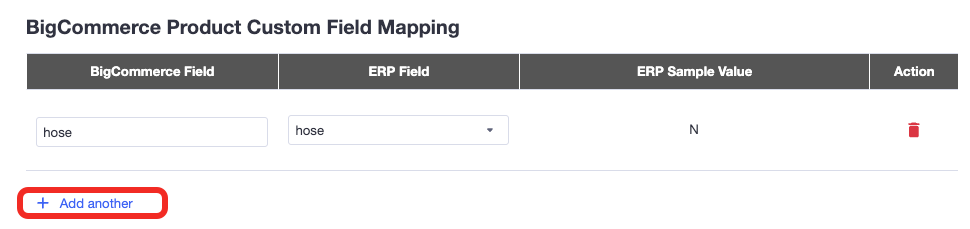
Save Configuration
Click the “Save” button to apply your mapping rules.
-
Warehouse Mapping
The Warehouse Mapping feature ensures seamless alignment between your Kinetic ERP system and your BigCommerce store. It enables you to link specific warehouse or location IDs in your BigCommerce store to corresponding Location IDs in Kinetic.

Steps to Configure Warehouse Mapping
-
Map to BigCommerce Inventory Location: From the dropdown, select the corresponding warehouse or fulfillment center used in your store.
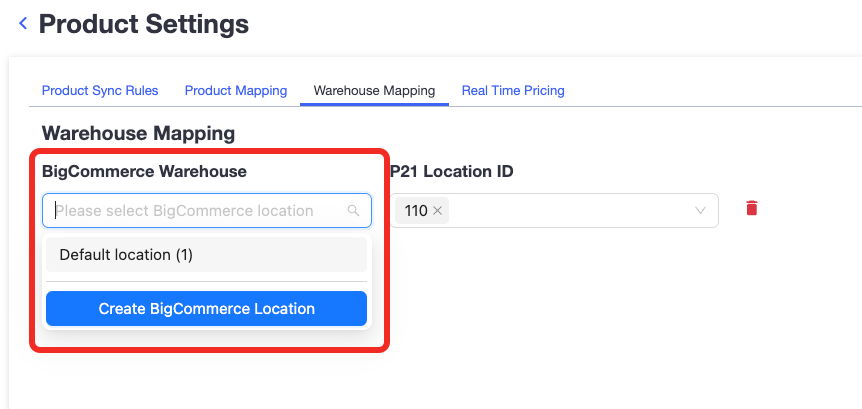
-
Select Kinetic Location ID: Choose the warehouse or location code used in your Kinetic system.
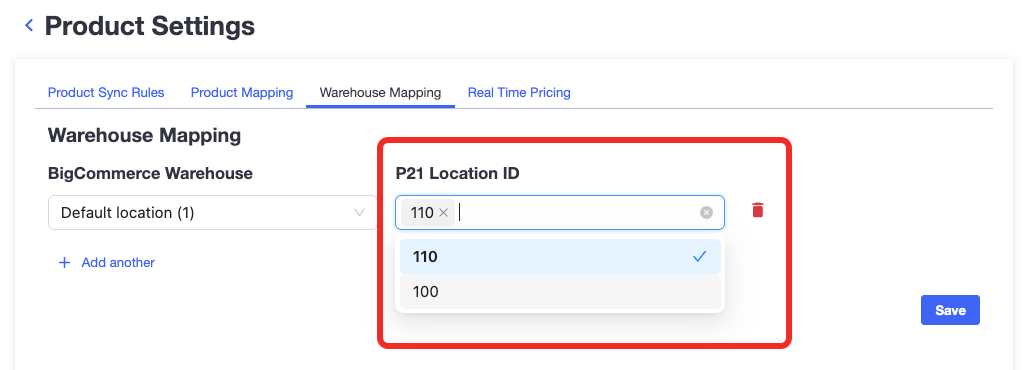
-
Click "Add another": Add additional mappings to support multiple warehouses or fulfillment locations.
-
Save Changes: Click Save to activate the mappings and enable synchronization.
-
Real-Time Pricing Settings
infoThe Real-time Pricing Setting in ShopHyve allows you to manage how often real-time product pricing is refreshed from your Kinetic ERP system on your BigCommerce storefront. By configuring the cache timelife, you can balance between performance and price accuracy, ensuring customers see up-to-date pricing without unnecessary API calls.
Pricing Refresh Interval
- What it does: This setting determines how long ShopHyve will cache product pricing data retrieved from Kinetic before requesting a fresh update.
- Default Value: 24 hours
- Unit: Minutes
- Behavior:
- When a customer views a product on your BigCommerce storefront, ShopHyve will display the cached price if it's still within the configured timelife.
- Once the cache expires, ShopHyve will automatically fetch the latest real-time price from Kinetic.
- For high-traffic or high-variance pricing products, consider setting a shorter timelife (e.g., 5-10 mins).
- For stable pricing environments, you may increase the timelife (e.g., 30+ mins) to reduce load and improve performance.
- Ensure your Kinetic system can handle the expected API request frequency based on your chosen cache duration.
Order Settings
-
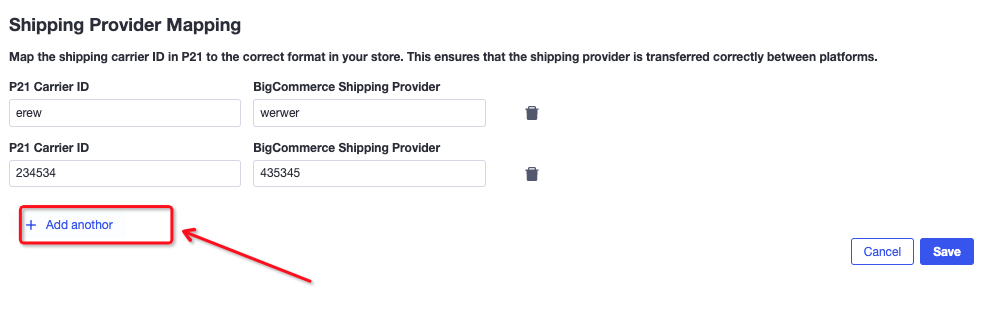
Shipping Provider Mapping
Map the shipping carrier ID in Kinetic to the correct format in your store. This ensures that the shipping provider is transferred correctly between platforms.
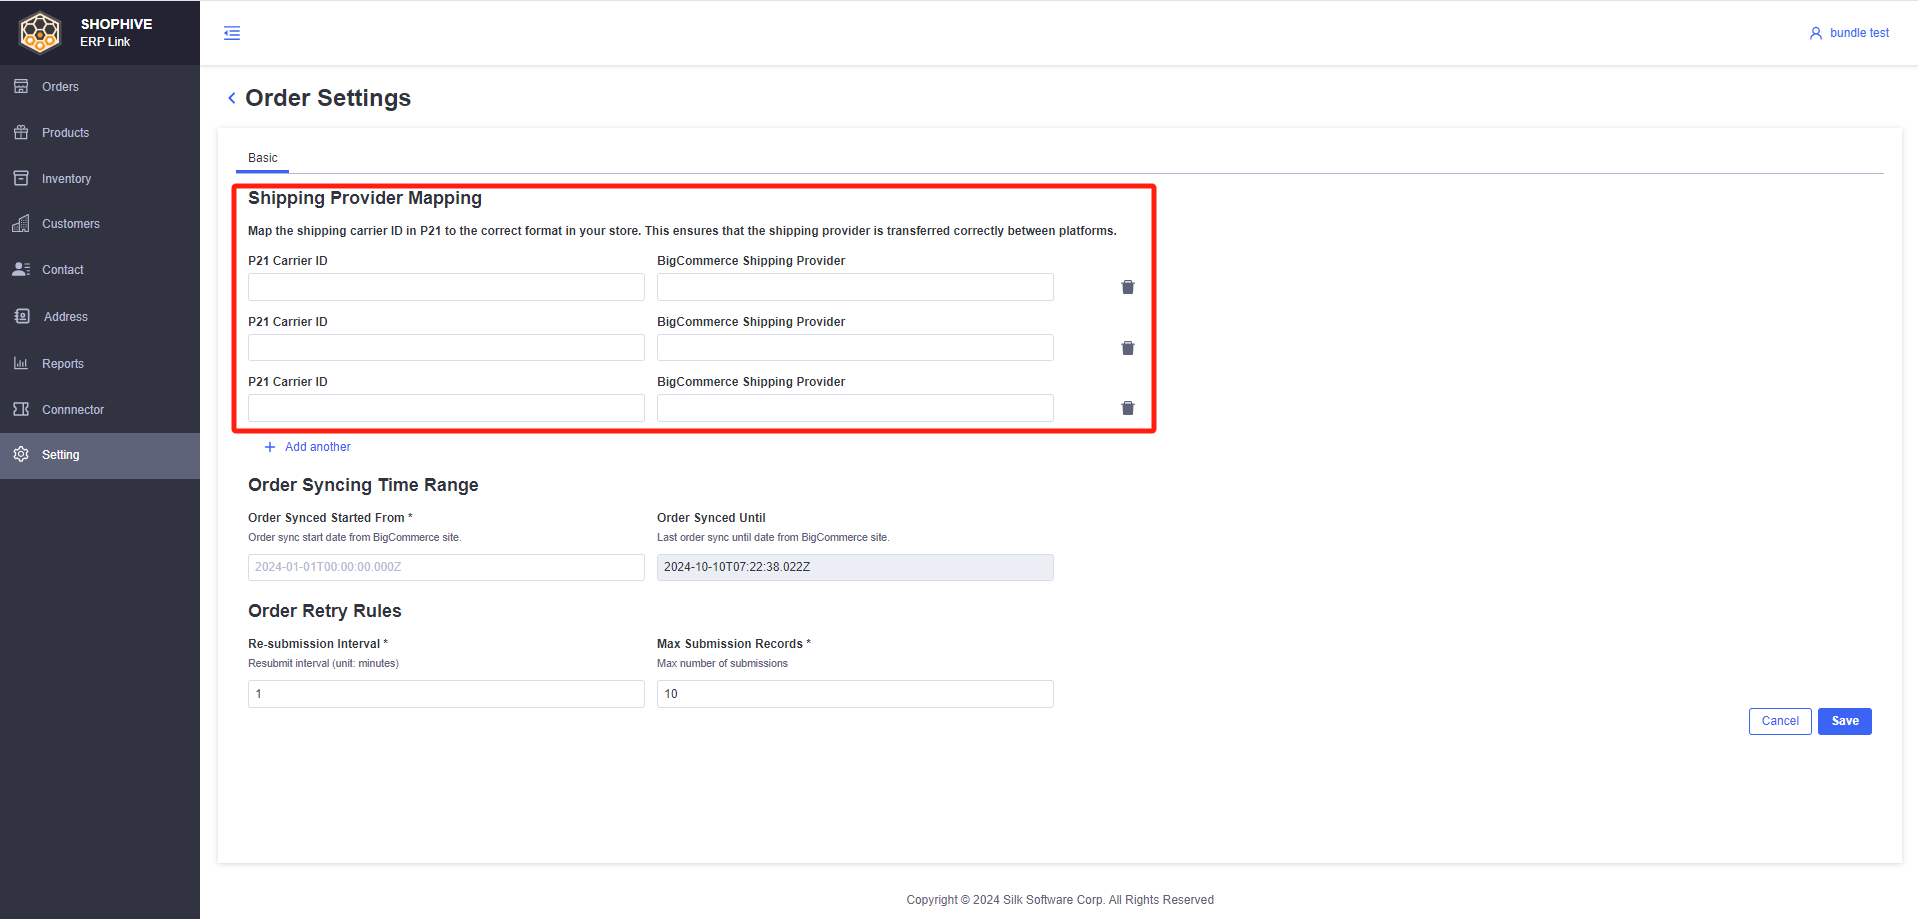
- Click "+Add another" to add a new Carrier Mapping
-
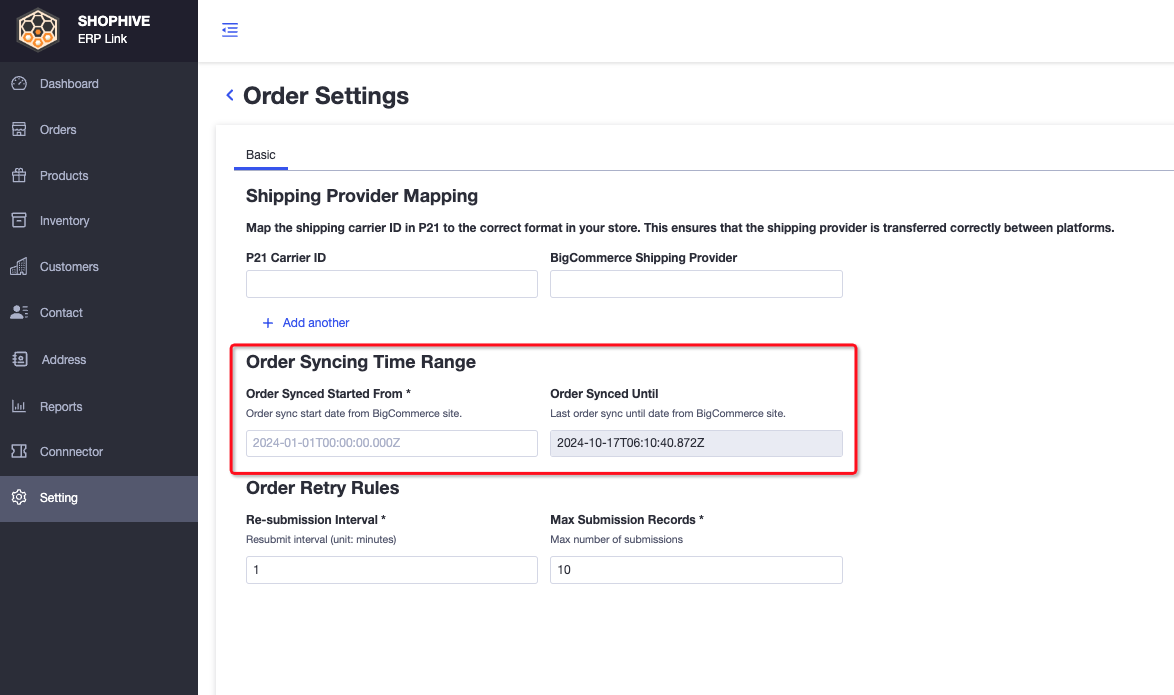
Order Syncing Time Range
- Users can set the time range for synchronizing orders through the 'Order Syncing Time Range'.
- Order Synced Started Range
- Order Synced Until
- Click 'Save' to save order syncing time range information
-
Order Retry Rules
- Users can reset sync interval
- Re-submission Interval
- Interval for repeated submissions
- Max Submission Times
- Maximum number of submissions
- Click 'Save' to save order retry rules information
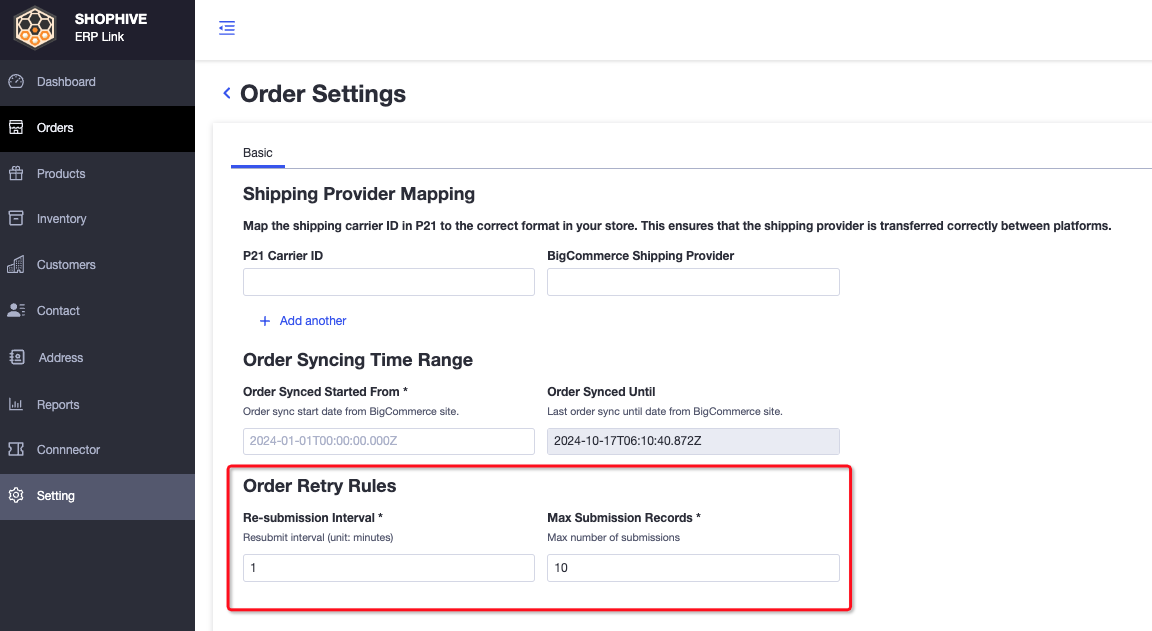
Re submission interval and Max Submission are commonly used to encounter return errors when synchronizing orders on Kinetic, and they do not write data to Kinetic.
-
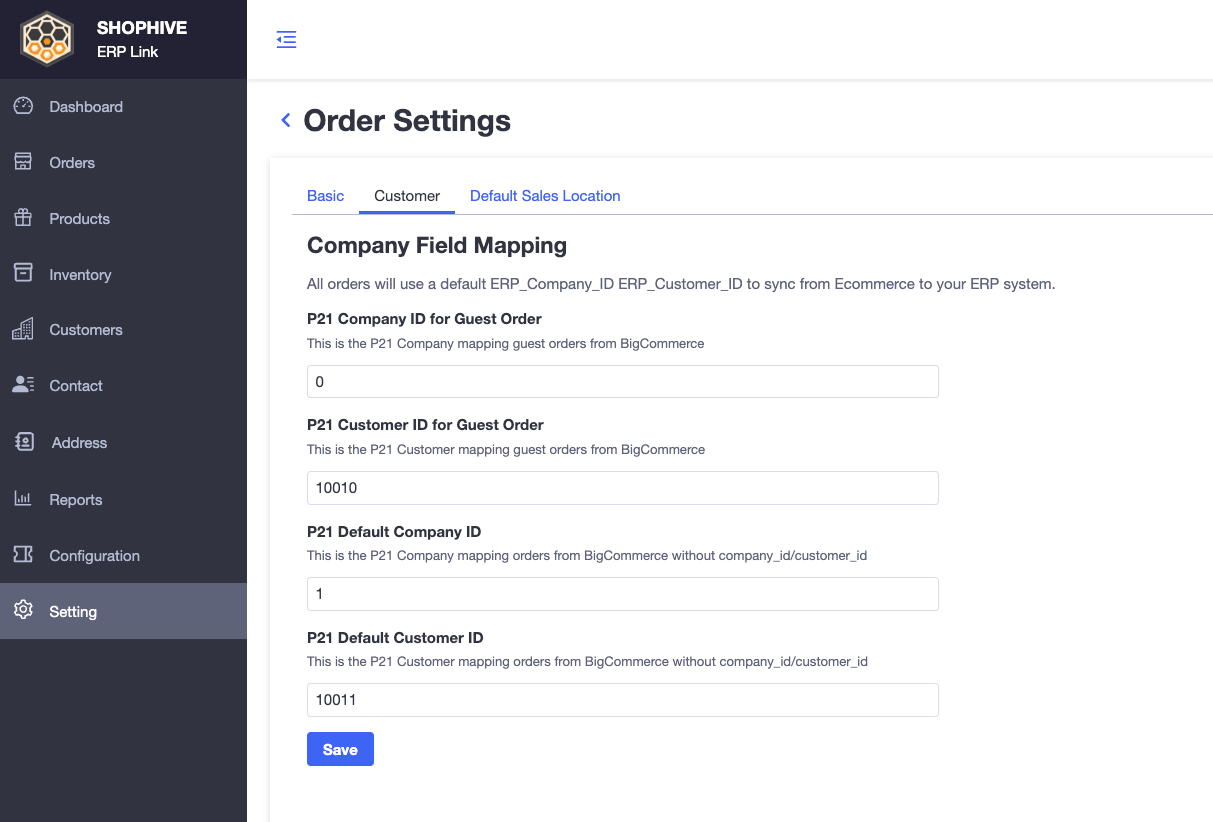
Default Kinetic Customer ID
When syncing orders from your BigCommerce store back to your ERP (like Epicor Kinetic), ShopHyve needs to know which Company ID and Customer ID to use.
These default settings help ShopHyve create ERP orders correctly when:
- The order comes from an online customer that doesn’t exist in ERP yet.
- Or the ERP Customer ID cannot be found during sync.
- Determine the customer type for B2C/B2B/Guest Orders:
| Order Type | BigCommerce Customer | BigCommerce Company | ERP Customer | ERP Company |
|---|---|---|---|---|
| B2B | Exist | Exist | Exist | Exist |
| B2C | Exist | - | Exist | - |
| B2C | Exist | - | - | - |
| Guest | - | - | - | - |
| Guest | - | - | Exist | - |
-
Default Sales Location
The Default Sales Location setting allows you to specify the Kinetic Source Location ID for orders created through ShopHyve. This ensures that each order is associated with the correct ERP location for processing, fulfillment, and reporting.
Purpose:
In Epicor Kinetic, every order must be tied to a specific source location (warehouse or branch). This feature lets you set a default location ID, which ShopHyve will use when pushing orders to Kinetic.

Inventory Settings
-
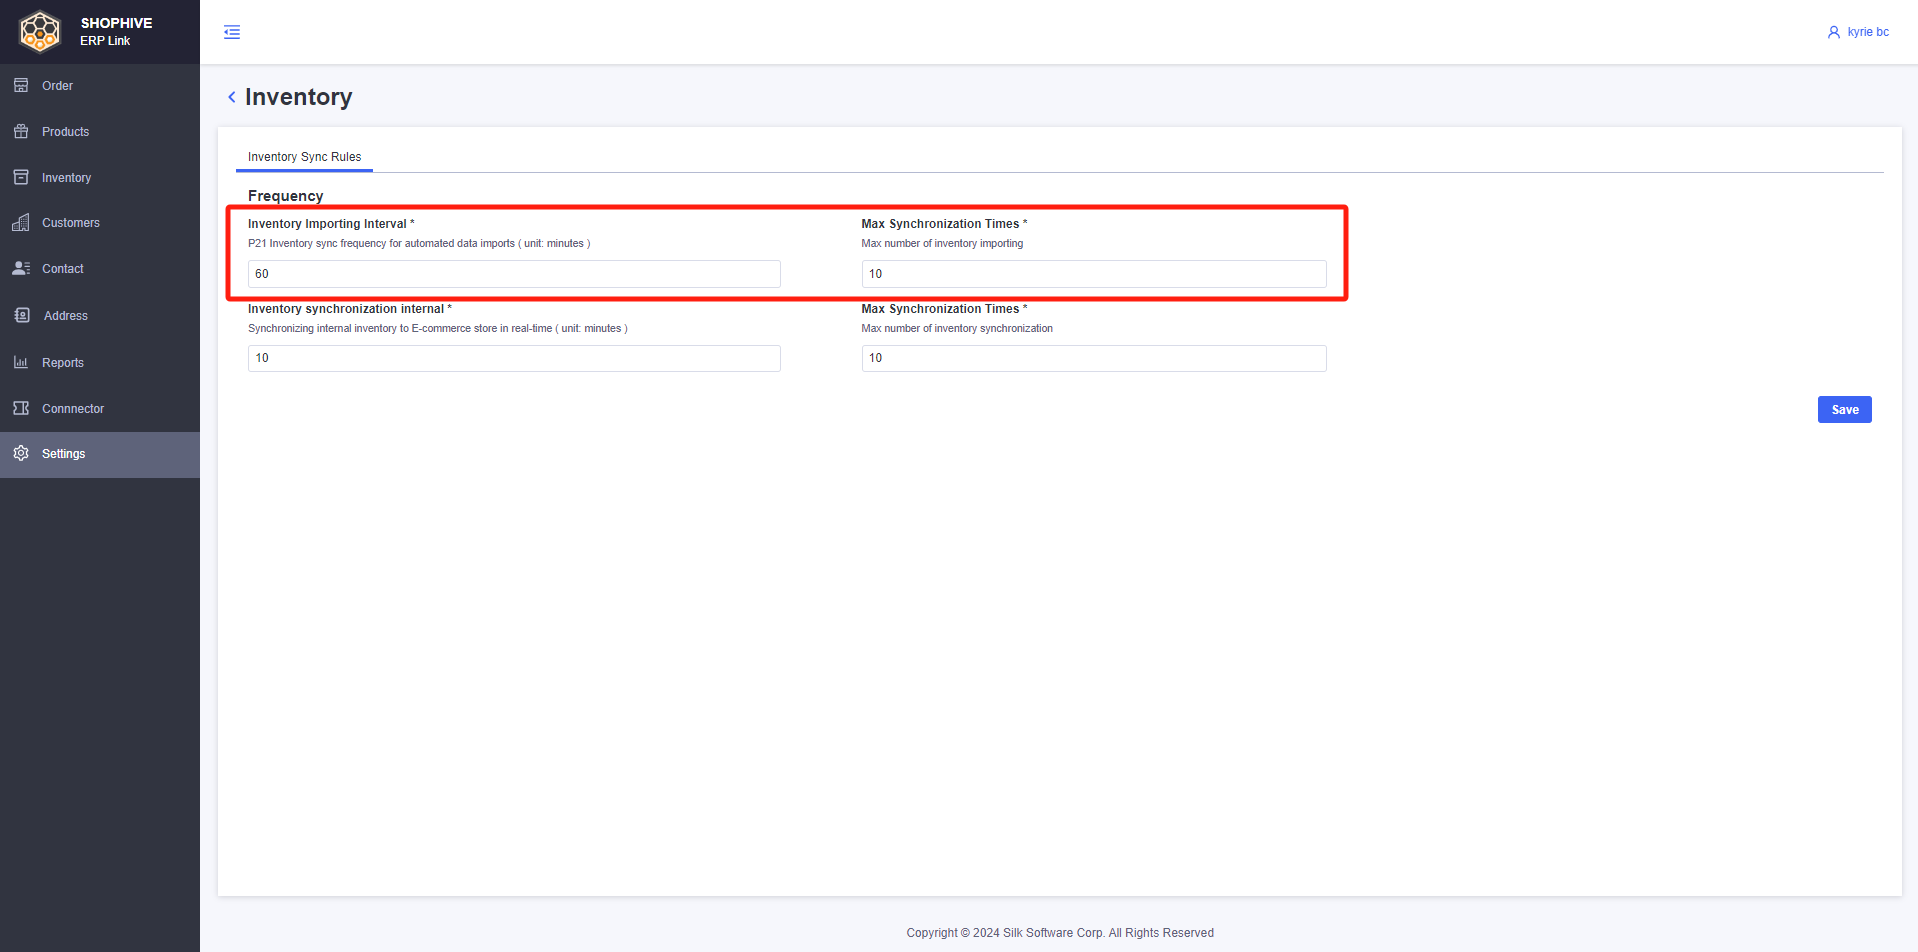
Importing interval
- Inventory Importing Interval
- Kinetic Inventory sync frequency for automated data imports
- Max Synchronization Times
- Max number of inventory importing
-
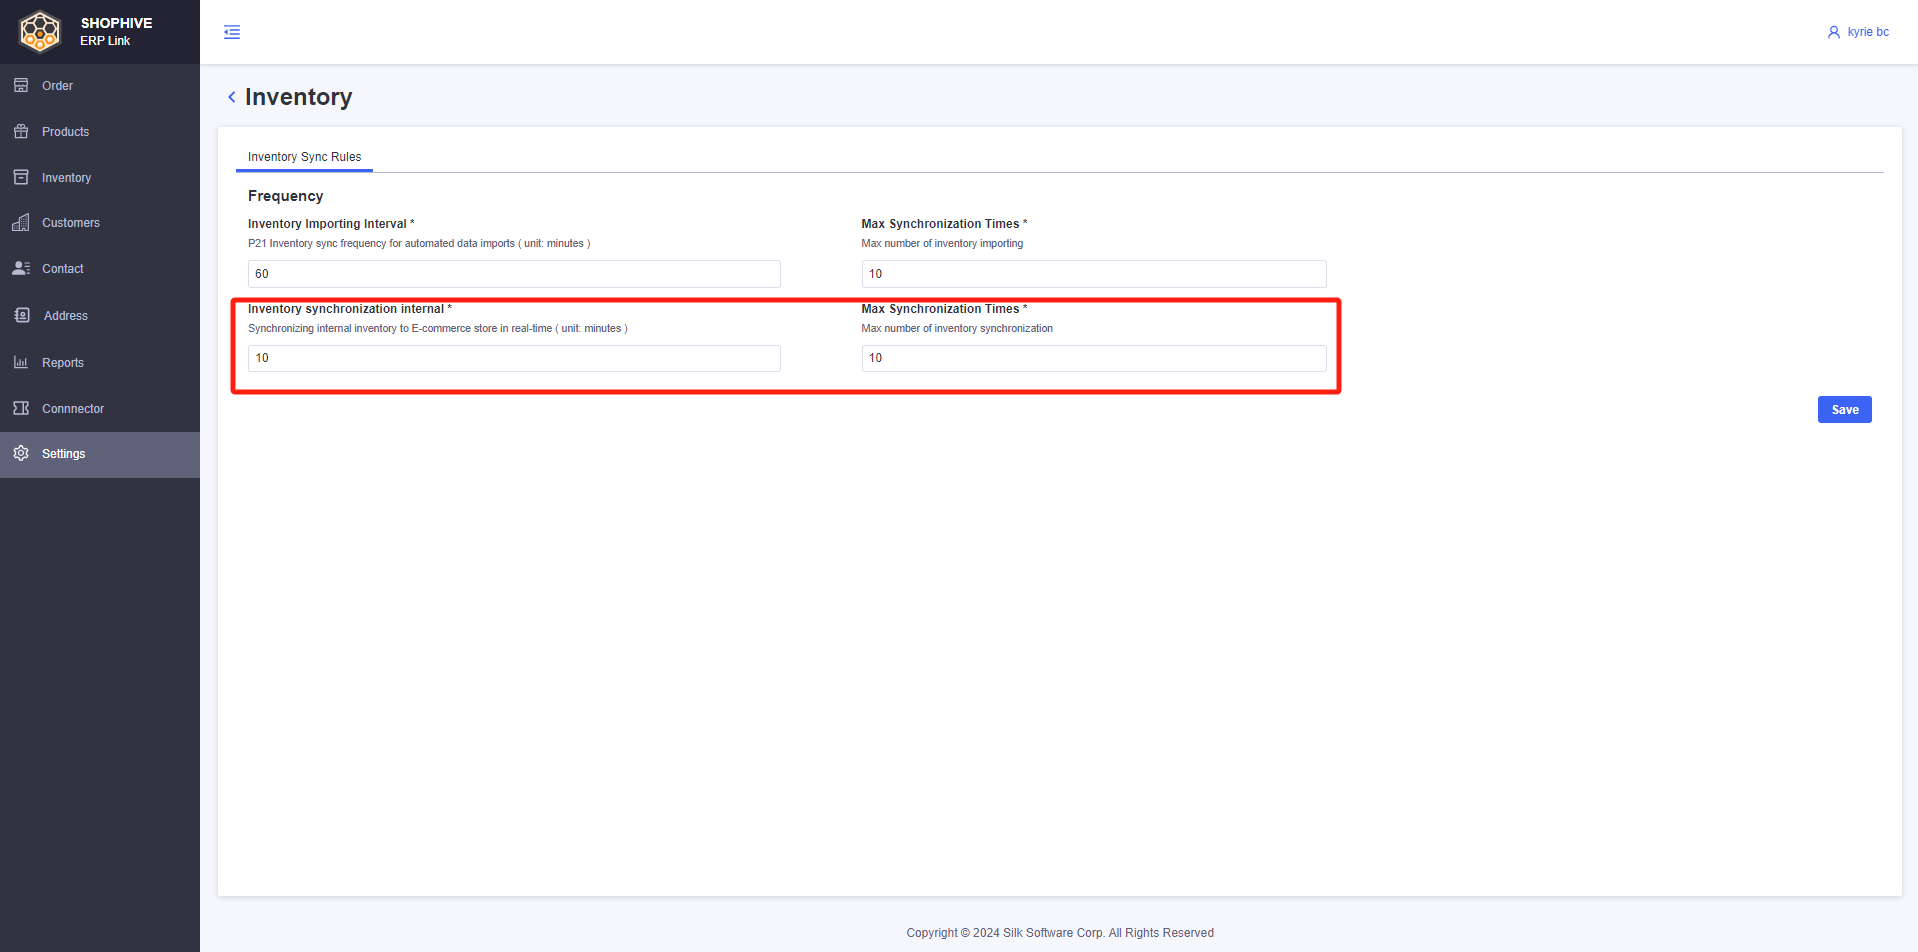
Syncing interval
- Inventory synchronization internal
- Synchronizing internal inventory to E-commerce stores in real-time
- Max Synchronization Times
- Max number of inventory synchronization
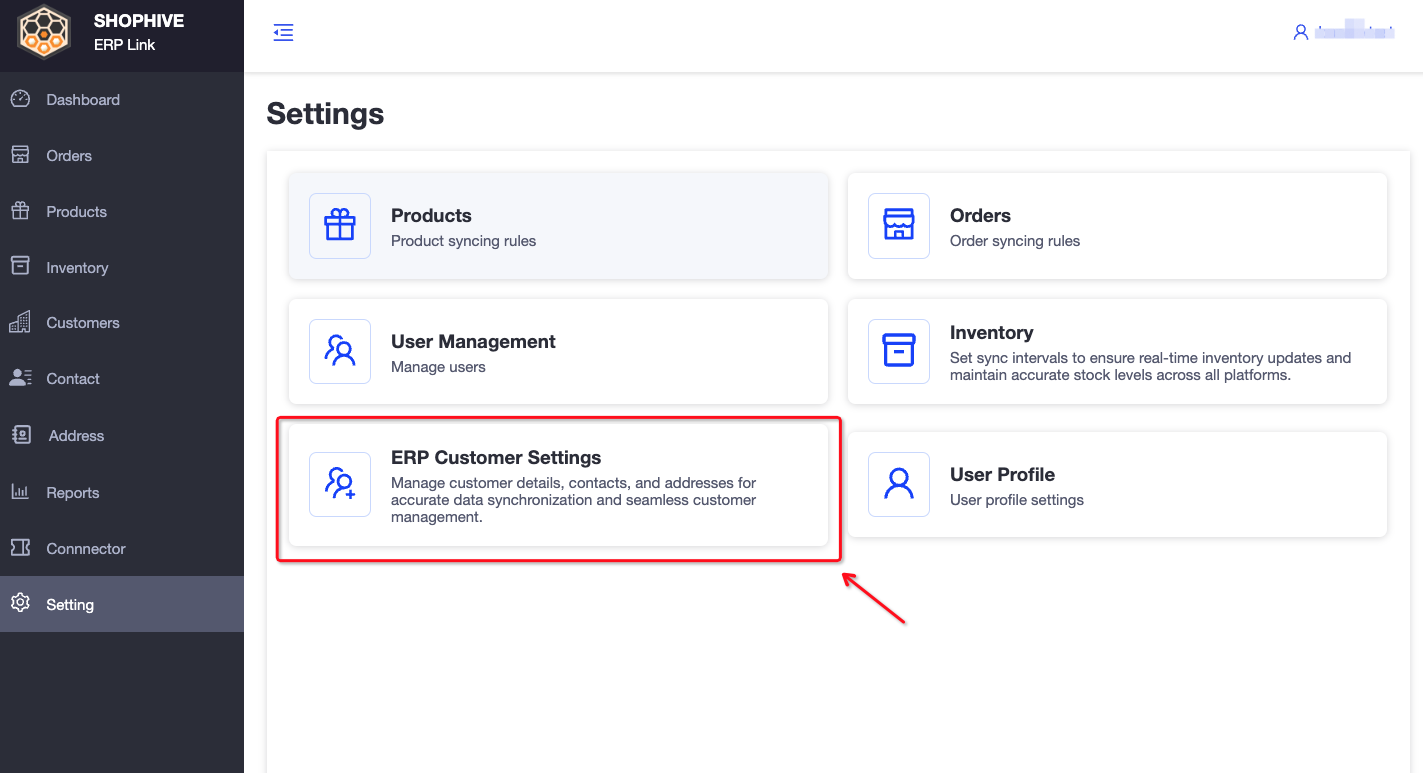
ERP Customer Settings
This guide explains how Customer Sync Rules and Customer Field Mappings work between your eCommerce platform and Kinetic system. It helps ensure accurate and automated customer data synchronization, including related contacts and addresses.
-
Basic Settings
Basic Sync Rules allow you to define the Create Source and Update Source for customer, contact and address data during bi-directional syncing between your ERP system (Kinetic) and your eCommerce platform (BigCommerce).
- Create Source: Determines where new records will be created from. - Update Source: Determines which system’s data will overwrite during updates.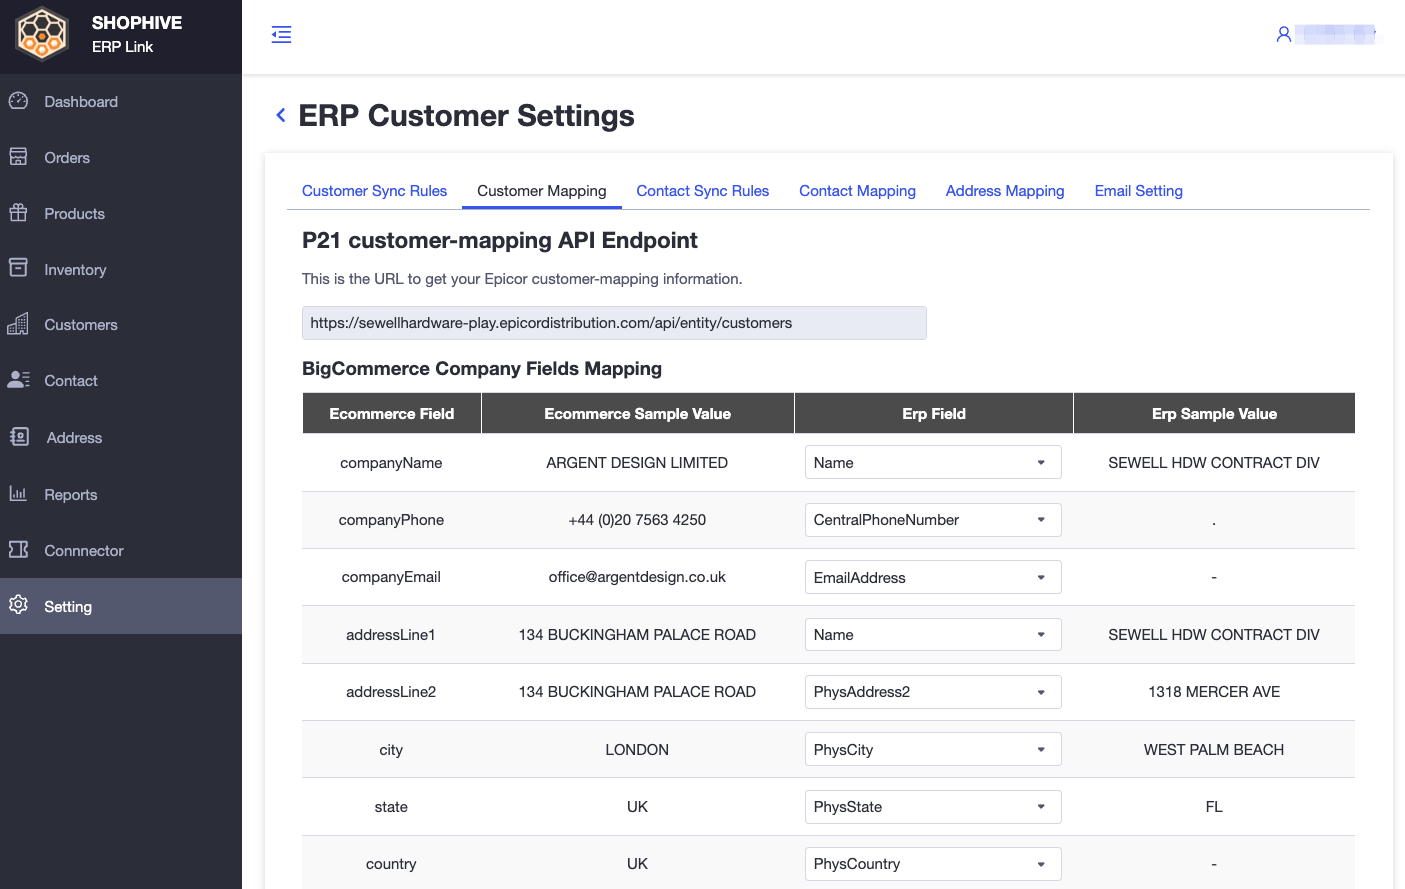
Field Configuration
tipMake sure the Kinetic Sales Rep ID and Kinetic Default Branch ID values are correct — missing values may cause sync failures.
Field Description Kinetic Sales Rep ID A required value for creating a new customer in Kinetic ERP.
This field must be pre-configured for successful synchronization when creating customers from BigCommerce to Kinetic.Kinetic Default Branch ID A required value for creating a new Ship-To Address in Kinetic ERP.
This field must be pre-configured for successful synchronization when creating Ship-To Addresses from BigCommerce to Kinetic.
-
Epicor Customer Account (include Contacts, Addresses) Sync Rules
NoteImporting refers to fetching data from Kinetic/Kinetic to the app. Syncing refers to updating data between both systems.
Setting Default Value Description Customer Importing Interval 5 minutes Defines how often customers, contacts, and addresses are automatically imported from Kinetic. (Unit: minutes) Max Importing Records 100 records Limits the number of customers (along with their contacts and addresses) imported in each batch. Customer Syncing Interval 5 minutes Controls the frequency of syncing customers, contacts, and addresses between systems. (Unit: minutes) Max Syncing Records 100 records Limits the number of customer records (with contacts and addresses) synced per pull. 
-
Epicor Customer Mapping
Customer field mapping allows you to define how customer information from Kinetic matches with your eCommerce platform.
How it Works
- Customer data is retrieved from Kinetic using the Customer API.
- You can configure field mappings based on your business needs.
- Mappings control how fields from Kinetic Customers populate your eCommerce Customer fields.
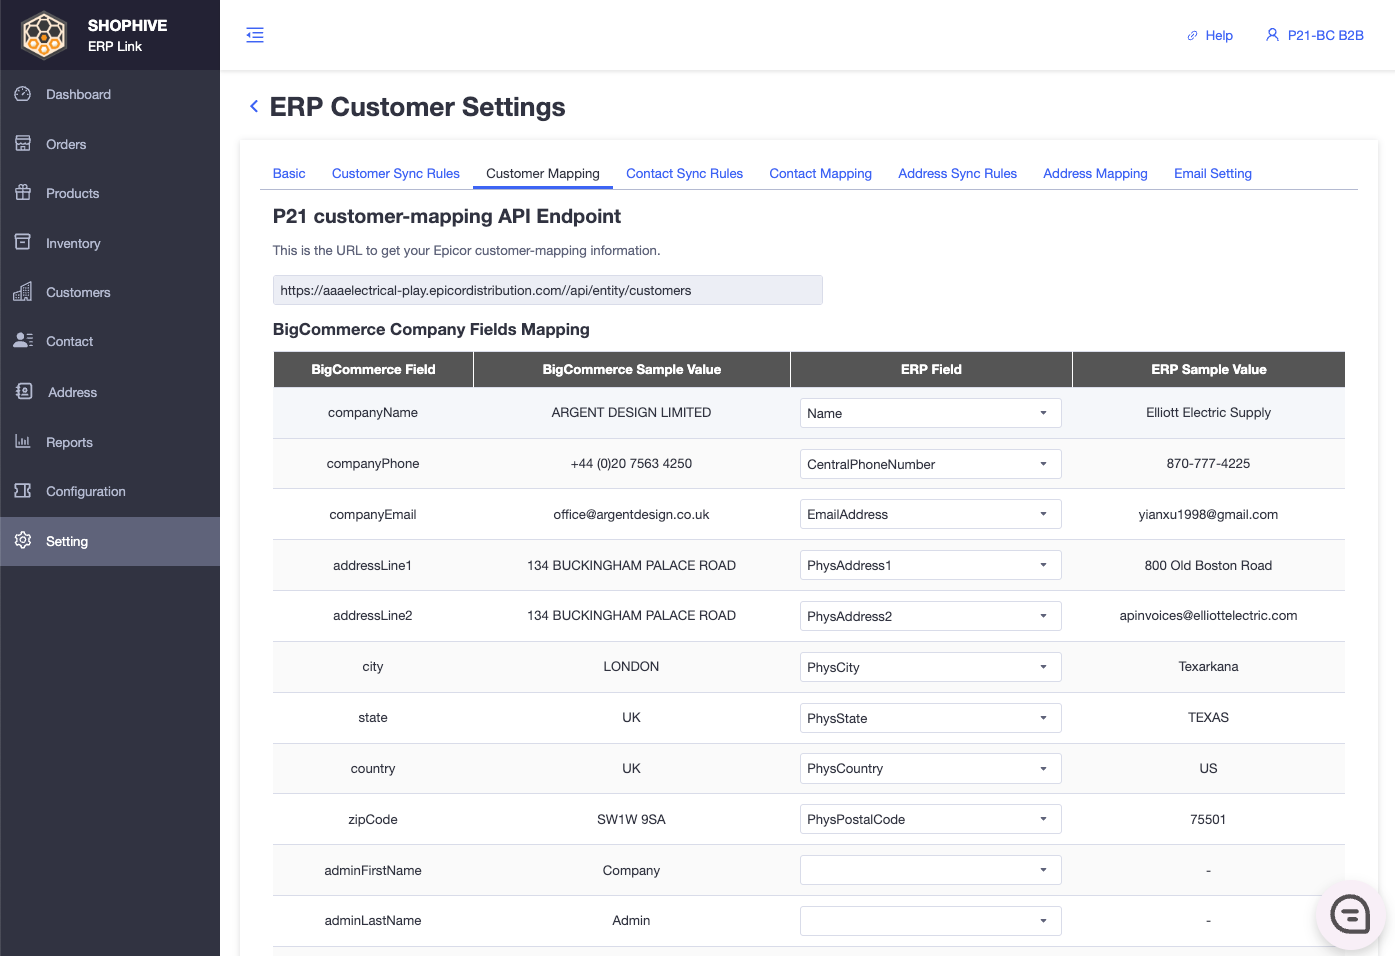
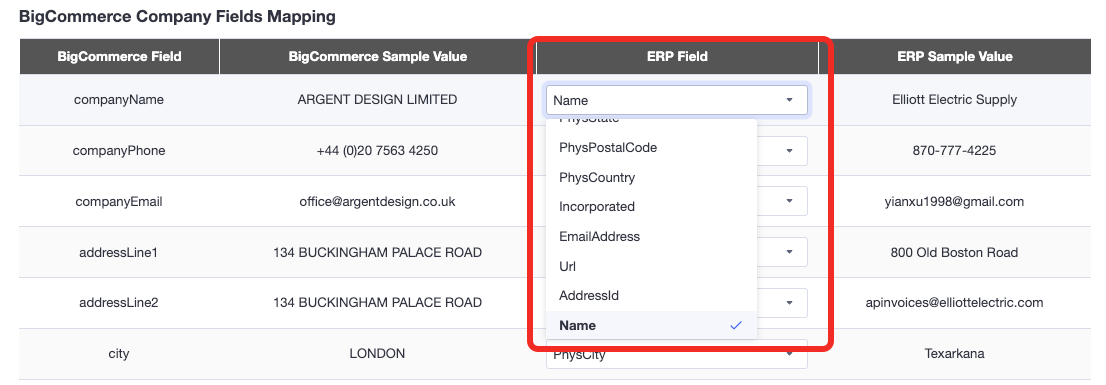
Manage Field Mapping
- Navigate to: Settings → Customer Mapping
- Select or edit the corresponding Kinetic Customer Fields for each E-commerce Field.
- Click Save to apply your changes.
-
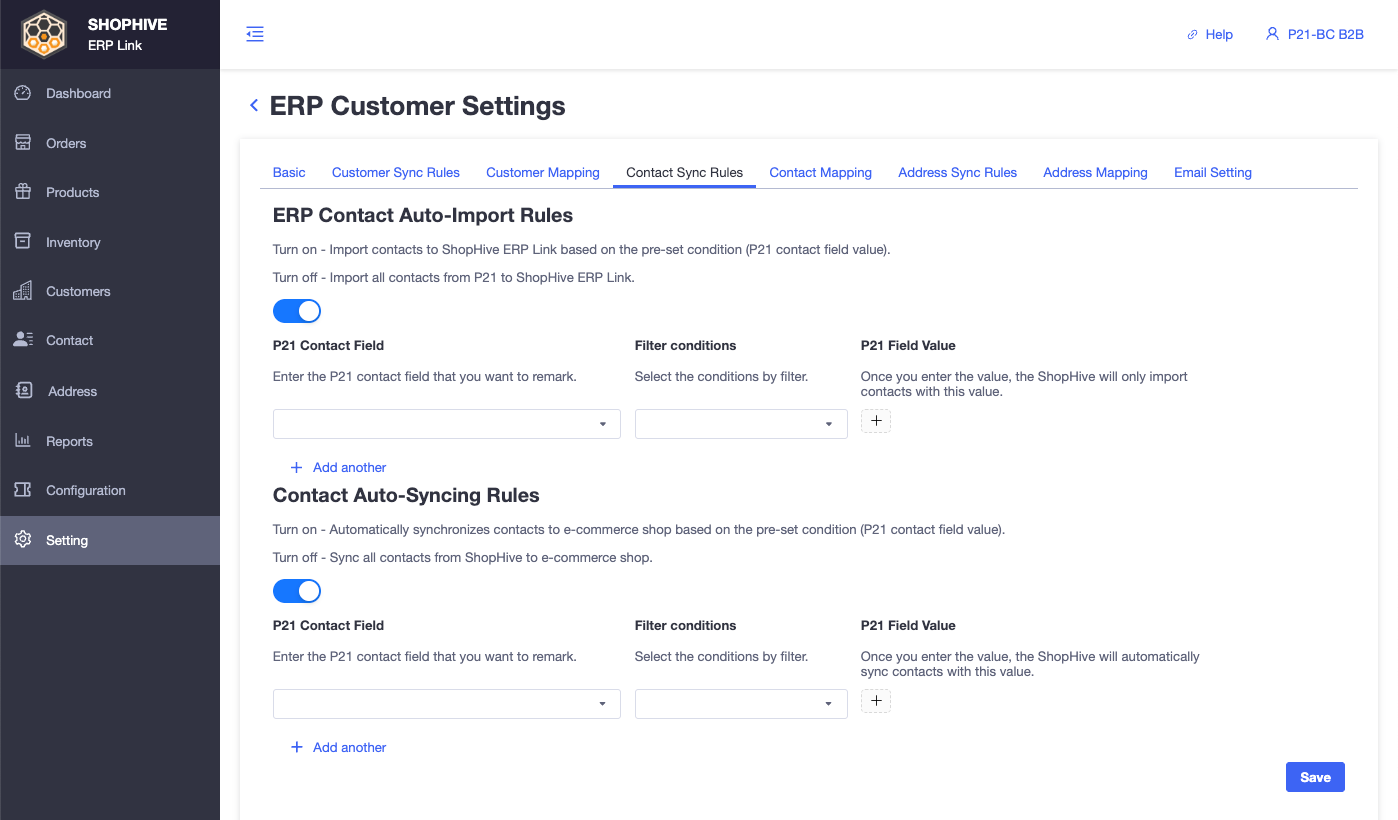
Epicor Contact Sync Rules
NoteContact data is usually imported along with related customer data but can also be managed independently depending on system settings.
This guide explains how to configure and manage Contact Auto-Import and Auto-Syncing Rules between your ERP system (Kinetic/Kinetic), ShopHyve ERP Link, and your eCommerce store.
Epicor Contact Auto-Import Rules
Option Behavior Usage Turn ON Import contacts based on pre-set conditions (specific Kinetic Contact Field Value) Recommended if you only want to import qualified contacts (e.g., contacts with a certain type or role). Turn OFF Import all contacts from Kinetic into ShopHyve ERP Link Recommended if you want a full import of all Kinetic contacts without any filter conditions. Example Condition:
- Only import contacts where Title = Sales
- Only import contacts where Status = Active
Contact Auto-Syncing Rules
Control how contacts in ShopHyve ERP Link sync to your eCommerce store.
Option Behavior Usage Turn ON Automatically sync contacts from ShopHyve ERP Link to eCommerce store based on pre-set conditions (specific Kinetic Contact Field Value) Recommended if you want to sync specific groups of contacts (e.g., customers' main contacts only). Turn OFF Sync all contacts from ShopHyve ERP Link to eCommerce store Recommended if you want all contacts to be available in your online store without filters. Example Condition:
- Only sync contacts where Contact Type = Primary
- Only sync contacts where Marketing Opt-in = True
-
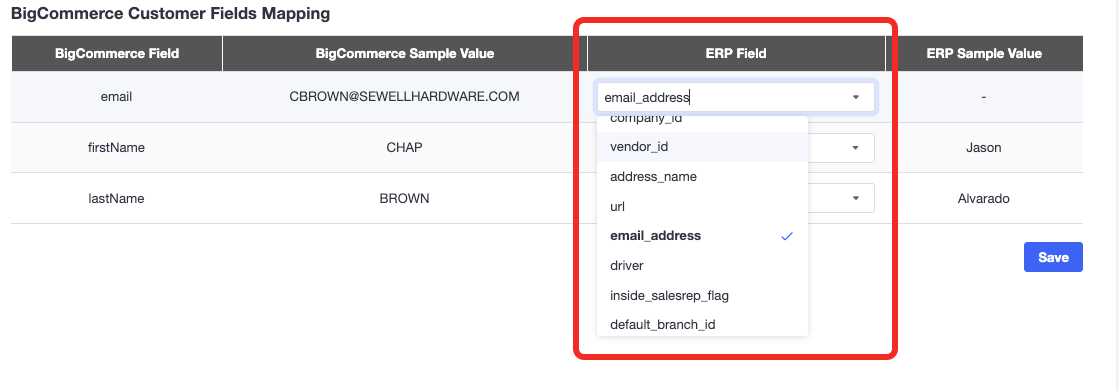
Epicor Contact Field Mapping
Contact field mapping allows you to define how contact information from Kinetic matches with your eCommerce platform fields.
How it Works
- Contact data is retrieved from Kinetic using the Contact API.
- You can configure how each contact field from Kinetic is mapped to your eCommerce contact fields.
- Mappings can be customized to fit your specific business needs.
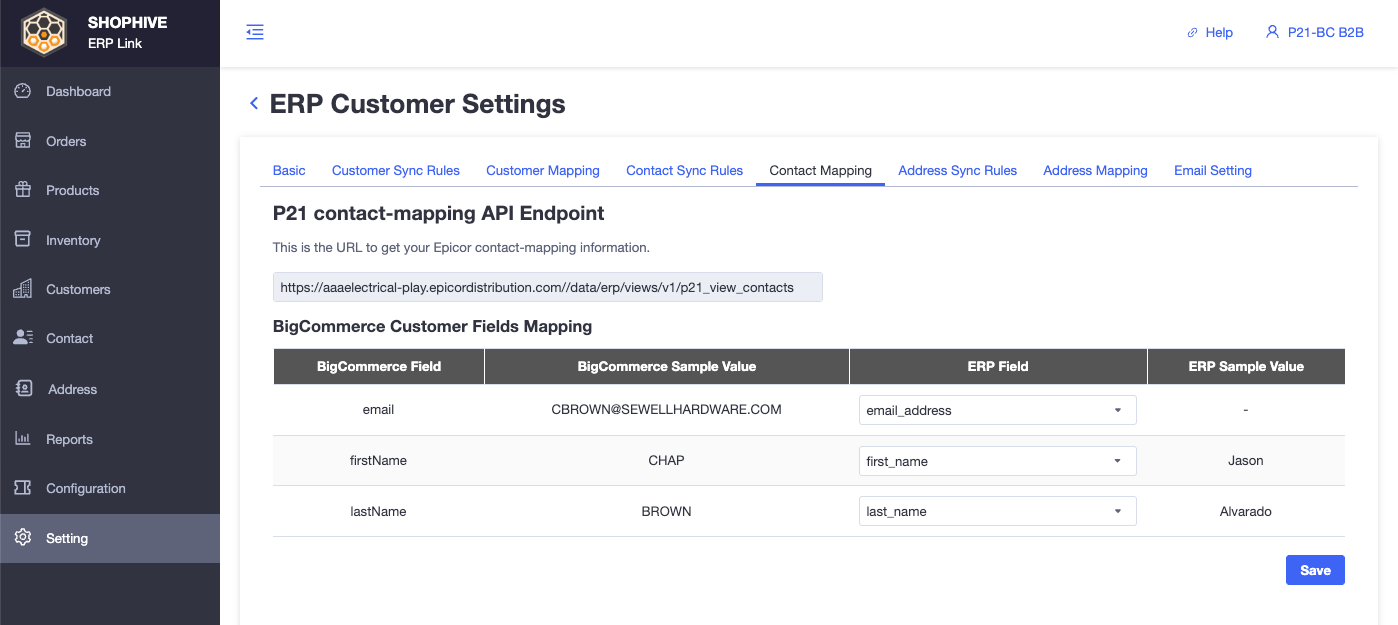
Manage Field Mapping
- Navigate to: Settings → Contact Mapping
- Select or edit the corresponding Kinetic Contact Fields for each E-commerce Field.
- Click Save to apply your changes.
-
Epicor ShipToAddress Sync Rules
ERP Address Auto-Import Rules
Control which addresses from Kinetic/Kinetic are imported into ShopHyve ERP Link based on your business conditions.
Option Description Turn ON Import addresses from Kinetic to ShopHyve ERP Link based on the pre-defined condition (specific Kinetic Address field value). Turn OFF Import all addresses from Kinetic to ShopHyve ERP Link without any filter conditions. Address Auto-Syncing Rules
Controls which addresses in ShopHyve ERP Link are automatically synchronized to your eCommerce store.
Option Description Turn ON Automatically sync addresses from ShopHyve to your eCommerce store based on the pre-defined condition (specific Kinetic Address field value). Turn OFF Sync all addresses from ShopHyve to your eCommerce store without any filter conditions. 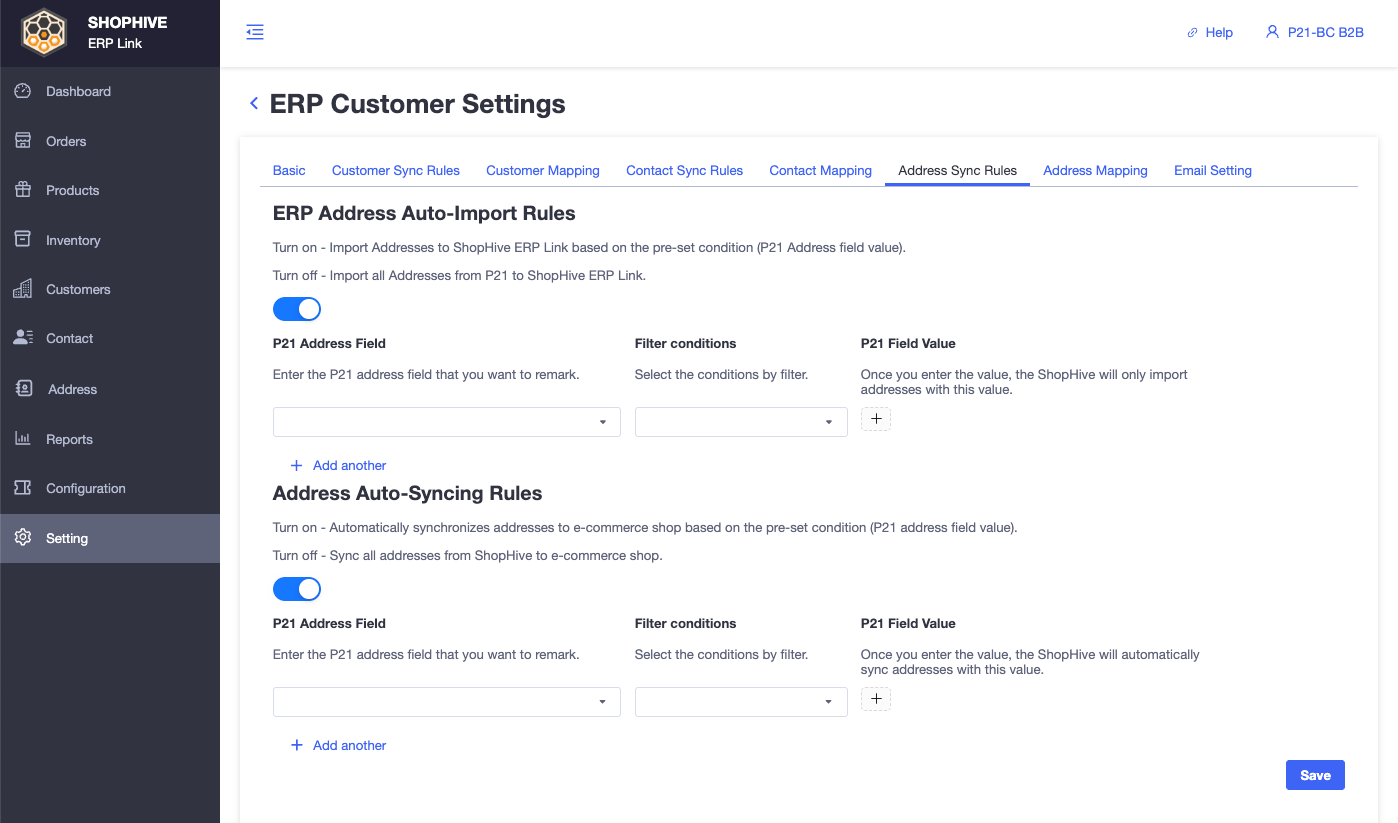
-
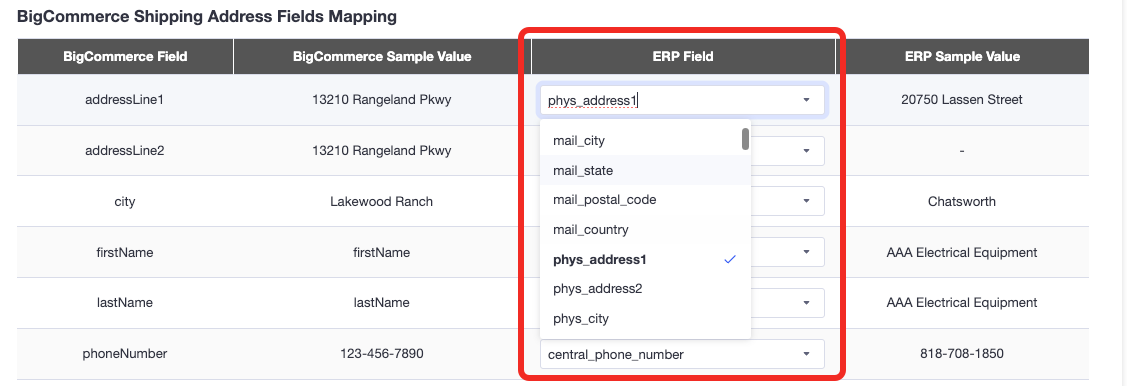
Address Mapping
Retrieve the address information from Kinetic/Kinetic via the Kinetic Address API and map the ERP address fields to the corresponding fields in your eCommerce store.
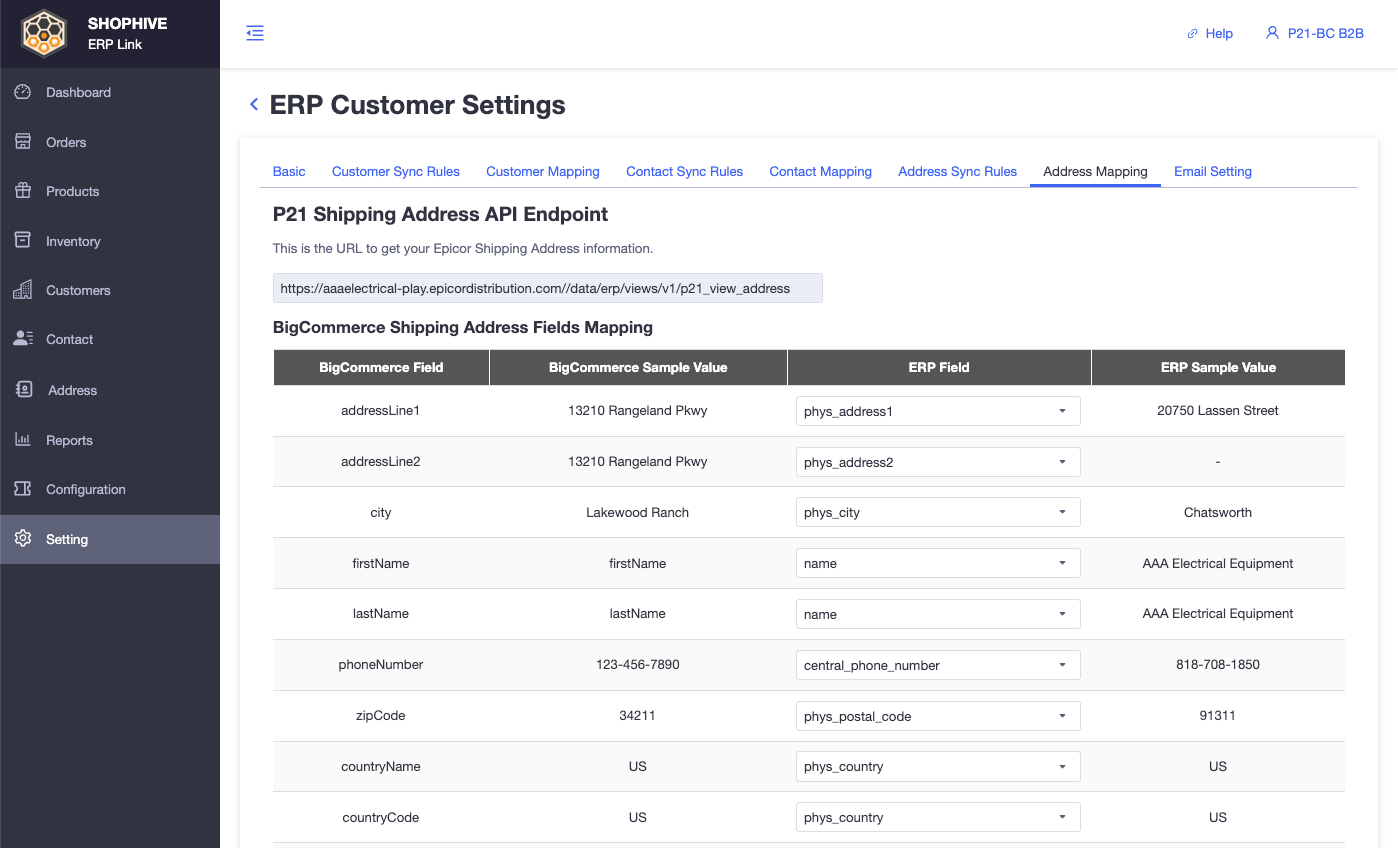
Field Mapping Instructions
-
The following list shows the mapping relationship between the eCommerce address fields and the Kinetic address fields.
-
You can flexibly configure the mapping according to your business needs.
-
-
B2B Company User Admin Email
- BC(B2B) needs an admin user to create a company.
- When synchronizing the company, the first contact under p21company will be pushed to BC Company as the User Admin by default.
- If there is no contact under p21company, a virtual email will be automatically created based on the Email Settings to ensure the synchronization of Kinetic customers to BC company.